
Zesty Lemon Gugelhupf Cake
Bake a Moist and Refreshing Gugelhupf at Home

This recipe introduces a simple way to bake a moist and refreshing lemon gugelhupf at home. By adding fresh lemon zest to the batter and finishing it with a sweet lemon icing, you’ll create a truly special dessert. These bite-sized, adorable gugelhupfs are perfect for tea time or as a thoughtful gift!
Gugelhupf Batter Ingredients- 80g cake flour (low-gluten flour)
- 80g unsalted butter, softened to room temperature
- 2 room temperature eggs (approx. 100g)
- 2g baking powder
- 2g lemon juice (approx. 1/2 tsp)
- 1g vanilla extract (approx. 1/4 tsp)
Lemon Zest Ingredients- 60g granulated sugar
- Zest of 1/4 lemon
Lemon Cleaning Ingredients- Baking soda
- Coarse salt
- Boiling water
Lemon Icing Ingredients- 60g powdered sugar (confectioners’ sugar)
- 15g lemon juice (approx. 1 tbsp)
- A few apple mint leaves (for garnish)
- 60g granulated sugar
- Zest of 1/4 lemon
Lemon Cleaning Ingredients- Baking soda
- Coarse salt
- Boiling water
Lemon Icing Ingredients- 60g powdered sugar (confectioners’ sugar)
- 15g lemon juice (approx. 1 tbsp)
- A few apple mint leaves (for garnish)
- 60g powdered sugar (confectioners’ sugar)
- 15g lemon juice (approx. 1 tbsp)
- A few apple mint leaves (for garnish)
Cooking Instructions
Step 1
First, thoroughly grease your gugelhupf mold with melted butter. Then, dust the inside of the mold evenly with cake flour, tapping out any excess. This prevents the batter from sticking, so place the prepared mold in the refrigerator to chill.

Step 2
Properly cleaning the lemon is crucial. Start by scrubbing the lemon’s surface with baking soda to remove any pesticides or wax. Rinse it thoroughly under running water.

Step 3
After washing with baking soda, rub the lemon again with coarse salt. The abrasive nature of the salt helps to clean the peel even more effectively.

Step 4
Place the cleaned lemon in boiling water for about 30 seconds. This brief blanching helps to remove any remaining wax coating on the lemon peel.

Step 5
Once the lemon is dry, use a microplane grater or a small sharp knife to carefully remove only the yellow zest, avoiding the bitter white pith. Finely mince the zest.

Step 6
Combine the finely minced lemon zest with the pre-measured granulated sugar and mix well. This creates your fragrant lemon zest sugar, which will infuse the cake with a bright, citrusy aroma.

Step 7
Now, let’s make the batter. In a large mixing bowl, place the softened room-temperature butter. Using a mixer or whisk, cream the butter on low speed until it’s smooth and creamy. Ensure there are no large lumps.

Step 8
Add the prepared lemon sugar mixture all at once to the creamed butter. Begin mixing on low speed to incorporate, and once the sugar starts to combine without scattering, increase the speed to medium and whip for about 5 minutes. This step is key to dissolving the sugar and creating a light texture.

Step 9
Continue whipping until the mixture becomes pale and fluffy, resembling a light, creamy emulsion. You should no longer hear the ‘gritty’ sound of sugar granules. This indicates the sugar has fully dissolved into the butter.

Step 10
With the butter and sugar well combined, gradually add the beaten eggs in 4-5 additions. Beat well after each addition on low speed, ensuring each addition is fully incorporated before adding the next. If you add the eggs too quickly, the mixture might curdle. Continue until smooth and homogenous.

Step 11
Once the eggs are fully incorporated, it’s time to add the dry ingredients. Sift the cake flour and baking powder together directly over the batter. Sifting helps to aerate the flour and prevents lumps, contributing to a lighter cake crumb.

Step 12
Using a spatula, gently fold the dry ingredients into the wet ingredients. Use a ‘figure 11’ motion (cutting through the center and folding over) just until no streaks of flour remain. Be careful not to overmix, as this can develop gluten and make the cake tough.

Step 13
When the flour is just combined, add the lemon juice and vanilla extract. These will enhance the overall flavor profile. Gently fold them into the batter until everything is evenly distributed. The batter should be smooth and luscious.

Step 14
Transfer the finished gugelhupf batter into a piping bag. If you don’t have a piping bag, you can use a sturdy zip-top bag with a corner snipped off. Using a piping bag helps to fill the mold neatly and evenly.

Step 15
Pipe the batter into the prepared gugelhupf mold, filling it about 80% full. The batter will rise as it bakes, so avoid overfilling to prevent overflow. Bake in a preheated oven at 180°C (350°F) for approximately 20 minutes. You can check for doneness by inserting a skewer into the center; it should come out clean.

Step 16
While the cake is baking, prepare the lemon icing. In a small bowl, combine the powdered sugar and lemon juice. Whisk until smooth. The consistency should be thick enough to coat the cake but pourable, not too runny. Adjust the lemon juice slightly if needed to reach your desired consistency.

Step 17
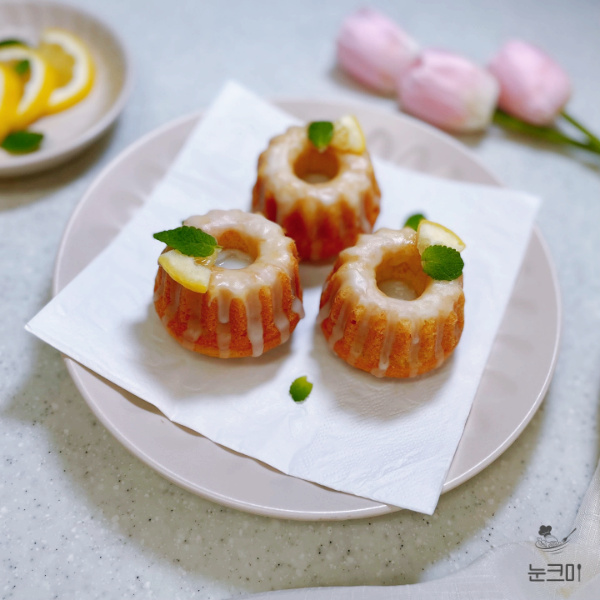
Once baked, carefully remove the gugelhupf from the mold and let it cool completely on a wire rack. Once cooled, drizzle or spread the prepared lemon icing over the top of the cake. Garnish with fresh apple mint leaves or small pieces of lemon for a beautiful finish.

Step 18
While delicious fresh from the oven, this gugelhupf tastes even better after resting. Refrigerate it for about a day before serving. This allows the flavors to meld and deepen, resulting in an even more delightful cake experience!
