
Winter Dongchimi: Crisp and Refreshing Radish Kimchi
How to Make Delicious Winter Dongchimi

This recipe features dongchimi made with firm and satisfying ‘cheonsu’ radishes, a perfect choice for a small jar. Making dongchimi is simpler than other kimchi varieties, with fewer ingredients and an easier process for achieving a delightful taste. Cheonsu radishes, though small, are dense and naturally sweet, making them ideal for dongchimi. To prepare, roll the radishes in coarse sea salt, layer them in a crock or jar, and then add a pinch more salt the next day, flipping the radishes to ensure even salting. Next, dissolve salt and ‘new sugar’ in water and pour it over the radishes. Using ‘new sugar’ instead of regular sugar prevents the radishes from becoming too soft and results in a cleaner flavor. Place a cloth bundle containing pear, garlic, and ginger into the jar. Top with radish greens, scallions, and chili peppers. Weigh everything down with a pressing stone. After about a week, the dongchimi will begin to ferment, much like makgeolli (rice wine), with small bubbles appearing and a slightly fermented aroma. At this point, transfer it to the refrigerator. In winter, you can enjoy it by taking out the icy dongchimi radishes and broth, adding water and plum syrup to adjust the saltiness. Fermenting in a crock initially and then moving it to the refrigerator enhances the flavor. The sensation of eating icy dongchimi on a cold winter day is incredibly refreshing and satisfying – truly ‘fighting cold with cold’! Dongchimi can spoil if made too bland, so it’s best to make it slightly saltier initially. You can always dilute it with water later to achieve your desired salt level. A bowl of crisp, cool dongchimi is the perfect way to refresh your palate during winter.
Ingredients- Cheonsu radishes 1 bunch (approx. 7 radishes)
For Salting the Radishes- Coarse sea salt 1 cup (plus 1 Tbsp to sprinkle on top)
For the Dongchimi Broth & Seasoning- Water 7L
- Coarse sea salt 1 cup
- New sugar 2 Tbsp
- Pear 1
- Garlic 1 cup (cloves)
- Ginger 1 knob
- Jujubes (dates) 2
- Scallions 10 stalks
- Cheongyang chili peppers 3
- Coarse sea salt 1 cup (plus 1 Tbsp to sprinkle on top)
For the Dongchimi Broth & Seasoning- Water 7L
- Coarse sea salt 1 cup
- New sugar 2 Tbsp
- Pear 1
- Garlic 1 cup (cloves)
- Ginger 1 knob
- Jujubes (dates) 2
- Scallions 10 stalks
- Cheongyang chili peppers 3
Cooking Instructions
Step 1
First, detach the radish greens from the cheonsu radishes. These will be used later in the dongchimi.

Step 2
Rinse the radishes thoroughly under cold water to remove any dirt. For a deeper clean, gently scrub the surface of the radishes with a clean steel wool scrubber.

Step 3
After washing, place the cheonsu radishes in a colander to drain thoroughly. It’s important to remove as much excess water as possible, as residual water can make the dongchimi broth cloudy.

Step 4
Measure out 1 cup of coarse sea salt. Roll each radish in the salt, ensuring it’s well-coated, and then carefully pack them into your crock or fermentation jar.

Step 5
Once the radishes are in the jar, sprinkle about 1 tablespoon of additional sea salt over the top.

Step 6
The next day, swap the positions of the radishes within the jar – place the ones from the bottom on top and vice-versa. Add another tablespoon of salt on top. Let the radishes salt-cure for one to two days. They should become slightly softened but still firm.

Step 7
Now, let’s prepare the dongchimi brine. In a large bowl, combine 7 liters of water with 1 cup of coarse sea salt and 2 tablespoons of new sugar. Stir well until both the salt and new sugar are completely dissolved, ensuring no lumps remain.

Step 8
Prepare the aromatics and flavorings that will be added to the dongchimi. This includes pear, garlic, and ginger.

Step 9
Wash the pear thoroughly and cut it into pieces, keeping the skin on. Remove the core and seeds. Place the pear pieces into a cheesecloth bag. Add the whole garlic cloves and the knob of ginger to the same cheesecloth bag. This makes them easy to remove later.

Step 10
Wash the reserved radish greens and the scallions thoroughly under running water.

Step 11
Place the washed radish greens and scallions in a colander to drain well. Excess water can dilute the brine, so ensure they are as dry as possible.

Step 12
Now, assemble the ingredients in the jar. Place the cheesecloth bag containing the pear, garlic, and ginger into the jar first. Then, arrange the drained radish greens and scallions on top.

Step 13
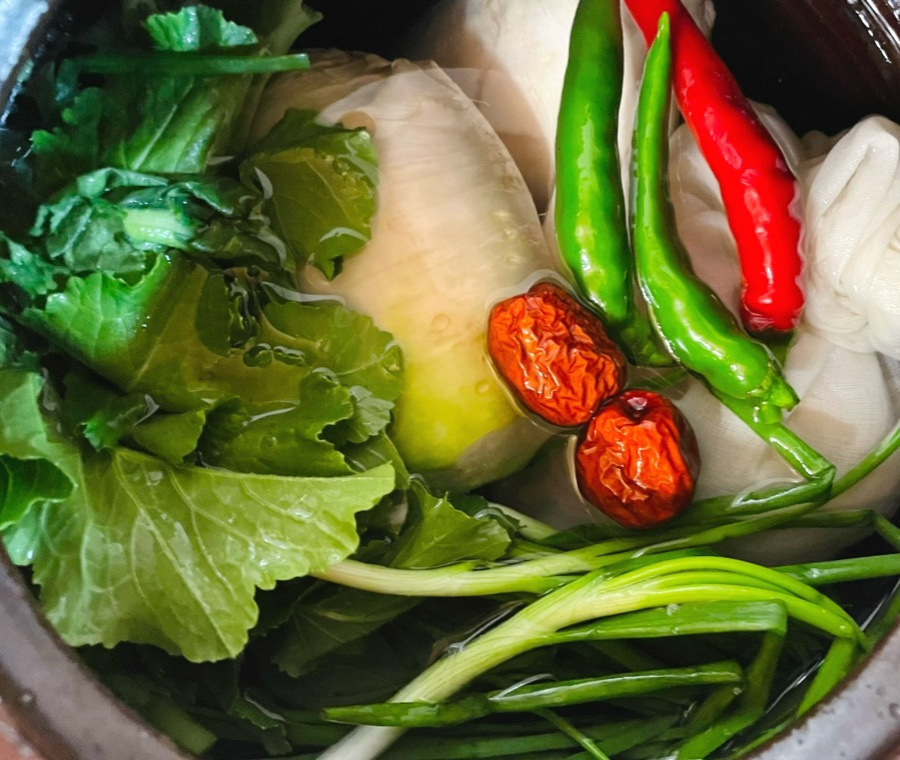
Pour the prepared brine over the ingredients in the jar, filling it up. Garnish the top with the Cheongyang chili peppers, (optional red chili peppers), and jujubes for color and flavor.

Step 14
To keep the radishes submerged and ensure proper fermentation, prepare a pressing stone. It’s recommended to use a stone that has been boiled and sterilized for hygiene.

Step 15
After boiling and sterilizing the pressing stone, cool it completely in cold water. Then, place the cooled stone on top of the ingredients in the jar to weigh them down. After about a week, you should notice small bubbles rising, indicating fermentation has begun. At this stage, transfer the jar to your kimchi refrigerator to store and chill. You might notice a slightly tangy, refreshing aroma as it ferments. Storing in a crock for initial fermentation and then refrigerating further enhances the flavor. Enjoy the wonderfully refreshing taste of this homemade dongchimi throughout the winter!
