
Sweet & Savory Soy Sauce Pickled Chilies
The Ultimate Rice Thief! How to Make Sweet & Savory Soy Sauce Pickled Chilies

When you’re having a pork belly feast at home, those who love a spicy kick always reach for the chili peppers, right? Here’s a recipe for ‘Soy Sauce Pickled Chilies’ that you can make once and enjoy for a long time! This magical side dish will make you finish a bowl of rice in no time. Let’s make it together right now! 🙂
Main Ingredients- 2 bags of Cheongyang peppers (approx. 400-500g)
- 1 bag of small garlic cloves (approx. 100g)
- 4 cups soy sauce (standard paper cup, approx. 720ml)
- 1 cup vinegar (standard paper cup, approx. 180ml)
- 4 cups plum extract/syrup (standard paper cup, approx. 720ml)
Cooking Instructions
Step 1
First, wash the fresh Cheongyang peppers thoroughly under running water. If there are any stems attached, trim them off neatly.

Step 2
To ensure the marinade penetrates deeply into the chilies, use a chopstick to poke about 3 holes into each pepper. This step is crucial for flavor absorption.

Step 3
After poking the holes, rinse the peppers lightly again. It’s very important to dry them completely to remove any moisture. If water remains, the pickles might become mushy or spoil. Pat them dry meticulously with paper towels or a clean cloth.

Step 4
Place the prepared chilies neatly into a wide, clean glass storage container. Using an airtight container, like a kimchi jar or glass bottle, is recommended.

Step 5
To add a rich and deep flavor to the pickles, I’m using one bag of small garlic cloves. Peel the garlic and slice it thinly. If the slices are too thick, the marinade won’t penetrate well.

Step 6
Distribute the thinly sliced garlic evenly among the chilies in the container. This way, the pungent flavor and aroma of garlic will spread throughout the pickles, making them even more delicious.

Step 7
Now, let’s make the flavorful pickling brine. First, pour 4 cups of soy sauce (about 720ml, using a standard paper cup) into the container.

Step 8
Next, add 1 cup of vinegar (about 180ml, using a standard paper cup) for a touch of sourness.

Step 9
Finally, add 4 cups of plum extract/syrup (about 720ml, using a standard paper cup) to provide sweetness. The perfect ratio of soy sauce, vinegar, and plum syrup is the secret to delicious pickled chilies.

Step 10
When you pour the liquid, the chilies might float to the top. Gently press them down with two chopsticks so they are submerged in the brine. This ensures the chilies pickle evenly.

Step 11
Close the lid of the container and let it sit until the next day, allowing the ingredients to meld with the brine. The following day, open the lid and remove the chopsticks.

Step 12
For the soy sauce pickled chilies, let them ferment at room temperature for about 4 days initially. This process allows the marinade to slowly seep into the chilies, starting the delicious pickling process.

Step 13
After 4 days of room temperature fermentation, move the container to the refrigerator and let it mature for another 5 days. A total of about 9 days of aging will result in perfectly flavored pickled chilies that are incredibly delicious. (After 5 more days of maturing, they’ll be mouthwateringly good!)

Step 14
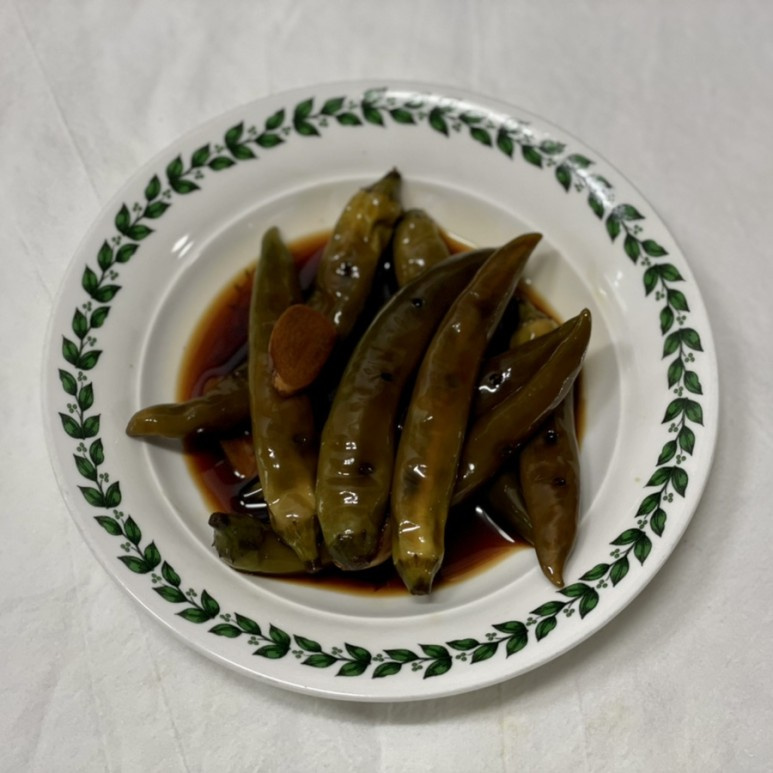
I’ve transferred the finished pickled chilies to a plate for serving. Look! The soy sauce marinade has beautifully permeated even the inside of the poked chilies, and the thinly sliced garlic fermented alongside them offers a delightful crispness. These delicious pickled chilies are truly a rice-thief! 🙂
