
Spicy & Sweet Stir-Fried Squid: The Golden Recipe
Chef Eo Nam’s Fun-Restaurant Style Stir-Fried Squid: A Homemade Delicacy

Hello everyone! Today, we’re diving into a beloved dish: Stir-Fried Squid, with a special recipe that will elevate your home cooking. Squid is packed with taurine, excellent for combating fatigue, and squid ink is even known for its potential anti-cancer properties. This Fun-Restaurant-inspired recipe ensures you can recreate a restaurant-quality meal right in your kitchen. Perfect as a side dish with rice or a delightful appetizer with drinks, let’s get cooking this deliciously spicy, sweet, and chewy stir-fried squid!
Main Ingredients- 1.5 squids (or 2 small squids)
- 1 stalk of green onion
- 1 onion
- 10 cloves of garlic
- 3 Korean green chili peppers (Cheongyang peppers)
Cooking Instructions
Step 1
Prepare the Squid: Start with 1.5 squids (or 2 small ones). You can also use pre-cleaned frozen squid. To clean fresh squid, gently pull the tentacles away from the body. Remove the transparent quill from inside the body cavity and rinse everything under cold running water. For the tentacles, rub them with your hands to remove any slime or grit, then push out the beak and rinse again thoroughly.

Step 2
Score the Squid: Cut the squid body in half. Then, on the white inner side of the body, make diagonal score marks in a crosshatch pattern. This not only makes the squid look more appealing when cooked but also improves its texture, making it more tender and pleasant to chew.

Step 3
Slice to Bite-Sized Pieces: The squid’s skin contains a lot of taurine, so it’s best to leave it on. Slice both the body and the tentacles into pieces that are easy to eat. Consider cutting them smaller for a rice topping or larger if serving as an appetizer.

Step 4
Chop the Vegetables: Slice the green onion diagonally. Peel the onion and slice it into strips. Lightly smash the garlic cloves with the side of your knife to make them flat (smash and slice). Finely chop the Korean green chili peppers – these are key for adding that desirable heat.

Step 5
Make the Sauce: Let’s create the flavor base! In a bowl, combine 4 Tbsp soy sauce, 3 Tbsp gochugaru, 3 Tbsp sugar, and a generously heaped tablespoon of gochujang. Stir everything together until well mixed.

Step 6
Sauté Green Onion and Garlic: Heat a wok or large pan over high heat until hot. Add about 4 swirls of vegetable oil, then add 1 Tbsp of sesame oil and immediately add the sliced green onions. Stir-fry until fragrant. Once the green onion is aromatic, add the smashed garlic and continue to sauté until fragrant. Adding sesame oil later prevents it from burning and preserves its nutty aroma. Sautéing vegetables individually, as we’re doing here, prevents excess water from releasing, leading to a better stir-fry.

Step 7
Toast the Chili Powder: Once the garlic is lightly golden, add the chopped green chili peppers and stir-fry briefly. When the vegetables begin to look vibrant, reduce the heat to the lowest setting. Add 3 Tbsp of gochugaru and stir-fry for 2-3 minutes. Cooking gochugaru on low heat allows its deep flavor to develop without burning.

Step 8
Add Sugar and Soy Sauce: To the toasted chili powder mixture, add 3 Tbsp of sugar and continue to cook over low heat for another 2-3 minutes, allowing the sugar to dissolve and meld with the flavors. Now, pour in 4 Tbsp of soy sauce and increase the heat to high. Let the soy sauce simmer and slightly caramelize along the edges of the pan; this adds a wonderful depth of flavor.

Step 9
Incorporate Gochujang and Onion: As the soy sauce bubbles, stir in the heaped tablespoon of gochujang until it dissolves into the sauce. Add the sliced onions and stir-fry until they become translucent and soft.

Step 10
Cook the Squid: Once the onions are nicely softened, add the prepared squid to the pan. Stir quickly to coat the squid with the sauce. As the squid begins to turn opaque and red, cover the pan and cook over medium heat for about 2 minutes. Covering the pan helps the squid cook through evenly and stay tender, as it will release some liquid.

Step 11
Reduce the Sauce and Create ‘Scorched’ Flavor: Remove the lid and turn the heat back up to high. Stir-fry for about 1 more minute to reduce the sauce. Instead of constantly stirring, allow the sauce to gently stick and slightly ‘sear’ on the bottom of the pan for a minute. This creates a delicious, slightly caramelized, ‘scorched’ flavor.

Step 12
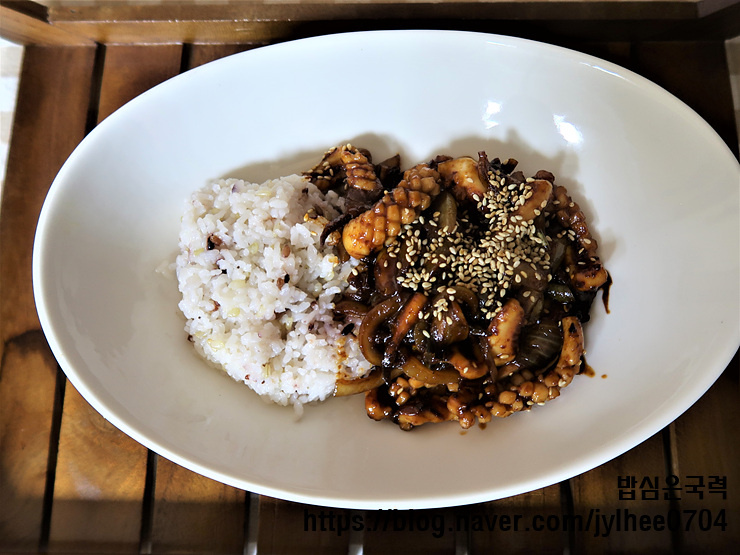
Final Touches: Scrape any delicious bits stuck to the bottom of the pan and mix them thoroughly with the squid and sauce. Turn off the heat. Finish with a light drizzle of sesame oil and a sprinkle of sesame seeds for that perfect presentation and nutty aroma.

Step 13
Serve and Enjoy: Spoon the finished stir-fried squid generously over a bowl of hot rice to create a delightful squid rice bowl (Ojingeo Deopbap). Alternatively, mix any leftover sauce with rice for another incredibly tasty dish!
