
Spicy & Sweet Jjolmyeon Sauce Recipe
Make Delicious Jjolmyeon Noodles with a Full of Veggies Using This Perfect Sauce

Lately, I’ve been craving jjolmyeon so much. I wanted to go to a snack bar, but when I end up at a chain restaurant, I never order jjolmyeon. Haha. If you want something, you make it yourself… Who? Me! I even bought a pre-made sauce kit before, but this time, I decided to make the jjolmyeon sauce from scratch.
Jjolmyeon & Toppings Ingredients- Jjolmyeon noodles, 1 serving (approx. 150g)
- 1 hard-boiled egg
- A handful of cabbage
- A little carrot
- 1/4 cucumber
- A handful of bean sprouts
- A few lettuce leaves
- 1 Tbsp perilla oil (or sesame oil)
Spicy & Sweet Jjolmyeon Sauce- 1/3 Tbsp red pepper flakes
- 3 Tbsp gochujang (Korean chili paste)
- 2 Tbsp oligosaccharide
- 1 Tbsp maesilcheong (green plum syrup)
- 3 Tbsp vinegar
- Plenty of sesame seeds (1 Tbsp)
- 1/3 Tbsp red pepper flakes
- 3 Tbsp gochujang (Korean chili paste)
- 2 Tbsp oligosaccharide
- 1 Tbsp maesilcheong (green plum syrup)
- 3 Tbsp vinegar
- Plenty of sesame seeds (1 Tbsp)
Cooking Instructions
Step 1
First, let’s make the golden ratio for the jjolmyeon sauce. In a bowl, combine 1/3 Tbsp red pepper flakes, 3 Tbsp gochujang, 2 Tbsp oligosaccharide, 3 Tbsp of tangy vinegar, and 1 Tbsp of sweet and fragrant maesilcheong. Mix them well. Finally, sprinkle generously with sesame seeds for a nutty flavor to complete the sauce. (This sauce is for one serving of jjolmyeon, and you can adjust the amounts to your preference.)

Step 2
Here’s the sauce I made to enhance the flavor of jjolmyeon, with a perfect balance of tangy and sweet! ^^ If you ask how many servings this makes, it’s for 150g of noodles, which is about one serving.

Step 3
Let’s prepare the toppings to go with the jjolmyeon. For a satisfying crunch, I boiled some thick bean sprouts. I also boiled one egg beforehand to add richness to the noodles.

Step 4
Now it’s time to cook the jjolmyeon noodles. It’s important to separate the noodles strand by strand before cooking so they don’t clump together and remain wonderfully chewy. Boil the jjolmyeon in boiling water for exactly 3 minutes! To truly enjoy the unique chewy texture of jjolmyeon, you must not overcook it. Take them out right after 3 minutes.

Step 5
After boiling the jjolmyeon, immediately transfer them to cold water. Rinse them by gently rubbing them with your hands, as if you were washing laundry. This process removes excess starch, resulting in firmer, chewier noodles with a cleaner taste.

Step 6
Drain the rinsed jjolmyeon thoroughly in a colander. Removing excess water is crucial for the sauce to adhere well and prevent it from becoming watery.

Step 7
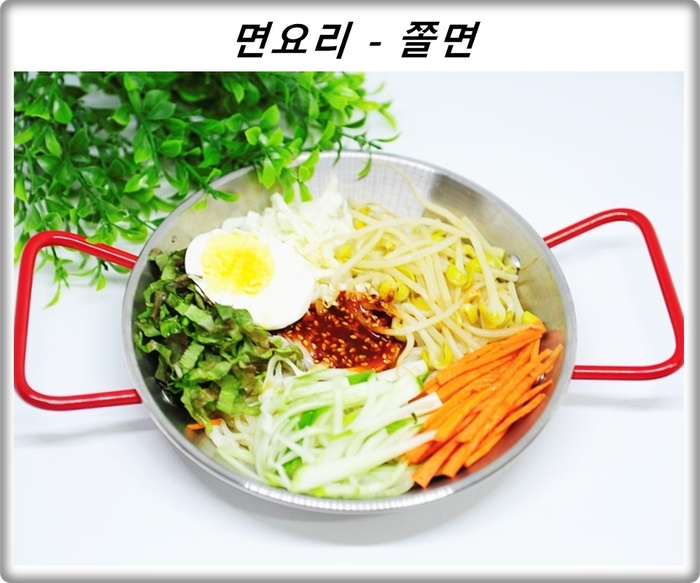
Prepare the vegetables that will add color and freshness to your jjolmyeon. Thinly slice the cabbage, cucumber, and carrot. Cut the lettuce into bite-sized pieces. Also, arrange the pre-boiled bean sprouts and egg attractively.

Step 8
Here’s a personal tip to make your jjolmyeon even more flavorful! After draining the cooked noodles, add 1 Tbsp of perilla oil and toss them to coat. Perilla oil adds a subtle aroma to the noodles and helps the sauce meld beautifully. (If you have sesame oil, you can use that instead.)

Step 9
Finally, place the prepared jjolmyeon noodles in a large bowl. Arrange the thinly sliced crisp vegetables, boiled egg, and bean sprouts on top for a beautiful presentation. Add a generous amount of the prepared spicy and sweet jjolmyeon sauce, and finish with a drizzle of perilla oil. Your mouth-watering jjolmyeon is ready to be mixed and enjoyed!
