
Spicy and Sweet Scallion Kimchi: The Perfect Recipe
How to Make Delicious Scallion Kimchi Easily at Home (Beginner-Friendly!)

Craving delicious scallion kimchi even when it’s not kimchi-making season? I recently bought fresh scallions online but decided against salted napa cabbage, so I made this delightful scallion kimchi instead. This #scallionkimchi is incredibly tasty, even right after making it! You’ll find that making #greenonionkimchi is much simpler and less intimidating than you might think. Try making this fresh kimchi at home with vibrant green onions. It’s perfect as a side dish for rice or as a tasty snack!
Main Ingredients- 700g fresh scallions (net weight after trimming)
- 2/3 cup fish sauce (anchovy or sand lance type, approx. 130ml)
Sweet Rice Porridge (Juk)- 2 Tbsp sweet rice flour
- 1 cup kelp broth (approx. 200ml)
Seasoning Paste (Blended Ingredients)- 1/2 pear (seeds removed)
- 1/4 apple (seeds removed)
- 1/2 cup plum extract (Maesilcheong, approx. 100ml)
- 2/3 cup Gochugaru (Korean chili flakes, approx. 60-70g)
- 2 Tbsp minced garlic (approx. 30g)
- 1 pinch ginger powder (or 1/2 tsp minced fresh ginger)
- 2 Tbsp sweet rice flour
- 1 cup kelp broth (approx. 200ml)
Seasoning Paste (Blended Ingredients)- 1/2 pear (seeds removed)
- 1/4 apple (seeds removed)
- 1/2 cup plum extract (Maesilcheong, approx. 100ml)
- 2/3 cup Gochugaru (Korean chili flakes, approx. 60-70g)
- 2 Tbsp minced garlic (approx. 30g)
- 1 pinch ginger powder (or 1/2 tsp minced fresh ginger)
Cooking Instructions
Step 1
First, prepare your fresh scallions. This time, I purchased 1 bunch of peeled scallions, which weighed about 1kg. After trimming, the net weight was around 700g. They were so fresh and clean that no further preparation was needed. I’ll use some for dongchimi (radish kimchi) and other dishes, and the rest for this delicious scallion kimchi.

Step 2
Rinse the scallions thoroughly 3-4 times under running water. Make sure to clean the root areas well, as they can retain dirt. Drain them well in a colander. Sprinkle 2/3 cup of fish sauce evenly over the root ends of the 700g of scallions. Let them salt for about 1 hour. The fish sauce will help wilt the scallions and add a savory depth of flavor.

Step 3
To ensure the scallions salt evenly, gently turn them over 2-3 times during the salting process. This helps all parts of the scallions to soften uniformly.

Step 4
While the scallions are salting, prepare the kimchi paste. First, make a sweet rice porridge. In a pot, combine 2 Tbsp sweet rice flour with 1 cup of kelp broth. Cook over low heat, stirring constantly, until it thickens into a smooth porridge. If you don’t have sweet rice flour, you can use regular flour or blend cooked rice with water. Let the porridge cool completely. Once cooled, add the pureed pear, apple, plum extract, gochugaru, minced garlic, and ginger powder to the porridge. Mix well until all the seasoning ingredients are thoroughly combined. This #scallionkimchi seasoning will ferment and develop a richer flavor and a deeper color while the scallions are salting.

Step 5
After 1 hour of salting, take out the scallions. Don’t discard the fish sauce that has accumulated; mix it into the prepared kimchi paste for extra flavor. Trim the scallions to about 10-15cm in length (bite-sized pieces). When mixing with the paste, apply it thoroughly to the root ends first, then gently coat the entire scallion. Be careful not to mash the scallions, as this can affect their texture.

Step 6
After coating the scallions evenly with the paste, instead of immediately packing them into a container, let them sit at room temperature for about 10-20 minutes. This resting period allows the flavors to meld and the scallions to become even more tender and delicious. This step significantly improves the texture of the kimchi.

Step 7
Carefully transfer the seasoned scallion kimchi into your kimchi container. Press down gently to remove any air pockets and ensure an even distribution of the paste. Finally, sprinkle sesame seeds on top for an added nutty aroma, if desired.

Step 8
And there you have it! Your homemade #scallionkimchirecipe #greenoniondish is ready. It looks so appetizing and is a true rice-stealing dish. The batch doesn’t seem very large, so I suspect we’ll finish it quickly and I’ll need to make more soon. This kimchi is delicious eaten immediately and even better after a bit of fermentation. Give this scallion kimchi recipe a try!

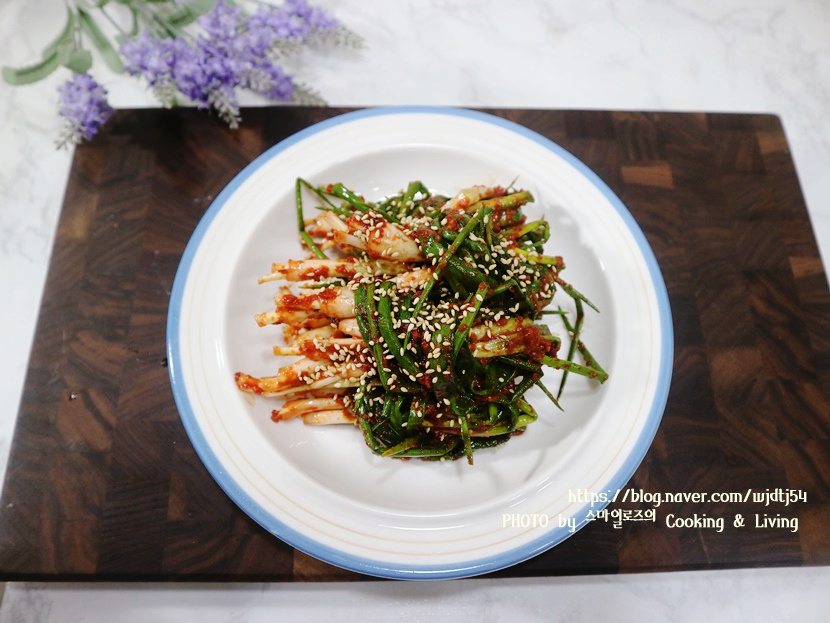
Step 9
Freshly made scallion kimchi tastes absolutely wonderful. Serve it on a plate in manageable portions for a fantastic side dish. Since it’s difficult to plate the entire batch, you can neatly roll portions and arrange them on a serving dish for a more elegant presentation.
