
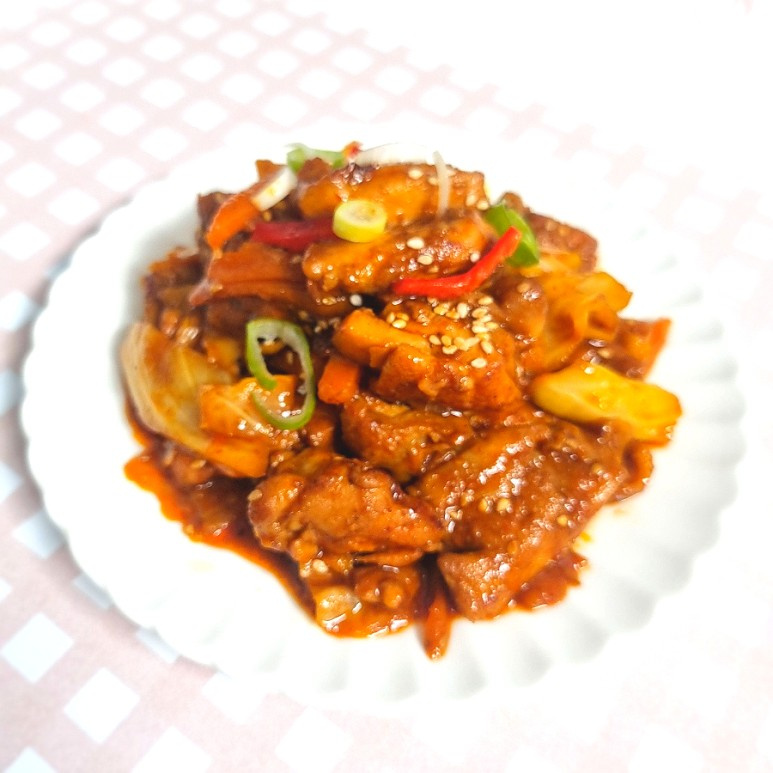
Spicy and Sweet Chuncheon Dakgalbi
Homemade Chuncheon-Style Dakgalbi Recipe (Spicy & Sweet Sauce)

Experience the famous Chuncheon Dakgalbi right in your own kitchen! Using boneless chicken thigh meat, this recipe is incredibly easy to make with simple pantry ingredients. We’ll guide you through creating a special sauce that’s perfectly spicy and savory, offering a delightful taste that rivals any restaurant. It’s a fantastic dish for any occasion, whether as a main meal or a shareable appetizer!
Main Ingredients for Dakgalbi- 1 kg boneless, skinless chicken thighs
- 1/2 head of cabbage, thinly sliced
- 1 pack of enoki mushrooms, trimmed and halved
Spicy & Sweet Chuncheon Dakgalbi Sauce- 2 Tbsp gochujang (Korean chili paste)
- 1 Tbsp jjamppong sauce (or 2 Tbsp gochugaru – Korean chili flakes)
- 3 Tbsp soy sauce
- 1 Tbsp minced garlic
- 2 Tbsp mirin (or rice wine)
- 3 Tbsp oligo syrup (or corn syrup)
- 1 Tbsp sesame oil
- 1 tsp black pepper
- 1 Tbsp toasted sesame seeds
- 2 Tbsp gochujang (Korean chili paste)
- 1 Tbsp jjamppong sauce (or 2 Tbsp gochugaru – Korean chili flakes)
- 3 Tbsp soy sauce
- 1 Tbsp minced garlic
- 2 Tbsp mirin (or rice wine)
- 3 Tbsp oligo syrup (or corn syrup)
- 1 Tbsp sesame oil
- 1 tsp black pepper
- 1 Tbsp toasted sesame seeds
Cooking Instructions
Step 1
If your chicken thighs are frozen, thaw them completely. Once thawed, rinse them briefly under cold water to remove any impurities, and pat them thoroughly dry with paper towels.

Step 2
In a mixing bowl, add 2 generous tablespoons of gochujang. You can adjust the amount of gochujang based on your preference for spiciness and the quantity of chicken.

Step 3
For an extra layer of spicy flavor and depth, add 1 tablespoon of jjamppong sauce. If you don’t have jjamppong sauce, you can substitute it with 2 tablespoons of gochugaru (Korean chili flakes) for a similar spicy kick.

Step 4
Add 3 tablespoons of soy sauce for savory umami, and 3 tablespoons of oligo syrup (or corn syrup) for a touch of sweetness.

Step 5
Incorporate 1 tablespoon of sesame oil for a nutty aroma and 1 tablespoon of minced garlic for that essential pungent flavor.

Step 6
Add 1 teaspoon of black pepper to enhance the overall flavor profile and remove any gamey odors. Also, add 2 tablespoons of mirin (or rice wine), which helps tenderize the chicken and further reduces any unwanted smells.

Step 7
Whisk all the sauce ingredients together until well combined to create your Dakgalbi marinade. Let the sauce rest for about 30 minutes; this allows the flavors to meld beautifully, resulting in a richer and more complex taste. The color will also deepen, making it more appetizing.

Step 8
To ensure the marinade deeply penetrates the chicken, cover the bowl and refrigerate for at least 2 hours. For the best flavor, marinating overnight is highly recommended, allowing the seasoning to infuse completely into the chicken.

Step 9
Take the marinated chicken thighs out of the refrigerator and toss them well with your hands, ensuring each piece is evenly coated with the sauce. This step helps distribute the marinade thoroughly.

Step 10
Heat a large frying pan or skillet over medium-high heat and add 1 tablespoon of cooking oil. Place the marinated chicken thighs in the hot pan and begin to sear them until they are lightly browned.

Step 11
Sear the chicken for 2-3 minutes over high heat to lock in the juices. Then, reduce the heat to medium, cover the pan, and cook for about 5 minutes until the chicken is cooked through. Be aware that Dakgalbi can splatter a lot due to the oil, so using a lid is highly recommended for safety and to keep your stovetop clean.

Step 12
Once the chicken is mostly cooked on the surface, switch the heat back to medium and pour in 100cc (approximately 1/2 cup) of water. This helps to keep the chicken moist and prevents it from sticking to the pan.

Step 13
Cut the chicken thighs into bite-sized pieces. Since chicken thighs can be quite thick, cutting them helps them cook more evenly and prevents the outside from burning before the inside is fully cooked.

Step 14
When the chicken is almost cooked through, add the sliced cabbage and enoki mushrooms to the pan. Stir-fry gently until the vegetables are slightly wilted but still retain some crispness. Feel free to add other vegetables like onions, carrots, or perilla leaves for extra flavor and texture.

Step 15
Continue to stir-fry over high heat until most of the liquid has evaporated and the chicken is thoroughly cooked. This high-heat finishing step imparts a delicious smoky ‘wok hei’ flavor. Taste and adjust the seasoning with a little more soy sauce or oligo syrup if needed. Finally, sprinkle with toasted sesame seeds for a final touch of nutty aroma. Enjoy your homemade Chuncheon Dakgalbi!
