
Spicy and Refreshing Summer Radish Kimchi
Easy & Quick Yeolmu Kimchi (feat. Young Greens) for Beginners

As the monsoon season begins, refreshing summer kimchi is on my mind. Let’s make delicious Yeolmu Kimchi using fresh young radish and young napa cabbage to comfortably get through the hot summer. Freshly made Yeolmu Kimchi is great for mixing into bibimbap or enjoying as a refreshing cold noodle soup. At my home, we prepare two versions of Yeolmu Kimchi: rather than preserving it for a long time, we enjoy it fresh. We make a simple version with ground seasoning like a fresh kimchi salad (geotjeori), and another version as a watery kimchi (mulkimchi) by pouring in chilled broth made from dried pollack, kelp, and onion. With these prepared, it’s easy to make delicious cold radish noodles or noodle soup whenever you crave them.
Basic Ingredients for Yeolmu Kimchi- 2 bunches Young Radish (Yeolmu) (roots trimmed and cleaned)
- 1 bunch Young Napa Cabbage (Eolgari) (roots trimmed and cleaned)
- 1/3 bunch Green Onions (cut into 4-5cm lengths or left whole for noodle topping)
- 1 cup Coarse Sea Salt (200ml)
- 5 cups Water (1L)
- 2-3 Tbsp Vinegar
Yeolmu Kimchi Seasoning- 2.5 cups Fine Gochugaru (Korean chili flakes)
- 1 cup Anchovy Fish Sauce (can substitute or mix with sand lance fish sauce or salted shrimp)
- 1/3 bulb Grated Ginger
- 1 medium Onion
- 1/2 to 1 Apple (adjust for sweetness and flavor)
- Pinch of Salt (for adjusting seasoning)
- 2 Red Chilies (optional, for color and mild heat)
Rice Paste- 20g Rice Flour (or wheat flour, glutinous rice flour)
- 1.5 cups Water (300ml)
- 2.5 cups Fine Gochugaru (Korean chili flakes)
- 1 cup Anchovy Fish Sauce (can substitute or mix with sand lance fish sauce or salted shrimp)
- 1/3 bulb Grated Ginger
- 1 medium Onion
- 1/2 to 1 Apple (adjust for sweetness and flavor)
- Pinch of Salt (for adjusting seasoning)
- 2 Red Chilies (optional, for color and mild heat)
Rice Paste- 20g Rice Flour (or wheat flour, glutinous rice flour)
- 1.5 cups Water (300ml)
Cooking Instructions
Step 1
Thoroughly Wash Young Radish and Young Cabbage: First, brush off any dirt from the roots of the young radish and rinse under running water. Place the radish in a large bowl, add enough water to cover completely, and stir in 2-3 tablespoons of vinegar. Let it soak for about 10 minutes. This step helps remove any residual dirt or pesticides and reduces the raw, ‘green’ taste of the radish. After 10 minutes, carefully pour off the soaking water. Refill the bowl with fresh water and gently swish the radish to rinse. Then, under running water, thoroughly rinse each stalk, shaking them to remove dirt between the leaves, at least 2-3 more times. For the roots, gently scrape off any stubborn dirt with the back of a knife for a cleaner finish. Trim the root ends of the young cabbage and soak it in the same vinegar-water solution before rinsing thoroughly. By washing them meticulously now, you’ll only need to rinse them once after salting to avoid losing flavor.

Step 2
Salting Young Radish and Young Cabbage: After rinsing, lightly drain the young radish and cabbage. Sprinkle generously with coarse sea salt to cure. During summer, vegetables cure quickly, so timing is key. For thick, sturdy radish stalks, salt for about 40-50 minutes; for thinner ones, about 30 minutes. Flip them over halfway through to ensure even salting. They are ready when the radish stalks bend flexibly without snapping. Distribute half the salt dissolved in a little water over the vegetables, ensuring they are well moistened, and then sprinkle the remaining salt directly onto the thicker parts like stems and roots. Once well-salted, rinse them just once under cold water to prevent flavor loss. Then, place them in a colander and let them drain for about 5 minutes.

Step 3
Prepare Seasoning Ingredients for Delicious Yeolmu Kimchi: While the radish and cabbage are salting, let’s prepare the flavorful seasoning. For cabbage kimchi, grated pear adds a refreshing sweetness. However, for young radish kimchi or mustard green kimchi, grated apple provides a wonderfully tart and sweet flavor. You can substitute pear for apple if you prefer. If you have red chilies, grating them along with other ingredients will add beautiful color and a pleasant spiciness. (I skipped them this time as I couldn’t find red chilies at the market.) If you have a garlic allergy, you can omit the garlic. Using too much garlic or ginger can overpower the fresh taste characteristic of Yeolmu Kimchi, so use them moderately.

Step 4
Finely Grind Seasoning Ingredients: Grind the prepared apple, onion, and ginger finely using a blender or grater. Grinding these ingredients will allow the seasoning to permeate the vegetables better, resulting in a richer flavor.

Step 5
Boil and Cool Fish Sauce (Optional): In summer, to remove any potential fishy odor and achieve a cleaner taste, it’s recommended to briefly boil the anchovy fish sauce and let it cool before use. Mixing in sand lance fish sauce or salted shrimp can also enhance the flavor.

Step 6
Mix Chili Flakes and Seasonings to Bloom: Combine the finely ground chili flakes with the cooled fish sauce and the ground vegetables. Let it sit for a while to allow the chili flakes to fully absorb the liquid and bloom, developing their flavor.

Step 7
Cook Delicious Rice Paste: Cook the rice paste, which will give the kimchi its savory depth and texture. Dissolve 20g of rice flour (or baby food rice flour) in 1.5 cups of water in a pot. Stir well to prevent lumps, then cook over medium-low heat, stirring constantly. Once it begins to boil, reduce the heat to low and continue to stir slowly until it thickens to a consistency slightly thicker than pancake batter. It should fall off a spoon in thick ribbons. Remove from heat and let it cool completely. Adding hot paste to kimchi will cause it to cook, so ensure it’s fully cooled. The paste will thicken further as it cools, becoming quite dense, almost like wallpaper paste.

Step 8
Combine Seasoning and Rice Paste for Completion: Mix the bloomed seasoning with the completely cooled rice paste in a bowl until well combined. Taste and adjust the seasoning with salt if needed. (This recipe makes a generous amount of seasoning, considering we’ll also make watery kimchi.)

Step 9
Mix the Kimchi Filling: Add the prepared seasoning and the rinsed green onions to the drained salted young radish and cabbage. Gently mix everything together. You can cut the green onions into 4-5cm lengths or leave them whole for use as a topping for noodles. Ensure the seasoning coats the radish and cabbage evenly.

Step 10
Ferment at Room Temperature: Place the well-mixed kimchi in an airtight container and let it ferment at room temperature for about half a day to a full day. This process develops the characteristic delicious flavor of kimchi.

Step 11
Check Fermentation Progress: After about a day at room temperature, the kimchi will naturally release its own juice, and the radish will be partially submerged. While it’s delicious to eat at this stage, refrigerating it will allow the flavors to mature further and deepen.

Step 12
Make Broth for Watery Kimchi (Optional): For family members who love radish noodle soup, set aside a portion of the kimchi to make a separate batch of watery kimchi for noodles. The broth is made by boiling dried pollack, kelp, onion, and green onion roots, then cooling it completely. A clear and refreshing broth enhances the flavor of the watery kimchi.

Step 13
Complete the Watery Kimchi: To the reserved kimchi, add a ladleful of the main seasoning and the chilled broth. Store this in a separate container, allowing it to develop a rich flavor. Having this concentrated radish noodle soup base ready makes it easy to prepare delicious radish noodle soup anytime. (Tip: When serving noodles, use the kimchi pieces as a topping. Strain the broth through a sieve and add a ladleful to stock or dongchimi broth for a spicy and refreshing taste.)

Step 14
Serving Suggestion 1: Enjoy as a refreshing cold noodle dish by combining store-bought naengmyeon broth and noodles with the watery kimchi.

Step 15
Serving Suggestion 2: Serve with somen noodles in dongchimi broth, topped with the watery kimchi broth for a refreshing noodle soup.

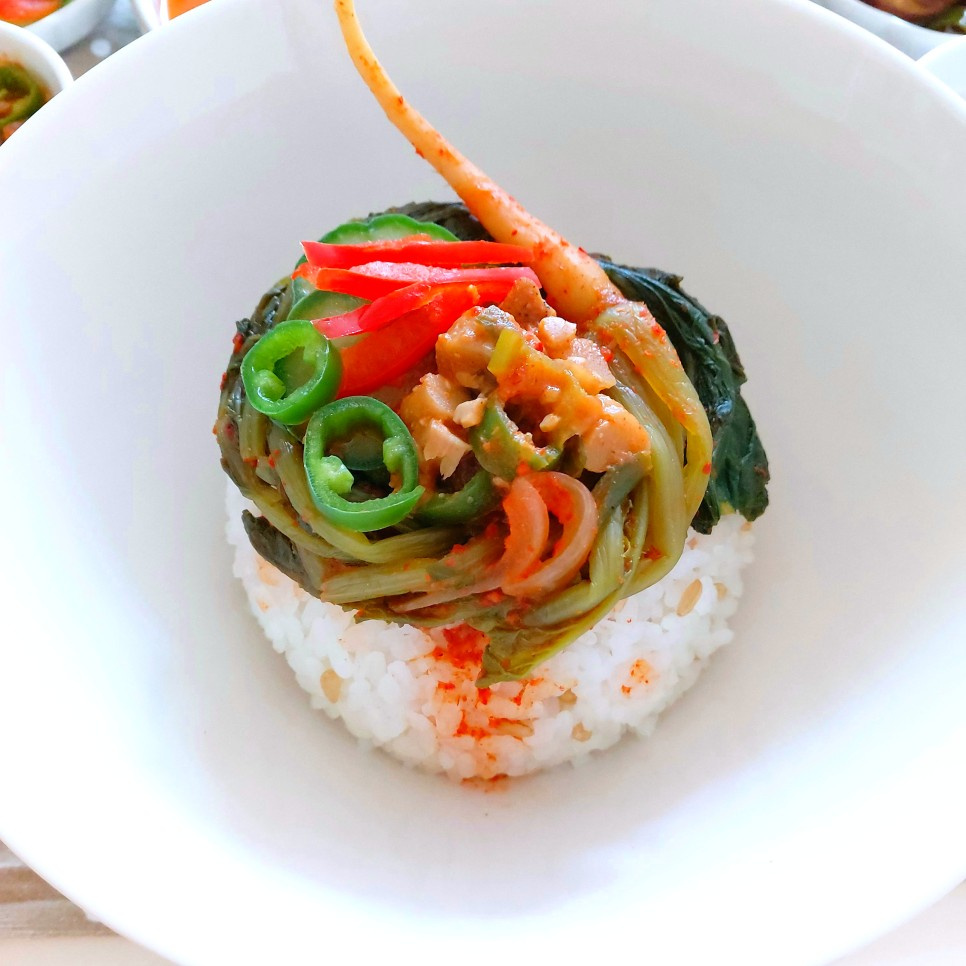
Step 16
Serving Suggestion 3: Top a bowl of rice with a generous amount of Yeolmu Kimchi, mix with ssamjang or a soybean paste sauce, and enjoy a satisfying and hearty meal!
