
Soft and Fluffy White Bean Paste Buns
Recipe for Soft White Bean Paste Buns Using Discarded Sourdough Starter

Are you looking for a way to use up your excess sourdough starter? These soft and fluffy white bean paste buns are the perfect solution! This recipe leverages your discard starter to add wonderful flavor to your bread while keeping it incredibly moist thanks to a generous hydration level. Instead of the usual red bean paste, we’re using sweet white bean paste for a delightful twist. With simple ingredient preparation and step-by-step instructions, even beginners can easily follow along and bake these delicious buns.
Dough Ingredients- 187g Old Sourdough Starter (100% hydration, fed with Baekseol bread flour)
- 40g Bread Flour
- 60g Cake Flour
- 108g ‘Baemtet’ Flour (can substitute with regular bread flour if unavailable)
- 6g Instant Dry Yeast
- 35g Unrefined Sugar (sift if lumpy)
- 6g Salt
- 9g Skim Milk Powder
- 1 large Egg (room temperature)
- 40-50g Low-Fat Milk (adjust for dough consistency)
- 40g Unsalted Butter (room temperature)
Cooking Instructions
Step 1
Prepare your sourdough starter. This recipe uses starter that has been maintained with 100% hydration using Baekseol bread flour. If your starter has been refrigerated for a couple of months, take it out the day before you plan to bake and let it come to room temperature. This ensures it’s in optimal condition for baking.

Step 2
In a mixing bowl, combine the sourdough starter, bread flour, cake flour, ‘Baemtet’ flour (or regular bread flour), instant dry yeast, unrefined sugar, salt, skim milk powder, and egg. If your unrefined sugar is lumpy, sift it beforehand to ensure it incorporates smoothly into the dough. Add most of the low-fat milk, reserving a little to adjust the dough’s consistency later.

Step 3
Using a stand mixer, begin mixing on low speed. The dough will start to come together and clear the sides of the bowl. At this point, add the room temperature butter and continue mixing on low or medium speed. Mix until the dough becomes smooth and glossy. You’ll know it’s ready when you can gently stretch a piece of dough without it tearing. (Tip: If you don’t have ‘Baemtet’ flour, regular bread flour works perfectly well. I used ‘Baemtet’ flour because I ran out of regular bread flour.)

Step 4
Turn the smoothly mixed dough out onto a lightly floured surface. Gently shape it into a round ball. Place the dough back into the bowl, cover it, and let it begin its first rise.

Step 5
The first proofing takes about 50-60 minutes at around 30°C (86°F), or until the dough has doubled in size. To check if it’s ready, gently poke the dough with a floured finger. If the indentation remains or slowly springs back, the proofing is complete.

Step 6
While the dough is proofing, prepare the white bean paste filling. Divide the 550g of white bean paste into 10 equal portions (about 55g each). Roll each portion into a neat ball and set aside.

Step 7
Once the first proof is finished, gently punch down the dough to release the gas. Divide it into 10 equal pieces. Shape each piece into a small ball and let them rest, covered, for about 10-15 minutes. This intermediate proofing, or ‘benching’, makes the dough easier to shape.

Step 8
Each dough ball should weigh around 60g after dividing. This intermediate proofing step allows the gluten to relax, making the dough pliable for filling.

Step 9
Take one of the proofed dough balls and flatten it into a circle on your lightly floured surface. Aim for a slightly thicker edge and a thinner center. Place one ball of white bean paste in the center of the flattened dough.

Step 10
Carefully gather the edges of the dough up and over the bean paste, pinching them together to seal securely. Ensure there are no gaps where the filling can escape. Once sealed, gently roll the filled dough into a smooth ball.

Step 11
Gently press the sealed dough balls slightly flat, creating a round, slightly flattened bun. Then, using a round object like a bottle cap or a small lid, press down firmly in the center to create an indentation, reminiscent of a traditional bun shape.

Step 12
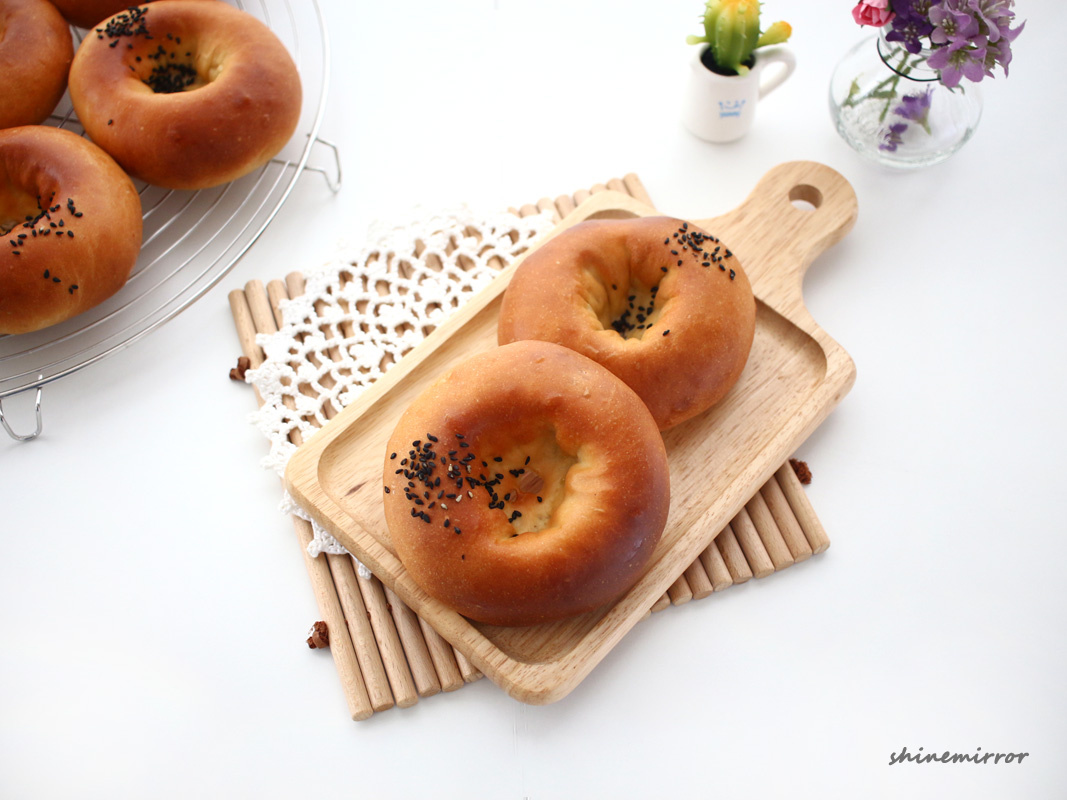
Brush the tops of the buns with milk or an egg wash for a beautiful golden sheen when baked. Be careful not to get the wash on the very center indentation.

Step 13
Sprinkle a few black sesame seeds over the brushed surface of the buns. The sesame seeds add a nice visual contrast and a subtle nutty flavor.

Step 14
Place the shaped and garnished buns on a baking sheet lined with parchment paper. Cover them loosely and let them undergo their second proofing in a warm place.

Step 15
The second proofing takes about 30-40 minutes at around 30°C (86°F), or until the buns have increased in size by about 50% (approximately 1.5 times their original volume). While the buns are proofing, preheat your oven to 170°C (340°F).

Step 16
Bake the buns in the preheated oven at 170°C (340°F) for 12-15 minutes, or until they are golden brown and sound hollow when tapped on the bottom. Baking time may vary slightly depending on your oven.
