
Smooth Homemade Pave Chocolate
Easy Yet Elegant Valentine’s Day Gift: Recipe for Luxurious Pave Chocolate Made at Home

This Valentine’s Day, impress your loved ones with homemade, melt-in-your-mouth pave chocolate! Simple to make, this ‘raw chocolate’ boasts an incredibly smooth texture and rich flavor. It’s the perfect sweet gesture. Follow along and become your own chocolatier!
Essential Ingredients- Dark Chocolate (Couverture or with cocoa butter) 200g
- Heavy Cream 100g
- Unsalted Butter 10g
Cooking Instructions
Step 1
First, prepare and measure all your ingredients. For the best flavor and texture, it’s recommended to use dark couverture chocolate or high-quality dark chocolate that contains cocoa butter, rather than standard confectionery chocolate. This choice is crucial for the final result!

Step 2
Prepare the outer coating ingredients: cocoa powder and matcha powder. Sifting them through a fine-mesh sieve beforehand will ensure a smooth, even coating without lumps.

Step 3
Since the dark chocolate will be melted using a double boiler, chop it into small, uniform pieces. This helps it melt faster and more evenly. Smaller pieces melt more quickly and consistently.

Step 4
Prepare the mold for setting the pave chocolate. You can use a square mousse ring or a suitable container. Line it meticulously with plastic wrap, ensuring there are no gaps, so the chocolate sets smoothly and is easy to remove. Tucking the wrap in tightly without wrinkles is key.

Step 5
In a wide bowl, pour the measured heavy cream. Microwave for about 1 to 1.5 minutes, just until it’s warm and starting to steam slightly around the edges. Place the chopped dark chocolate into the warm cream and let it sit undisturbed. The residual heat will gradually melt the chocolate.

Step 6
Once the chocolate has mostly melted, add the unsalted butter. Stir gently until both the chocolate and butter are fully incorporated and smooth. The butter adds richness and a luxurious mouthfeel.

Step 7
If any lumps remain, use a double boiler method to ensure the mixture is perfectly smooth. Place the bowl over a saucepan of simmering water (making sure the water doesn’t touch the bottom of the bowl) and stir constantly until completely melted. Be careful not to let any water splash into the chocolate.

Step 8
Carefully pour the smooth, melted chocolate mixture into the prepared mold. Use a spatula to level the surface, creating a perfectly flat top. A smooth surface will make for a more professional-looking finished chocolate.

Step 9
Cover the mold with plastic wrap to prevent a skin from forming. Place it in the freezer for about 1.5 to 2 hours, or until the chocolate is firm and set. It needs to be completely solid to handle easily.

Step 10
Once the chocolate is firmly set, carefully demold it. You can use cookie cutters for decorative shapes or a sharp knife to cut it into bite-sized pieces. For cleaner cuts with a knife, you can warm the blade slightly in hot water.

Step 11
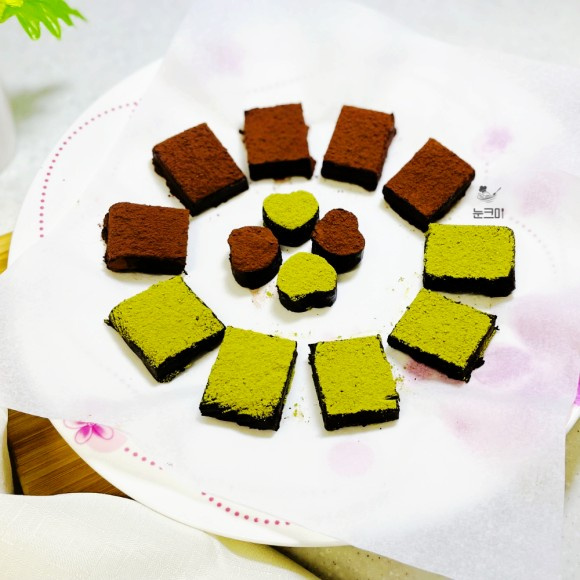
For the first batch, coat the cut chocolate pieces with cocoa powder. Use a fine-mesh sieve for an even dusting. Alternatively, place the cocoa powder in a resealable bag, add the chocolate pieces, and gently shake until evenly coated. The cocoa powder adds a sophisticated bitter note that complements the sweetness.

Step 12
For the second batch, coat the remaining chocolate pieces with the matcha powder using the same method. Now you have two delightful flavors – rich dark chocolate and aromatic matcha – in one beautiful pave chocolate creation!

Step 13
Feel free to experiment with other coatings like powdered sugar, chopped nuts, or even edible glitter to create uniquely flavored and visually stunning pave chocolates! For gifting, consider inserting small forks or toothpicks into the chocolates before packaging. This adds a charming and practical touch for your recipients. Share your heartfelt creation and spread the sweetness!
