
Simple Homemade Chocolate Crepe Cake
Bake a Delicious Chocolate Crepe Cake at Home

Crepe cakes are a quintessential no-bake dessert that’s incredibly easy to make at home. This recipe focuses on a delightful chocolate crepe cake, perfect for any occasion. Enjoy the rich chocolate flavor and light, creamy texture!
Crepe Batter Ingredients- 180g Hot cake mix (pancake mix)
- 20g Cocoa powder (for a rich chocolate flavor)
- 25g Sugar (adjust to taste)
- 1 Large egg (fresh)
- 200-30ml Water (for consistency, or milk can be used)
Cooking Instructions
Step 1
In a large bowl, combine the cocoa powder, egg, and hot cake mix. Mixing the dry ingredients first can help prevent lumps later on.

Step 2
Gradually add the water (or milk) while whisking the batter. The consistency should be slightly thinner than regular pancake batter, flowing smoothly but with some body – not too watery.

Step 3
You might notice some dry lumps of batter at this stage. Don’t worry! If you proceed without fixing this, your crepes might not have an even shape or texture. The next step is crucial for a smooth result.

Step 4
Place a fine-mesh sieve over another clean bowl. Pour the prepared batter into the sieve. Use a silicone spatula to gently press the batter through the sieve, ensuring all lumps are caught.

Step 5
The batter that passes through the sieve will be wonderfully smooth, much like a thin chocolate sauce. This step guarantees thin, uniform crepes. It might seem like extra work, but it’s essential for a perfect cake!

Step 6
Before heating the frying pan, lightly coat the surface with a thin layer of cooking oil using a paper towel. This prevents the crepes from sticking and ensures a clean release. Heat the pan over low heat to avoid burning the batter.

Step 7
Pour about one ladleful (approximately 100ml) of batter into the heated pan over low heat. Immediately tilt and swirl the pan rapidly to spread the batter as thinly and evenly as possible. Thinner crepes result in a more delicate texture.

Step 8
Since the batter cooks quickly, you’ll see small bubbles forming on the surface when it’s ready. Another sign is when the crepe moves freely across the pan when gently shaken. If the edges start to lift slightly, it’s time to flip.

Step 9
Carefully lift the cooked crepe using a spatula or thin turner and place it directly onto a plate or serving dish, stacking them one on top of another. This prevents them from sticking together as they cool. Continue until all batter is used, then let them cool completely.

Step 10
While the crepes are cooling, add sugar to the cold whipping cream.

Step 11
Whip the cream using a hand mixer or whisk until it holds firm peaks. Be careful not to over-whip, but ensure it’s stiff enough to hold its shape without being too dry. Aim for peaks that stand up and curl slightly at the tip.

Step 12
Place one crepe onto a flat plate or cake stand. For a neater finish, place it upside down so the smoother side faces up.

Step 13
Spread a generous layer of whipped cream over the crepe using a spatula or knife, ensuring it’s evenly distributed all the way to the edges.

Step 14
Place another crepe on top of the cream and repeat the process of spreading whipped cream. Continue layering crepes and cream until you’ve used them all up.

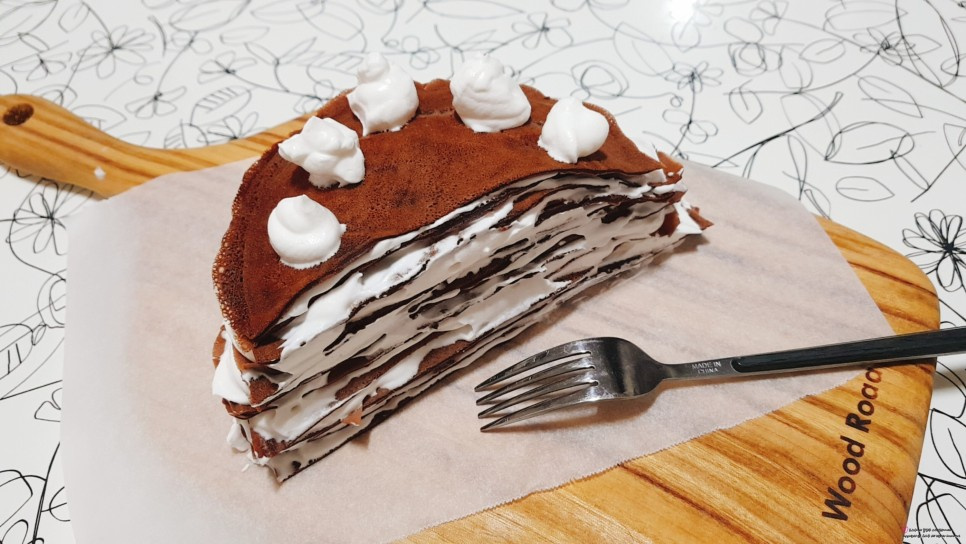
Step 15
Your chocolate crepe cake is now complete! You can finish with a final layer of cream on top or leave the last crepe as is. Feel free to garnish with chocolate syrup or fresh fruit for an extra touch. Enjoy your delicious homemade creation!
