
Seedless Green Grape Tart
Making Sweet & Tangy Seedless Green Grape & Wild Berry Tarts

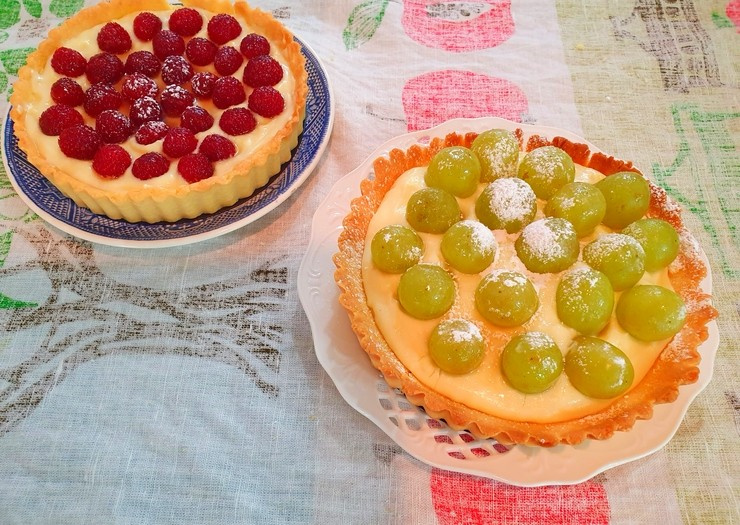
I spotted some fresh wild berries at the market and picked them along with seedless green grapes to create this wonderfully sweet and tangy fruit tart! The ripe wild berries were so incredibly sweet, I couldn’t stop popping them into my mouth. This fresh and vibrant fruit tart, with its crisp pastry shell filled generously with luscious cream and juicy fruit, is always a delightful and sophisticated treat. Enjoy this elegant dessert right at home!
Tart Dough (for 2 x 16cm tarts)- 100g unsalted butter, softened
- 40g powdered sugar
- 1 pinch salt
- 30g egg (approx. 1/2 egg)
- 90g cake flour
- 20g almond flour
Custard Cream- 300ml milk
- 1/2 vanilla bean
- 70g sugar
- 60g egg yolks (approx. 3 yolks)
- 20g cornstarch
- 12g all-purpose flour
Whipped Cream (for Diplomat Cream)- 40ml heavy cream, chilled
- 10g sugar
- 300ml milk
- 1/2 vanilla bean
- 70g sugar
- 60g egg yolks (approx. 3 yolks)
- 20g cornstarch
- 12g all-purpose flour
Whipped Cream (for Diplomat Cream)- 40ml heavy cream, chilled
- 10g sugar
Cooking Instructions
Step 1
Making the Tart Dough:
① In a bowl, cream the softened butter until smooth using a whisk. Add the powdered sugar and salt, mixing until well combined and no powder is visible.
② Gradually add the beaten egg in 2-3 additions, mixing well after each addition. Adding it all at once can cause the mixture to separate, so be patient.
③ Sift the cake flour and almond flour over the butter mixture. Using a spatula, cut the flour into the butter using a ’11’ motion until just combined. Avoid overmixing, as this can make the tart crust tough. The dough should come together without much kneading.
④ Gather the dough into a ball, wrap it tightly in plastic wrap, flatten it into a disc, and refrigerate for at least 1 hour. This chilling step makes the dough easier to handle.
⑤ Once chilled, roll out the dough to a thickness of about 2-3mm.
⑥ Carefully place the rolled-out dough into your tart molds. Gently press the dough into the edges and corners of the mold with your fingertips, ensuring an even thickness all around.
⑦ Prick the bottom of the dough all over with a fork. This prevents the crust from puffing up during baking. Refrigerate the prepared tart shells for at least another 30 minutes.

Step 2
Pre-bake the Tart Shells: Preheat your oven to 180°C (350°F). Bake the tart shells for about 20 minutes, or until they are lightly golden brown. Remove from the oven and let them cool completely.

Step 3
Making the Custard Cream (Part 1): Split the vanilla bean lengthwise and scrape out the seeds. In a saucepan, combine the milk, vanilla bean seeds, and half of the sugar (35g). Heat over low heat until the edges just begin to simmer. You can add the scraped vanilla bean pod to the milk as well to infuse more flavor.

Step 4
As soon as the milk mixture starts to simmer, remove it from the heat immediately. Discard the vanilla bean pod.

Step 5
In a separate bowl, whisk together the egg yolks and the remaining sugar (35g) until pale and well combined. Sift in the all-purpose flour and cornstarch, and whisk again until smooth, ensuring there are no lumps.

Step 6
Gradually temper the egg yolk mixture by slowly whisking in the warm milk. Pour the warm milk in a thin stream while continuously whisking the egg yolk mixture. This gradual addition prevents the eggs from cooking and scrambling.

Step 7
Place a fine-mesh sieve over a clean saucepan. Pour the tempered egg mixture through the sieve into the saucepan. This step ensures a silky-smooth cream by catching any potential lumps or vanilla bean pod fragments.

Step 8
Cook the custard mixture over medium heat, stirring constantly with a whisk to prevent sticking and ensure even cooking. Continue stirring until the cream thickens.

Step 9
The mixture will begin to thicken, a process called gelatinization. You’ll notice the consistency becoming creamy and rich.

Step 10
When the custard has thickened and you see bubbles appearing in the center, indicating it’s boiling gently, remove it from the heat. Be careful not to overcook it, as it can become too stiff.

Step 11
Pour the finished custard cream onto a shallow tray or plate. Cover the surface directly with plastic wrap to prevent a skin from forming. Refrigerate until completely chilled and set.

Step 12
Making Whipped Cream: In a very clean, dry bowl (preferably chilled), pour the cold heavy cream (40ml) and sugar (10g). Beat with an electric mixer on high speed. Once soft peaks begin to form, add the sugar and continue beating until firm, glossy peaks form. The cream should hold its shape when the beaters are lifted.

Step 13
Making the Diplomat Cream: Gently whisk the completely chilled custard cream until smooth. Fold in the whipped cream using a spatula until just combined. Be careful not to overmix, as this can deflate the whipped cream.

Step 14
Your delicious and airy ‘Diplomat Cream’ is now ready! It’s a delightful blend of rich custard and light whipped cream.

Step 15
Transfer the Diplomat Cream into a piping bag fitted with your desired tip. This will allow for neat and decorative filling of the tart shells.

Step 16
Pipe the Diplomat Cream into the pre-baked and cooled tart shells. Arrange the seedless green grapes decoratively on top of the cream.

Step 17
Add the wild berries to further adorn the tart, creating a beautiful and colorful display. The combination of green grapes and berries looks incredibly appetizing.

Step 18
Optionally, brush a thin layer of apricot glaze (or clear jelly) over the fruit with a pastry brush. This adds a beautiful sheen and helps keep the fruit looking fresh.

Step 19
Finally, lightly dust the tart with powdered sugar using a fine-mesh sieve. Once assembled, refrigerate the tart immediately. It tastes best when served chilled!
