
Scallion Kimchi (Pa Kimchi) in Baek Jong Won Style
Baek Jong Won’s Scallion Kimchi Recipe: A Refreshing Tanginess to Awaken Your Appetite!

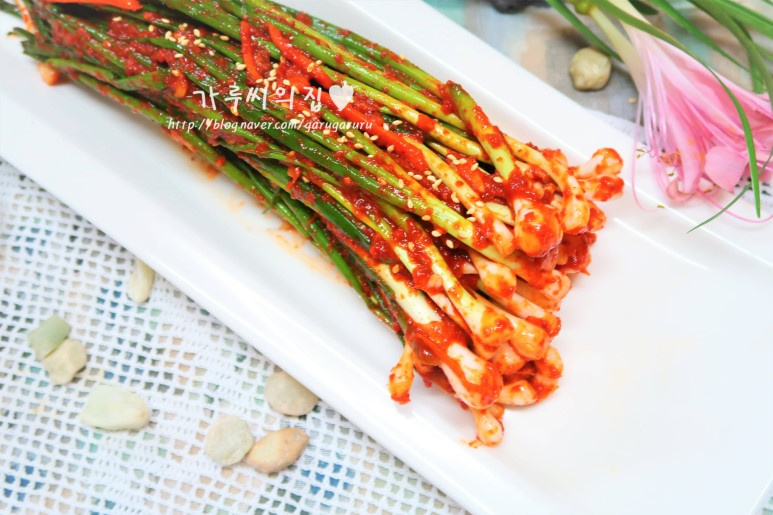
Vibrant green scallions that are a feast for the eyes! This kimchi boasts a delightful tanginess from the seasoning, perfectly complemented by the unique flavor and aroma of scallions. It’s sure to stimulate your appetite!
Ingredients- 1 bunch scallions (about 200g)
- 1/2 carrot (about 50g)
Seasoning- 2 cups gochugaru (Korean chili flakes, about 200g)
- 2/3 cup fish sauce or soy sauce for kimchi (about 130ml)
- 3 Tbsp salted shrimp, minced (about 45g)
- 1 medium onion (about 150g, blended into a puree)
- 3 Tbsp minced garlic (about 45g)
- 2 Tbsp sugar (about 30g)
- 1 Tbsp toasted sesame seeds (about 10g)
- 2 Tbsp flour (about 20g)
- 2 cups water (about 400ml)
- 2 cups gochugaru (Korean chili flakes, about 200g)
- 2/3 cup fish sauce or soy sauce for kimchi (about 130ml)
- 3 Tbsp salted shrimp, minced (about 45g)
- 1 medium onion (about 150g, blended into a puree)
- 3 Tbsp minced garlic (about 45g)
- 2 Tbsp sugar (about 30g)
- 1 Tbsp toasted sesame seeds (about 10g)
- 2 Tbsp flour (about 20g)
- 2 cups water (about 400ml)
Cooking Instructions
Step 1
First, gently trim the very tips of the scallions. If there are any yellowed or wilted leaves, remove them as well. You can lightly snip off the ends with scissors or a knife to ensure a clean preparation.

Step 2
Arrange the cleaned scallions neatly in a large bowl or tray. Pour the 2/3 cup of fish sauce (or kimchi soy sauce) evenly over the scallions. Cover with plastic wrap or a lid and let them cure for 30 minutes at room temperature. It’s best to focus the fish sauce application on the thicker, stem parts of the scallions to help them wilt and absorb the flavor.

Step 3
Finely julienne the carrot. This will add a beautiful color and a slight crunch to the kimchi.

Step 4
Mince the salted shrimp finely. This adds a crucial layer of umami to the seasoning.

Step 5
To make the flour paste (or ‘pul’), whisk together 2 Tbsp of flour and 2 cups of water in a saucepan until smooth. Cook over medium heat, stirring constantly, until it thickens and bubbles. Once it starts to boil, continue cooking for another 1-2 minutes. Then, remove from heat and let it cool completely before using it in the seasoning. Stirring occasionally as it cools will prevent lumps.

Step 6
After 30 minutes, drain the cured scallions in a colander. Crucially, do NOT discard the liquid that comes out – save this flavorful brine to incorporate into your kimchi seasoning!

Step 7
Now, let’s prepare the seasoning. Peel the onion and blend it with a little water until you have a smooth puree. Add this onion puree to a mixing bowl along with the reserved scallion brine.

Step 8
Add the gochugaru, minced garlic, minced salted shrimp, sugar, and the cooled flour paste to the bowl. Finally, add the julienned carrots and toasted sesame seeds. Mix all the ingredients thoroughly using a spatula, stirring in one direction. This helps to create a smooth, well-incorporated seasoning and ensures an even distribution of the chili flakes for a vibrant color.

Step 9
Gently coat the scallions with the prepared seasoning. Focus on ensuring each piece of scallion is evenly covered. It’s important to be gentle with the leafy parts, as if you’re ‘wiping’ the seasoning onto them, rather than vigorously mixing, to maintain the scallions’ crisp texture.

Step 10
This scallion kimchi is delicious right away, but it benefits from a short fermentation. Allow it to ferment at room temperature for about 1-2 days (depending on the weather – a bit longer in cooler temperatures), then store it in the refrigerator. Enjoy the refreshing taste of your homemade scallion kimchi!
