
Rich and Deep Flavored Dakgomtang Made at Home
Beginner-Friendly Dakgomtang Recipe: From Chicken Prep to Achieving a Rich Broth

As the weather chills and the temperature drops, it’s the perfect season for catching a cold. What better way to combat it than with a hearty, warm bowl of nourishing soup? Dakgomtang is the answer! This recipe includes detailed steps on how to prepare the chicken from scratch, ensuring a savory and delicious broth. Let’s make this comforting Dakgomtang together!
Basic Ingredients- 1.5 onions
- 10 cloves garlic
- 2 chickens, 800g each (young or old hen)
- 1/2 stalk green onion
- 1/5 Tbsp whole peppercorns
- 2.5L water
- 3 bay leaves
- 25g astragalus root (optional)
- 4 jujubes (optional)
- 150g glass noodles (optional)
Chicken Seasoning (Optional)- 1 tsp minced garlic
- 1/2 Tbsp salt
- 8-10 twists black pepper
Garnish- 1 cheongyang chili pepper
- 1/4 stalk green onion (green parts only)
- 1 tsp minced garlic
- 1/2 Tbsp salt
- 8-10 twists black pepper
Garnish- 1 cheongyang chili pepper
- 1/4 stalk green onion (green parts only)
Cooking Instructions
Step 1
We’ll start by blanching the chicken to remove any impurities. This step is crucial for a cleaner, clearer broth.

Step 2
Place the chicken in a pot with enough water to cover it. Bring to a boil over medium heat. Once impurities and foam rise to the surface, immediately turn off the heat and remove the chicken. This helps eliminate any gamey smell.

Step 3
Now, let’s get to trimming the chicken. Kitchen shears are the best tool for this! First, carefully cut open the chicken’s cavity with scissors.

Step 4
Next, trim off the tail end of the chicken with scissors. The tail area can contain a lot of fat, contributing to unwanted odors, so it’s best to remove it.

Step 5
Trim off the soft flap of skin on either side of the tail, often called ‘tail meat,’ for a cleaner presentation.

Step 6
Cut off the very tips of the chicken wings. These bony parts don’t have much meat and can make the broth less appealing, so it’s good to discard them.

Step 7
Remove the neck of the chicken as well. While you can leave it on for broth, removing it results in a cleaner final dish.

Step 8
It’s time to thoroughly wash the trimmed chicken. Look inside the chicken cavity – you’ll often find remnants of organs or blood pockets, indicated by the arrow. Clean these areas meticulously with your fingers or under running water.

Step 9
Rinse the outside of the chicken, and then thoroughly wash the inside under cold running water to remove any remaining blood or bits. A good wash is key to a clear and odorless broth.

Step 10
To make cooking easier, cut the chicken into manageable pieces. Then, place them in a colander to drain excess water. Draining the chicken helps the broth cook more clearly.

Step 11
We’re going to simmer the chicken for a long time to extract its rich flavor. To achieve a deep, savory broth without any gamey taste, we’ll add aromatics like onion, green onion, and garlic during the simmering process.

Step 12
In a large, deep pot, spread out the roughly chopped onion, garlic cloves, and green onion at the bottom. These vegetables will absorb any unwanted chicken odors and impart a subtle sweetness and aroma to the broth.

Step 13
Place the trimmed chicken pieces on top of the bed of vegetables. Arranging them evenly will help the chicken cook and release its flavors into the broth.

Step 14
Add 1/5 Tbsp of whole peppercorns over the chicken. Whole peppercorns help to neutralize any gamey smell and add a subtle spice to the broth.

Step 15
Add 3 bay leaves. Bay leaves are highly effective in removing gamey odors, so we strongly recommend including them.

Step 16
Add 25g of astragalus root and 4 jujubes for added health benefits and a deeper flavor. If these ingredients are hard to find or you prefer not to use them, they can be omitted.

Step 17
Pour in 2.5L of water, ensuring the chicken and vegetables are submerged. Cover the pot and bring to a boil over medium heat for about 30 minutes to start extracting the broth.

Step 18
As the chicken simmers, skim off any foam or impurities that rise to the surface with a ladle. This will result in a clearer broth. After 30 minutes on medium heat, reduce the heat to medium-low and simmer for an additional 20 minutes, for a total of 50 minutes of simmering to fully extract the chicken’s delicious flavor.

Step 19
Prepare to strain the broth. Get a large colander and place a cheesecloth, fine mesh cloth, or a muslin cloth at the bottom. This setup will allow only the clear broth to pass through.

Step 20
Carefully remove the cooked chicken pieces from the pot and place them on the prepared colander. Let the chicken cool slightly before shredding the meat.

Step 21
Now, pour all the contents from the pot (vegetables, aromatics, etc.) over the cloth-lined colander. The cloth will catch any solids, allowing only the clear, clean chicken broth to drip into the pot below. Transfer this clear broth back into the cleaned pot.

Step 22
Once the chicken has cooled enough to handle, separate the meat from the bones. Shred the meat into bite-sized pieces. The chicken bones have served their purpose in the broth and can now be discarded.

Step 23
To add a little flavor to the shredded chicken, mix in 1 tsp of minced garlic. This step is optional, but it seasons the meat itself for a tastier experience.

Step 24
Add 1/2 Tbsp of salt to season the shredded chicken. Adjust the amount of salt to your preference.

Step 25
Grind 8-10 twists of black pepper over the chicken. Gently mix everything together. This seasoned chicken can be set aside and enjoyed as a flavorful side dish.

Step 26
Don’t discard the chicken bones after shredding the meat! Adding these bones back to the clarified broth and simmering further will extract even more flavor, calcium, and richness, resulting in a more profound and nutritious Dakgomtang.

Step 27
Meanwhile, return the chicken bones to the clear chicken broth and simmer gently over medium-low heat for about 10-15 minutes. This step further enriches the broth with marrow and collagen from the bones, enhancing the overall depth of flavor.

Step 28
Glass noodles are optional but add a satisfying texture to Dakgomtang. Bring water to a boil and add the glass noodles. Cook for about 10 minutes, stirring occasionally to prevent sticking. Be careful not to overcook them, as they can become mushy.

Step 29
After cooking, rinse the glass noodles under cold water 2-3 times to remove excess starch. Shake them in a colander to drain, and then gently squeeze out any remaining water to ensure they remain delightfully chewy.

Step 30
Let’s prepare the garnishes to enhance the presentation and flavor of your Dakgomtang. We’ll use the green parts of the green onion and the cheongyang chili pepper. Thinly slice the green onion on an angle (bias cut). This cut looks aesthetically pleasing and releases a fresh aroma.

Step 31
Thinly slice the cheongyang chili pepper on an angle, just like the green onion. If you enjoy a bit of heat, feel free to add more, or omit it if you prefer less spice, or substitute with a milder chili pepper.

Step 32
Now, let’s assemble the bowls. If you’re using glass noodles, place a serving of warm rice and the drained glass noodles into the bowl first. This creates a hearty and satisfying base.

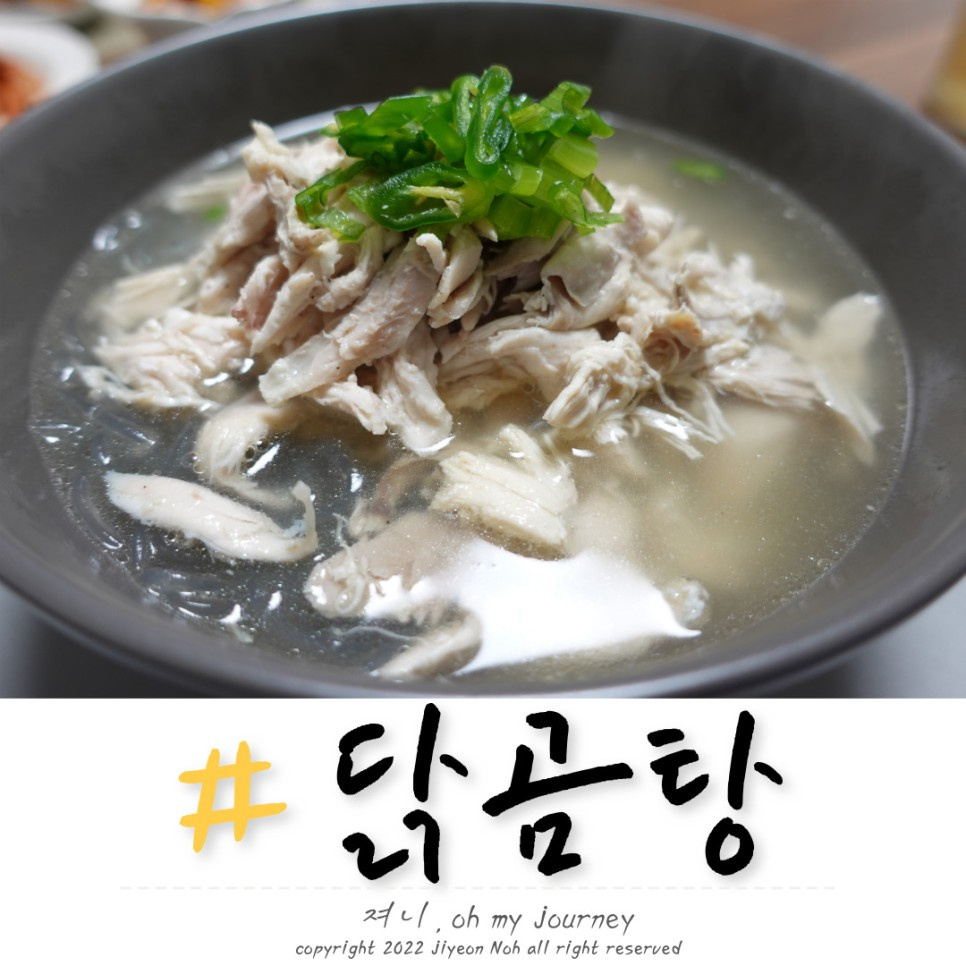
Step 33
Arrange the seasoned shredded chicken attractively on top of the rice and noodles. Then, ladle the hot, deeply flavored chicken broth over everything.

Step 34
Finally, garnish the chicken with the thinly sliced green onion and cheongyang chili pepper. Your delicious and nourishing homemade Dakgomtang is now complete! Enjoy this comforting and revitalizing soup.
