
Rich and Deep Flavor! Holiday Superfood, Korean Beef Marrow and Shank Soup (Gomtang)
How to Make Authentic Korean Beef Marrow and Shank Soup (Gomtang) Over 3 Days

Hello, it’s Henri’s Sister. When the cold wind starts blowing, I always think of the warm and rich Gomtang my mom used to make. Although it’s a tedious and time-consuming dish, the homemade taste is incomparable to store-bought versions, so I’m starting it again this year. I think I make it about twice a year! ㅎㅎ But what should I call this soup? I’ll be using beef marrow (sagol), beef shank (woojok), assorted bones (japbyeo), and beef brisket (sataesal) for this broth. ~~ ㅎㅎ
Gomtang Ingredients- 1kg Korean beef marrow bones (sagol)
- 1kg Korean beef shank bones (woojok)
- 2kg Korean assorted beef bones (japbyeo)
- 1kg Korean beef brisket (sataesal)
- 2 large stockpots (or a very large pot)
Cooking Instructions
Step 1
The most crucial step for a delicious Gomtang is to thoroughly remove all blood from the bones and meat. If you skip this, the soup will have an unpleasant smell and be unpalatable. What I’m holding here are cut beef shank bones.

Step 2
On the first day, soak the beef marrow bones, shank bones, brisket, and assorted bones in cold water. After some time, the water will turn reddish. Drain this water, refill with fresh cold water, and repeat this process until the water is almost clear. Soak them overnight to draw out the remaining blood. By morning, the water should be free of blood. (I started in the afternoon and finished soaking by the next morning.) *Now I understand why people make Sagol Gomtang when the weather gets cold. In hot weather, the bones might spoil while soaking to remove blood.

Step 3
I changed the water every one to two hours to remove the blood. A surprising amount of blood comes out. By morning, there was no more redness in the water. The water was almost clear of blood. For the brisket (sataesal), gently massage it with your hands while it’s soaking.

Step 4
Place the blood-drained bones and meat in a pot and bring to a rolling boil for a few minutes to remove any residual blood. Skim off the foam and impurities that float to the surface. Discard this water and rinse the bones and meat again under cold running water.

Step 5
For the first boil, place the bones and meat into the stockpot and fill it completely with cold water. We will now simmer this until the water reduces by half.

Step 6
The water has reduced by half after the first boiling. Notice how much whiter the broth has become compared to before?

Step 7
During the first boiling, remove the meat from the brisket (sataesal) and assorted bones as soon as it’s cooked and let it cool. This helps retain the meat’s flavor. Once cooled, slice this meat thinly against the grain and store it in an airtight container. You can add small portions to the soup later for a delicious side dish. If you continue to boil the meat with the bones, its flavor will leach into the broth, leaving the meat bland, which is why we remove it during the first boil.

Step 8
Carefully pick the meat off the assorted bones. If you boil until the meat completely falls off, it will lose its taste. Return the bones to the stockpot.

Step 9
For the second boil, place only the bones back into the second stockpot and add fresh cold water. Bring this to a simmer until the water reduces by half again.

Step 10
By the second boil, even the shank bones (woojok) are starting to lose their shape and become very tender.

Step 11
This is the color of the broth from the second boil. Pour this into the pot with the first batch of broth.

Step 12
Now for the third and final boil. Add the bones again…

Step 13
…and start boiling with cold water.

Step 14
This is the third batch of broth, reduced by half. Doesn’t it look incredibly milky and white? The more you boil, the whiter the broth becomes. However, I’ll stop here. My grandmother used to say they boiled it until it was completely white, even if it took days. ㅎㅎ

Step 15
We ended up with one full stockpot and about half of another from the two 14-liter pots. If we kept boiling, we could get more, but I heard on TV that after three boils, there’s not much left in terms of nutrients. ㅎㅎ

Step 16
Have all the nutrients been extracted from the bones? Remove all the bones now.

Step 17
Combine the broths from all three boils, mix them well, and bring to a simmer once more. The color is perfect now, and the aroma is wonderfully rich and savory.

Step 18
Skim off the yellowish fat that floats to the surface and refrigerate it. The fat will solidify. Discard the solidified fat and return the clarified broth to the stockpot.

Step 19
On the morning of the third day, carefully remove any solidified fat that has risen to the surface again.

Step 20
Finally, the 2-day, 3-night marathon is complete! I’m so happy we can eat it now. Since there’s a lot, I’ll portion it out and freeze it. I plan to eat some soon. I’ve also added the brisket meat I sliced yesterday.

Step 21
I’ve also prepared some boiled somen noodles, which I love to add to my Gomtang.

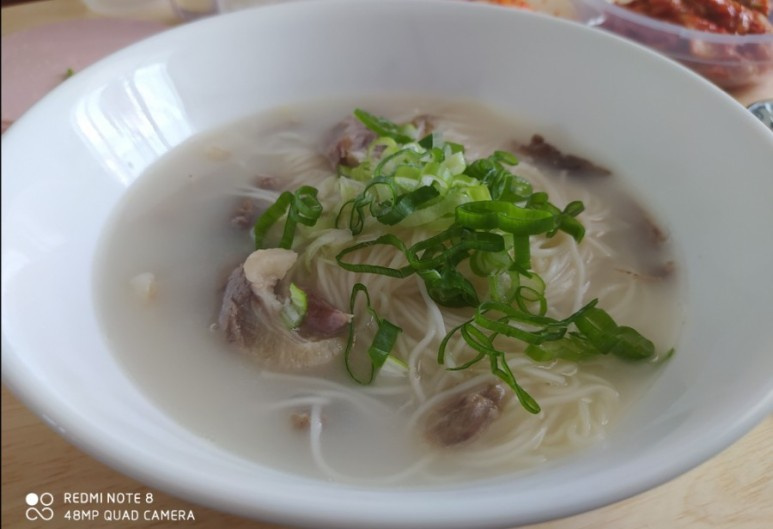
Step 22
Place the noodles into the boiling broth to warm them through, then ladle the soup and noodles into serving bowls.

Step 23
Top with freshly chopped green onions, and season with salt and pepper to taste. Wow! This is the long-awaited Woojok Sagol Gomtang. Henri’s Sister did a great job! I went through this 2-day, 3-night process to recapture the taste my mom used to make. The flavor is truly incomparable to store-bought Gomtang. Nowadays, fewer people boil marrow and assorted bones, so the price has become more affordable. They say it used to be very expensive when I was young.
