
Refreshing Plumade with Homemade Plum Syrup (Park Na-rae’s Recipe)
Easy Homemade Plum Syrup Recipe & Tips: How to Make Delicious Plumade!

Welcome to a refreshing treat! If you’ve made plum syrup at home, now is the perfect time to enjoy it. I made mine back on June 6th, and it’s been aging beautifully for nearly three months, ready to be strained soon. Even though it might feel a bit belated, I’m excited to share my tried-and-true plum syrup recipe, inspired by Park Na-rae’s method, with you. I’ll include a special tip for faster fermentation and how to create a delightful plumade!
Plum Syrup Ingredients- 5kg Green Plums
- 5kg White Sugar (1:1 ratio with plums)
- 1 bottle Oligosaccharide (adjust to taste)
Cooking Instructions
Step 1
Thoroughly Wash the Plums: Begin by selecting fresh green plums. Rinse them multiple times under running water to remove any dirt or surface impurities.

Step 2
Soak Plums in Vinegar Water: Place the washed plums in a large bowl and cover them with water. Add about 1-2 cups of vinegar and let them soak for approximately 30 minutes. This step is crucial for effectively removing any residual pesticides or stubborn residues.

Step 3
Carefully Remove Plum Stems: After soaking, drain the plums thoroughly. Now for a vital step: removing the stems. Using a toothpick, meticulously detach each stem from the plums. It’s important to remove all stems, as they can impart a bitter taste to the syrup.

Step 4
Sterilize the Jar: Prepare your glass jar for the plum syrup. Ensure it’s clean, then sterilize it by either immersing it in boiling water or microwaving it. Make sure the jar is completely dry before use. A clean environment is key to a fresh-tasting syrup.

Step 5
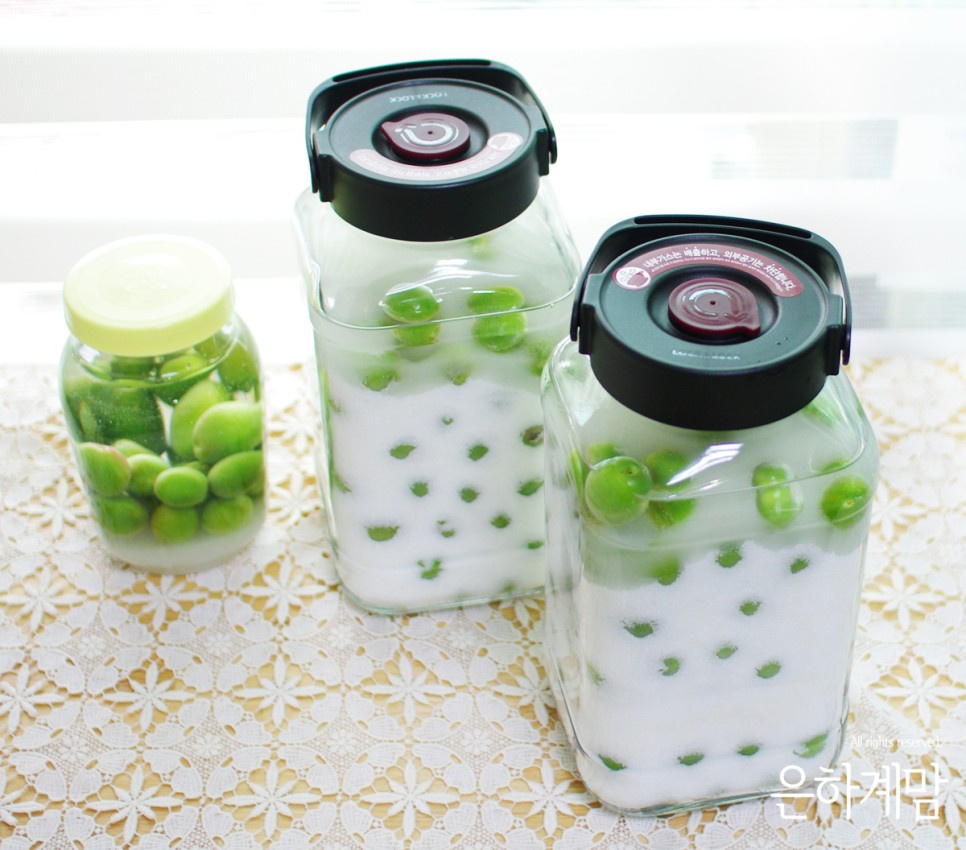
Layer Plums and Sugar: In the sterilized jar, alternate layers of the stemmed plums and white sugar. Imagine you’re building a layered cake or a ‘sirutteok’ (a type of Korean rice cake). Continue layering until the jar is filled, maintaining the 1:1 ratio of plums to sugar. Ensure the sugar is well distributed amongst the plums.

Step 6
Add Oligosaccharide for Faster Fermentation (Park Na-rae’s Tip!): Once the final layer of sugar is added, pour the oligosaccharide evenly over the top. This is Park Na-rae’s special tip! Including oligosaccharide helps to speed up the fermentation process of the plum syrup. Leave a little headspace in the jar, as the contents may expand slightly during fermentation.

Step 7
Enjoy Your Refreshing Plumade!: Once your plum syrup has fully matured, it’s time to make a delicious plumade. Fill a tall glass with plenty of ice. Add a generous amount of your homemade plum syrup to the glass. Top it off with sparkling water or cider for a delightful fizz. For an extra touch of elegance and flavor, garnish with fresh mint leaves or a slice of lemon. It creates a beautiful, non-alcoholic cocktail-like beverage. Enjoy your homemade oasis!
