
Refreshing Dongchimi Noodles
Making Refreshing Dongchimi Noodles with Perfectly Fermented Dongchimi

Today, we’re making delicious Dongchimi noodles using well-fermented winter kimchi! This dish is a perfect balance of cool, tangy broth and chewy noodles, making it an ideal meal for a hot day or when you crave something light and invigorating. Let’s create this refreshing classic together.
Dongchimi Noodles Ingredients- 1 serving of noodles (Somen or Joongmyeon)
- Generous amount of well-fermented Dongchimi and its brine
- 1 boiled egg, to taste
Boiling the Noodles- Plenty of water
- 1 cup of cold water (for rinsing)
- 1 serving of noodles
Preparing Boiled Eggs (Optional)- 1-2 eggs (to taste)
- 1 tablespoon salt (for boiling)
- 1 tablespoon vinegar (for boiling)
- Water (enough to cover the eggs)
- Plenty of water
- 1 cup of cold water (for rinsing)
- 1 serving of noodles
Preparing Boiled Eggs (Optional)- 1-2 eggs (to taste)
- 1 tablespoon salt (for boiling)
- 1 tablespoon vinegar (for boiling)
- Water (enough to cover the eggs)
Cooking Instructions
Step 1
First, prepare your well-fermented Dongchimi. This is the star ingredient, so ensure it’s nicely aged and has a refreshing, tangy flavor.

Step 2
Thinly slice the Dongchimi radishes. Thin slices are best for easy eating with the noodles and a pleasant texture.

Step 3
Cut the radish greens (Mucheong) and scallions from the Dongchimi into about 5cm lengths. These will add color and extra flavor as toppings.

Step 4
Let’s prepare the boiled eggs. Bring a pot of water to a rolling boil. Add 1 tablespoon of salt and 1 tablespoon of vinegar to the boiling water; this helps prevent the eggshells from cracking and adds a little something extra to the cooking water. Carefully add the eggs and reduce the heat to medium. Boil for 10 minutes for firm yolks, or about 8 minutes for a softer, jammy yolk. Tip: To center the yolk, gently stir the eggs in one direction for the first 2-3 minutes after adding them to the boiling water.

Step 5
Once boiled, immediately transfer the eggs to a bowl of cold water for about 5 minutes. This cooling step makes peeling much easier. Carefully peel the eggs once cooled.

Step 6
For a clean cut, using a piece of thread is recommended over a knife! This method ensures a beautiful, neat half. Place the peeled egg on a surface, loop a piece of thread around the middle, and pull the ends in opposite directions to slice through the egg cleanly.

Step 7
Now, let’s cook the noodles. In a large pot, bring plenty of water to a rolling boil. Add 1 serving of noodles and cook for 3-4 minutes, stirring occasionally to prevent sticking. For extra springy and chewy noodles, add about 1 cup of cold water in two additions as the water comes back to a boil. Tip: One serving of noodles is roughly the size of a 500-won coin when gathered.

Step 8
Drain the cooked noodles immediately and rinse them thoroughly under cold running water to achieve a firm texture. Drain well in a colander; excess water can dilute the broth’s flavor.

Step 9
Using chopsticks, twirl the drained noodles into a nest shape and place them neatly in a serving bowl.

Step 10
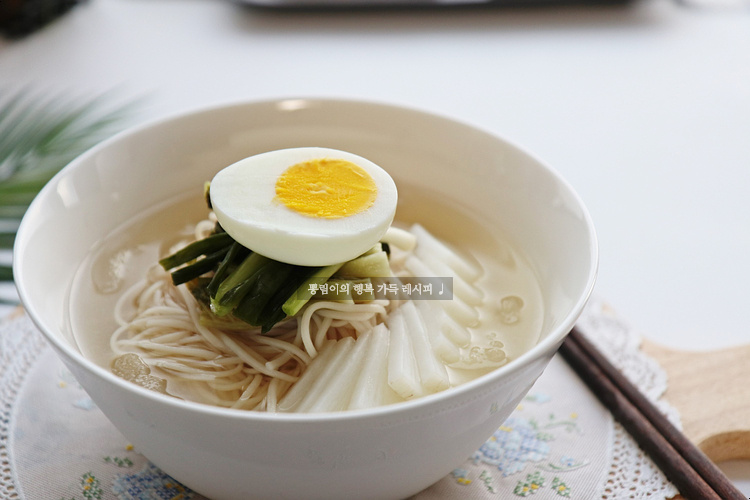
Arrange the prepared sliced Dongchimi radishes, radish greens, and scallions on top of the noodles. Finally, carefully ladle the chilled, slightly icy Dongchimi brine over everything. Top with the halved boiled egg, and your refreshing Dongchimi Noodles are complete! Enjoy the delightful combination of crisp radish, chewy noodles, and invigorating broth.
