
Oyster Radish Kimchi with Enhanced Freshness
[Specialty Kimchi] Golden Recipe for Oyster Radish Kimchi – Pro Tips to Prevent Oysters from Becoming Mushy!

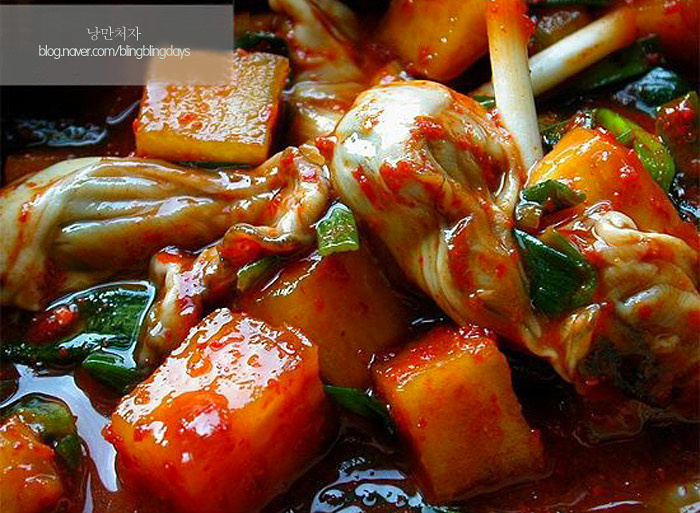
As the kimchi-making season approaches and your existing kimchi starts to dwindle, a simple-to-make Oyster Radish Kimchi (Gulgakdugi) is a delightful treat that can be enjoyed immediately. Gulgakdugi tends to ferment faster than regular radish kimchi, and because some people worry about the oysters becoming overly soft or ‘sake’ (fermented), I’ve prepared a recipe packed with tips to keep them fresh. Enjoy a delicious autumn with this refreshing Oyster Radish Kimchi made with fall radishes, known for their benefits to the respiratory system.
Main Ingredients- 1 Korean radish (mu)
- 1 packet of fresh oysters (cleaned)
- 5-6 stalks of green onions (pa)
- 5-6 stalks of garlic chives (buchu)
Radish Brining Ingredients- 1 Tbsp sugar
- 2-3 Tbsp coarse sea salt (kkot-sogeum)
Kimchi Seasoning- 1/2 cup gochugaru (Korean chili flakes)
- 2-3 Tbsp saeujeot (fermented shrimp, coarsely chopped if large)
- 1 tsp dried anchovy powder (myeolchi-garu)
- 1/2 Tbsp maesilcheong (green plum syrup) or sugar
- 1 clove garlic (minced or grated)
- A pinch of coarse sea salt (for adjusting taste)
- Brining liquid from the radish
- 1 Tbsp sugar
- 2-3 Tbsp coarse sea salt (kkot-sogeum)
Kimchi Seasoning- 1/2 cup gochugaru (Korean chili flakes)
- 2-3 Tbsp saeujeot (fermented shrimp, coarsely chopped if large)
- 1 tsp dried anchovy powder (myeolchi-garu)
- 1/2 Tbsp maesilcheong (green plum syrup) or sugar
- 1 clove garlic (minced or grated)
- A pinch of coarse sea salt (for adjusting taste)
- Brining liquid from the radish
Cooking Instructions
Step 1
1. Brining the Radish:
– Thoroughly scrub the radish to clean it, and trim away any bruised or damaged spots.
– Cut the radish into uniform cubes, about 1.5 cm square.
– In a bowl, combine the cubed radish with 1 Tbsp sugar and 2-3 Tbsp coarse sea salt. Gently mix and massage the ingredients into the radish.
– Let it brine for about 20 minutes, turning the radish once halfway through to ensure even salting.
– **Pro Tip 1:** Adding the sugar first and then the salt can help remove any raw radish taste and enhance its natural sweetness.
– **Pro Tip 2:** After brining, you’ll have about 1 cup of sweet liquid. Don’t discard this! Set it aside to use later when mixing the seasoning.

Step 2
2. Preparing the Secondary Ingredients:
– While the radish is brining, prepare the other vegetables. Wash and trim the green onions and garlic chives, then cut them into approximately 3 cm lengths.
– (Optional) In winter, garlic chives are excellent for their warming properties. In summer, you could use minari (water parsley) for a refreshing taste. Green onions alone also make a deliciously sweet kimchi.

Step 3
2. Preparing Seasoning Ingredients:
– If the pieces of saeujeot (fermented shrimp) are large, give them a light chop.
– Grate the ginger using a grater, or if you prefer not to have bits of ginger, slice it thinly into rounds.
– (Optional) If you don’t have a garlic allergy, mince an equivalent amount of garlic to the ginger and add it for a richer flavor.

Step 4
3. Infusing with Chili Color:
– Drain the brined radish well using a sieve.
– In a bowl, toss the drained radish with only the gochugaru (chili flakes) and mix gently until the radish pieces are evenly coated in a vibrant red color. Let it sit for a moment.

Step 5
4. Mixing the Kimchi:
– Add all the prepared seasoning ingredients (saeujeot, anchovy powder, maesilcheong/sugar, ginger, etc.) along with the chopped green onions and garlic chives to the gochugaru-coated radish.
– Mix everything thoroughly until the seasoning is evenly distributed throughout the radish cubes and vegetables.
– (Optional) For a deeper flavor, you can add a little more maesilcheong or anchovy powder.

Step 6
5. Packing and Initial Fermentation:
– Carefully pack the well-mixed kimchi into a kimchi crock, earthenware jar, or an airtight container.
– Pour the reserved radish brining liquid (about 1 cup) into the mixing bowl, rinse it clean, and pour this liquid over the kimchi in the container. This helps balance the seasoning and prevents flavor loss.

Step 7
6. First Fermentation (Before Adding Oysters):
– If possible, use a ceramic or earthenware jar for this step. Leave the kimchi at room temperature for about 12 hours (e.g., a full day) to allow it to ferment and develop initial flavors.

Step 8
7. Adding Oysters and Second Fermentation:
– Gently wash the oysters by swishing them in lightly salted water, then drain them thoroughly.
– Add the prepared oysters to the kimchi that has undergone its first fermentation. Mix gently, being careful not to break the oysters.
– Let the kimchi with oysters sit at room temperature for another 3-4 hours for a second fermentation before refrigerating. It’s also delicious to eat immediately after this step.

Step 9
**Pro Tip for Preventing Oysters from Fermenting Too Quickly!**
– The key is to first ferment the radish kimchi for about 12 hours at room temperature until it develops flavor. Only then, add the oysters, mix gently, and let it ferment for just a few more hours (3-4) before refrigerating.
– By fermenting the radish part first and adding the oysters later, you can enjoy fresh, crisp Oyster Radish Kimchi without any signs of over-fermentation from the oysters.
– (Personal Experience) My home tends to be a bit cool, so I fermented the radish for 12 hours, then added the oysters and let it sit for about 3-4 more hours. We ate it with dinner, and it had a wonderfully refreshing, ‘geotjeori’ (fresh kimchi) like taste. It was superb!
