
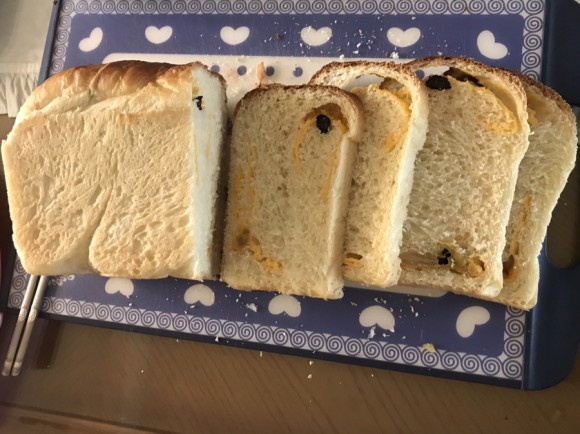
Moist Cheese Raisin Bread
Beginner-Friendly Homemade Cheese Raisin Bread Recipe

This recipe was born out of a desire to pack delicious homemade bread for my husband’s lunch sandwiches! The addition of sweet raisins and savory cheese makes this loaf extra special, perfect for both a satisfying meal and a delightful snack. With a crispy crust and a soft, chewy interior, it’s a hit with both kids and adults. Follow these detailed steps to easily create this wonderful bread!
Dough Ingredients- 400g Bread Flour
- 6g Salt
- 6g Instant Dry Yeast
- 30g Plum Extract (Maesil Extract)
- 70g Water
- 100g Milk
- 1 large Egg (yolk only, white separated and reserved)
Cooking Instructions
Step 1
Measure Ingredients: Begin by precisely measuring all your ingredients. Place the dry ingredients (bread flour, salt, yeast) in one bowl and the wet ingredients (plum extract, water, milk, egg yolk) in another. Ensure the salt and yeast do not directly touch each other. Chop the cheese into small pieces and prepare the raisins by briefly soaking them in warm water and then draining them well. Reserve the separated egg white for brushing later.

Step 2
Mix Wet Ingredients: In the bowl containing the wet ingredients, combine the plum extract, water, milk, and egg yolk. Whisk or stir thoroughly until well blended.

Step 3
Start the Dough: In a large mixing bowl, combine the bread flour, salt, and yeast, and give them a light toss. Create a well in the center and pour in all the prepared wet ingredients. Using a spatula or your hands, begin mixing until no dry flour is visible.

Step 4
Knead to Smoothness: Once the dough starts to come together, transfer it to a clean work surface. Knead for about 10-15 minutes until the dough becomes smooth, elastic, and no longer sticky. You can test if it’s ready by stretching a small piece; it should form a thin, translucent membrane without tearing easily.

Step 5
First Proofing: Shape the kneaded dough into a ball and place it in a lightly oiled bowl. Cover the bowl with plastic wrap or a damp kitchen towel. Let it rise in a warm place (around 25-28°C or 77-82°F, typical room temperature in summer) for about 1 hour and 30 minutes, or until it has doubled in size.

Step 6
Degas and Rest: Gently punch down the risen dough to release the accumulated gas. Divide the dough into two equal portions. Shape each portion into a ball, cover them with a damp cloth or plastic wrap, and let them rest at room temperature for about 15 minutes. This resting period relaxes the gluten, making the dough easier to shape in the next steps.

Step 7
Add Toppings: On a lightly floured surface, roll out each dough ball into a rectangle, slightly longer than your loaf pan. Evenly distribute the chopped cheese and prepared raisins over the surface of each rectangle. Be mindful not to overfill, as too many raisins can cause the dough to tear during shaping.

Step 8
Roll Like a Sushi Roll: Starting from one of the longer edges, tightly roll up each dough rectangle, similar to how you would roll sushi. Pinch the seam closed to prevent the fillings from escaping during baking.

Step 9
Braid the Dough: Take the two rolled dough logs and gently twist or braid them together. Ensure the ends are tucked in and sealed well to prevent unraveling.

Step 10
Pan the Dough: Carefully place the braided dough into your prepared loaf pan. Gently press down to ensure it sits evenly at the bottom of the pan.

Step 11
Second Proofing: Cover the loaf pan loosely with plastic wrap or a damp towel. Allow the dough to rise again in a warm place for about 1 hour, or until it has risen to about 80-90% of the height of the pan. Be careful not to overproof.

Step 12
Finishing Touches (Egg Wash): Just before baking, gently brush the top of the risen dough with the reserved egg white. This will give the bread a beautiful golden-brown color and a nice sheen once baked.

Step 13
Bake: Preheat your oven to 170°C (340°F). Bake the bread for 20-25 minutes, or until the crust is golden brown and the internal temperature reaches around 90°C (195°F). Remove the bread from the pan and let it cool completely on a wire rack before slicing and enjoying!
