
Juicy and Flavorful Beef Brisket Kimbap Recipe
Hearty Home-Cooked Meal | Delicious Lunch Box Idea | Special Beef Brisket Kimbap

Kimbap is always delicious, but today we’re making it special with tender beef brisket! A flavor everyone loves, from kids to adults. Shall we get started?
Ingredients- 4 sheets of dried seaweed (Gim)
- 2 bowls of freshly cooked warm rice
- 2 Tbsp sesame oil or perilla oil
- 1 Tbsp toasted sesame seeds
- 2 tsp salt
- 4 strips of thinly sliced beef brisket (approx. 200g)
- 1 cucumber
- 1/4 onion
- 1/4 red bell pepper
- 4 strips of pickled radish (Danmuji)
- 1 Tbsp store-bought tonkatsu sauce
- A little cooking oil
- Stir-fried kimchi (optional)
- 2 imitation crab sticks (surimi)
Cooking Instructions
Step 1
Peel the cucumber and slice it in half lengthwise. Use a spoon to scoop out and discard the seeds. Removing the seeds helps prevent the kimbap from becoming watery.

Step 2
Thinly slice the deseeded cucumber and lightly salt it. This process draws out excess moisture, ensuring a crisp texture.

Step 3
After about 10 minutes, rinse the salted cucumber under cold running water to remove excess salt. Pat it thoroughly dry with paper towels.

Step 4
Lightly stir-fry the prepared cucumber in a pan with a minimal amount of cooking oil. Cook just until fragrant; overcooking can make it mushy.

Step 5
Prepare the pickled radish (Danmuji), which will add a tangy contrast to the cucumber. These bright yellow strips already make you feel like packing a picnic basket!

Step 6
We’ll use the remaining imitation crab sticks for the kimbap filling. If you have long ones, two might be enough, but for smaller ones, you might need around 4 to 8 sticks.

Step 7
Finely julienne the onion. Sautéing the onion softens its pungent flavor and brings out its natural sweetness, making it a great addition to kimbap, especially with beef brisket. If you have some red bell pepper in your fridge, julienne and sauté it with the onion for added color and texture.

Step 8
Lightly pan-fry the imitation crab sticks until they are slightly golden. Gently cooked surimi becomes even more delicious.

Step 9
Sauté the julienned onion in a pan with just a touch of cooking oil until it becomes translucent. You’ll know it’s ready when a sweet aroma is released.

Step 10
Lightly stir-fry the vibrant red bell pepper with a pinch of salt. This enhances its sweetness and makes it look like beautiful flower petals inside the kimbap.

Step 11
All the delicious fillings for our beef brisket kimbap are now ready! The colorful assortment already looks mouthwatering.

Step 12
In a bowl with 2 cups of warm rice, add 2 Tbsp of perilla oil (or sesame oil), 1 Tbsp of toasted sesame seeds, and 2 tsp of salt. Gently mix everything together, being careful not to mash the rice grains. Ensure the rice isn’t too wet, as this can cause the kimbap to break.

Step 13
Here’s the star of our kimbap today: the wonderfully flavorful beef brisket!

Step 14
Sear the beef brisket in a hot pan until golden brown on both sides. Since it’s thin, it cooks quickly. Once the pinkness disappears and one side is cooked, flip it only once to retain its juices. Avoid flipping it multiple times.

Step 15
The beef brisket is nicely browning – that sizzle is making my mouth water!

Step 16
Place the cooked beef brisket on paper towels to absorb any excess oil. This step reduces greasiness, just like wiping away sweat after a workout! (Hehe)

Step 17
Brush the well-cooked beef brisket with store-bought tonkatsu sauce for an extra layer of flavor. The sweet and tangy sauce complements the rich beef perfectly.

Step 18
Let’s roll the kimbap! Place a sheet of seaweed on a bamboo rolling mat. Spread the seasoned rice evenly over the seaweed, leaving about 1-2 cm bare at the top edge to help seal the roll.

Step 19
Arrange the tonkatsu-sauced beef brisket neatly over the rice.

Step 20
Next, add a generous layer of the sautéed onions.

Step 21
Now, it’s time to layer the remaining ingredients. Place the cucumber and pickled radish strips upright along the bottom edge, then fill in the gaps with julienned bell peppers, imitation crab sticks, and stir-fried kimchi. This arrangement helps keep the fillings from spilling out when you roll the kimbap.

Step 22
Adding some spicy and sweet stir-fried kimchi balances the flavors and adds another delicious dimension. (Optional)

Step 23
Once all the fillings are in place, use the bamboo mat to roll the kimbap tightly. To seal the edge, you can moisten the bare seaweed strip with a little water or a few grains of rice.

Step 24
We’ve made 4 rolls of delicious beef brisket kimbap! Two will go into lunch boxes today, and the remaining two are perfect for a hearty breakfast tomorrow.

Step 25
Brush the outside of the kimbap rolls with a little perilla oil (or sesame oil). This gives them a beautiful sheen and enhances their savory aroma.

Step 26
To cut the kimbap cleanly, lightly oil the blade of your knife with sesame oil or cooking oil. This prevents the rice from sticking and ensures neat slices. It’s a great trick to stop the kimbap from falling apart!

Step 27
Look at these beautifully cut slices! The combination of colorful fillings and savory beef brisket looks absolutely appetizing.

Step 28
Cutting off the ends reveals a beautiful ‘flower’ of ingredients inside! I have to admit, I keep sneaking bites while I’m making them. (Haha)

Step 29
This beef brisket kimbap is a wonderfully satisfying meal for breakfast. It would also be great to pack and share with colleagues at work!

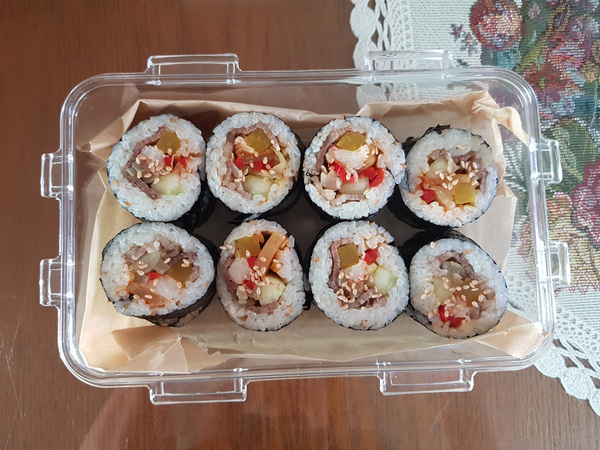
Step 30
Here is the finished beef brisket kimbap, ready to be packed as a lunch for my son. Enjoy and have a great day!
