
Homemade Sweet Bean Jelly (Yaggeng) – A Thoughtful Gift
Crafting Yaggeng at Home: The Perfect Gift for Holidays!

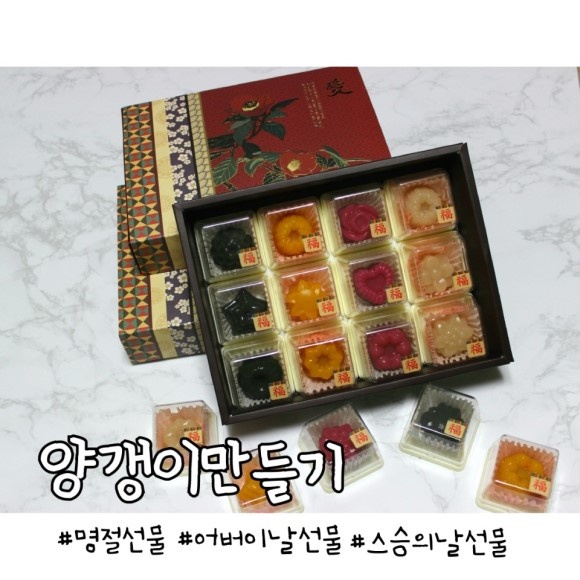
This holiday season, consider making homemade Yaggeng as a special gift for your loved ones! While I’ve often gifted fruits or health foods, my past experiences with wilted fruits arriving from online orders and the tendency for health foods to be put aside later prompted me to think differently this year. After much thought, I decided to make Yaggeng – a delightful treat that’s as beautiful as it is delicious. Present a gift of Yaggeng made with your own hands, making it truly unique and memorable.
Ingredients (Makes approx. 12 pieces)- 250g Red Bean Paste (smooth, sifted)
- 25g Sugar (white or brown)
- 10g Corn Syrup (for gloss)
- 7g Natural Powder (e.g., green tea, sweet pumpkin, cactus fruit – choose your favorite)
- 170g Water
- 10g Agar-agar powder
Cooking Instructions
Step 1
Prepare all the necessary ingredients for making Yaggeng. If you wish to create Yaggeng in various colors, consider purchasing about 1kg of red bean paste and dividing it into four portions to make four different colored batches. (This recipe yields approximately 12 pieces; for four colors, use 1/4 of the ingredients per color.)

Step 2
In a bowl, combine 10g of agar-agar powder with 170g of water. Stir well to prevent clumps, then let it soak for at least 10 minutes. This soaking process helps the agar-agar powder dissolve properly in water, promoting gelation.

Step 3
In another bowl, combine 250g of red bean paste, 25g of sugar, 10g of corn syrup, and 7g of your chosen natural powder. If the red bean paste is lumpy, sifting it through a fine-mesh sieve will result in a smoother texture.

Step 4
Pour the soaked agar-agar and water mixture into a pot and bring it to a simmer over medium heat. Once it starts boiling, stir continuously until it thickens and turns jelly-like. Simmer for about 1-2 minutes to ensure the agar-agar is fully dissolved.

Step 5
Once the agar-agar mixture is boiling, reduce the heat to low. Add the prepared red bean paste, sugar, corn syrup, and natural powder to the pot. Stir gently with a spatula until all ingredients are smoothly incorporated and any lumps of red bean paste are dissolved. Continue stirring for about 3-5 minutes until the mixture is smooth and homogeneous.

Step 6
When the mixture is lump-free, completely dissolved, and has a smooth consistency, remove the pot from the heat. Carefully pour the hot mixture into pre-prepared Yaggeng molds. Pour gently to minimize the formation of air bubbles.

Step 7
As you fill the molds, the mixture might start to thicken towards the end, potentially affecting the shape. Don’t worry too much; aim to fill them as neatly as possible. Smoothing the top surface after filling will contribute to a more polished final appearance.

Step 8
Place the filled molds in the refrigerator and chill for at least 15 minutes until firm. Once they have set, carefully remove them from the refrigerator. While some small air bubbles might appear, you should find beautifully set Yaggeng.

Step 9
Repeat the above process to create Yaggeng in your desired colors. Once all the Yaggeng are made, wrap each piece individually in its packaging. Your beautiful, homemade Yaggeng are now ready to be presented as a thoughtful holiday gift!
