
Homemade Strawberry Syrup: Sweetness from Your Kitchen, Real Strawberry Latte & Storage Guide
Making Homemade Strawberry Syrup with Fresh Seasonal Strawberries, a Rich Strawberry Latte Recipe, and Perfect Storage Tips

How are you storing and enjoying your fresh, seasonal strawberries lately? With their prices dropping, now is the perfect time to make your own ‘Homemade Strawberry Syrup’ easily at home using fresh strawberries. In particular, we’ll share the recipe for ‘Real Strawberry Latte,’ known for its rich texture that makes you feel like you’re eating fresh fruit, and tips for keeping it fresh for longer. Let’s dive in!
Strawberry Syrup Ingredients- 2 packs Fresh Strawberries (approx. 1kg)
- 1 Tbsp Vinegar (for washing strawberries)
- 1-2 Tbsp Lemon Juice (for brightness)
- Sugar (approx. 1/3 to 1/2 the weight of strawberries)
Real Strawberry Latte Ingredients- A few thinly sliced fresh strawberries (for cup decoration)
- Homemade Strawberry Syrup (to taste, approx. 1 part)
- Cold White Milk (approx. 3 parts)
- A few thinly sliced fresh strawberries (for cup decoration)
- Homemade Strawberry Syrup (to taste, approx. 1 part)
- Cold White Milk (approx. 3 parts)
Cooking Instructions
Step 1
First, remove the green stems from your fresh strawberries and rinse them thoroughly under running water. For an even cleaner wash, fill a bowl with water, add 1 tablespoon of vinegar, and let the strawberries soak for about 30 seconds before rinsing them off quickly. This method effectively removes surface impurities.

Step 2
A word of caution: Soaking strawberries in water for longer than 30 seconds can cause water-soluble vitamins, like Vitamin C, to leach out into the water. Therefore, it’s best to wash them quickly!

Step 3
After washing, gently pat the strawberries dry. Then, sort them based on their firmness: separate the firm ones from the softer, slightly bruised ones. This step is crucial for achieving the desired texture in your strawberry syrup.

Step 4
Start with the firm strawberries. Dice these into small, uniform pieces. These diced pieces will provide delightful chunks of fruit in your syrup.

Step 5
For the softer strawberries, mash them using your hands, a fork, or a potato masher until they are mostly broken down. It’s okay if there are still some small lumps.

Step 6
Mashing the softer strawberries by hand can be quite enjoyable, making it a fun activity to do with children. It’s a great way to create happy memories together in the kitchen!

Step 7
Once you’ve mashed the softer strawberries, set them aside. Now it’s time to prepare the next component.

Step 8
Next, prepare the strawberries that will add that ‘real’ texture to your syrup. Before slicing these, it’s very important to thoroughly pat them dry with paper towels to remove excess moisture. Once dry, slice them very thinly and thinly.

Step 9
These finely sliced strawberries are what give the strawberry syrup its authentic texture when mixed into milk or used in drinks, enhancing the overall strawberry experience.

Step 10
Now, combine the finely sliced strawberries and the mashed strawberries in a bowl. Gently mix them together, allowing their natural juices to meld.

Step 11
It’s time to add the lemon juice for a touch of brightness. Add about 1 to 2 tablespoons. If you’re using one pack of strawberries, 1 tablespoon of lemon juice might be sufficient. Adjust to your taste.

Step 12
Next, add the sugar. We recommend using about 1/3 of the strawberry’s weight in sugar. While traditional fruit syrup recipes often use a 1:1 ratio of fruit to sugar, this can result in a very sweet syrup. I found that using only 1/3 sugar allowed the natural strawberry flavor to shine through beautifully. Feel free to adjust this to your preference.

Step 13
Gently stir the mixture with a spatula or spoon to ensure the sugar and lemon juice are well incorporated into the strawberries. Be careful not to crush the strawberries too much; aim for an even blend.

Step 14
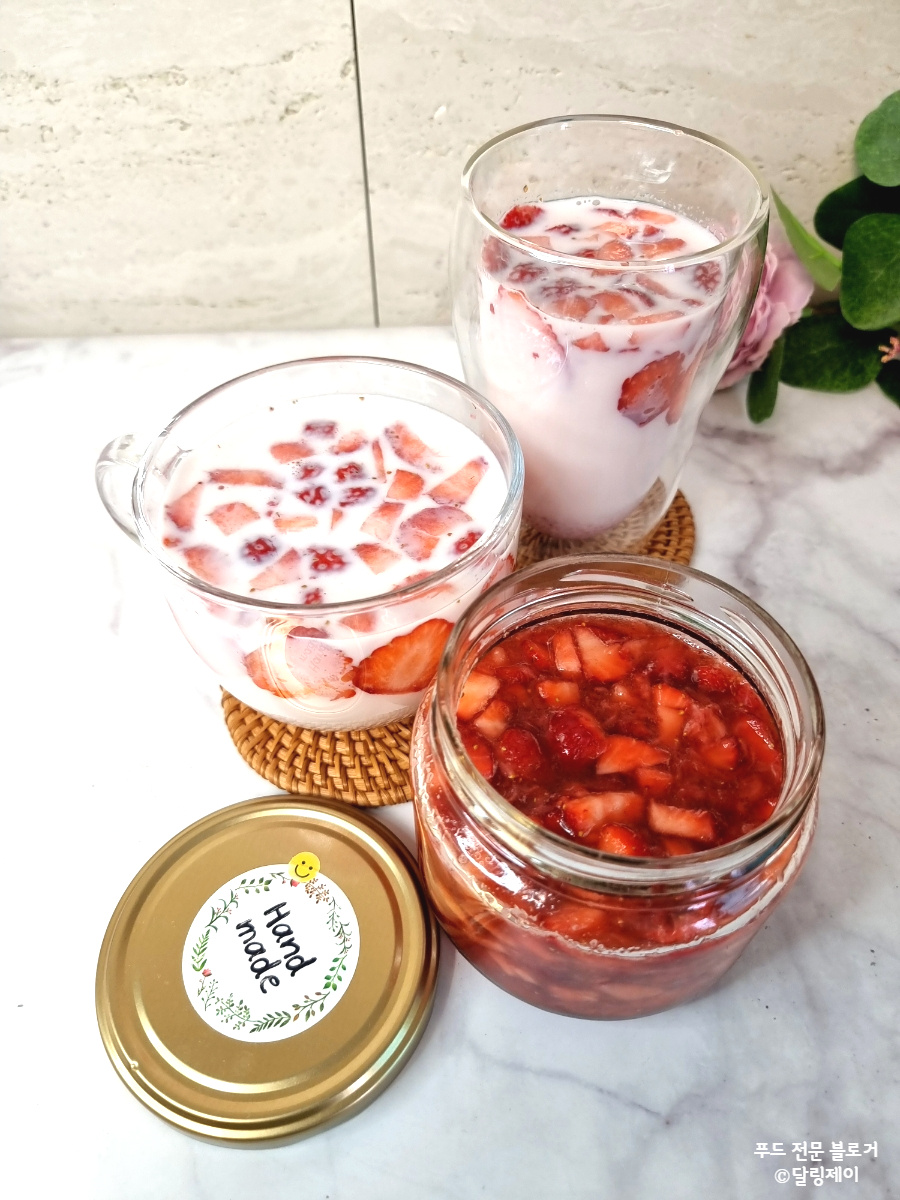
Once everything is well mixed, prepare your storage container. A sterilized glass jar is ideal. Spoon the prepared strawberry syrup into the jar. Your delicious homemade strawberry syrup is now complete!

Step 15
[Maturation & Storage] While you can enjoy the strawberry syrup immediately, letting it mature in the refrigerator for about a day will deepen the flavors and aromas, making it even more delicious. Always store it in the refrigerator. For long-term storage, freezing might alter the fresh taste and texture of the strawberries, so it’s best to consume it within 2 weeks to 1 month when kept refrigerated. 
Step 16
[Making Strawberry Latte] Now, let’s make a ‘Real Strawberry Latte’ with this wonderful syrup! First, take thinly sliced fresh strawberries and press them against the inside of your glass cup. This technique ensures you get a fresh strawberry texture with every sip. 
Step 17
Add about 2 tablespoons of the strawberry syrup to the cup. A good ratio to start with for strawberry latte is approximately 1 part syrup to 3 parts milk, but feel free to adjust this to suit your personal taste.

Step 18
Finally, slowly pour in cold white milk until the cup is full. Your ‘Real Strawberry Latte,’ with its wonderfully intact fruit pieces, is now ready! For a refreshing twist, you can add sparkling water or lemon-lime soda to create a delightful strawberry ade. Enjoy it your way!
