
Homemade BBQ Chicken Sandwich: Neat Packaging Without Tape
Kid’s Day Out Picnic Lunch Idea: Delicious BBQ Chicken Sandwich with Homemade Sauce, Neatly Wrapped with Parchment Paper (No Tape!)

A healthy and delicious sandwich made with our homemade BBQ sauce. Perfect for kids’ snacks or picnic lunches!
Sandwich Ingredients- 4 slices of bread (toasted, if desired)
- 8 pieces of chicken tenderloin (approx. 200g)
- 2 large lettuce leaves
- 1/2 medium onion
- 10cm piece of celery
- 4 tsp mayonnaise
- 1 Tbsp cooking oil
Homemade BBQ Sauce- 1 Tbsp soy sauce
- 1 Tbsp ketchup
- 1 Tbsp oligosaccharide (or corn syrup)
- Pinch of black pepper
Vegetable Pickle & Dressing- 1 Tbsp lemon juice
- 1 Tbsp oligosaccharide (or sugar)
- Pinch of salt
- 1 Tbsp soy sauce
- 1 Tbsp ketchup
- 1 Tbsp oligosaccharide (or corn syrup)
- Pinch of black pepper
Vegetable Pickle & Dressing- 1 Tbsp lemon juice
- 1 Tbsp oligosaccharide (or sugar)
- Pinch of salt
Cooking Instructions
Step 1
Let’s start by boiling the chicken. Pour 2 cups of water into a pot and bring it to a rolling boil over high heat. Once boiling, add the 8 chicken tenderloin pieces, reduce the heat to medium, and simmer for 12 minutes. This will ensure the chicken is moist and tender.

Step 2
While the chicken is cooking, let’s prepare the sandwich fillings. Thinly shred 2 large lettuce leaves. Julienne the 10cm piece of celery. Thinly slice the 1/2 medium onion.

Step 3
Place the shredded lettuce and julienned celery in a bowl. Now, let’s add the ingredients for a refreshing pickle: 1 Tbsp oligosaccharide, 1 Tbsp lemon juice, and a pinch of salt. Gently toss everything together and let it marinate for a bit. This will give you a delightful crunch and a zesty flavor.

Step 4
Next, we’ll prepare the sautéed onions. Heat 1 Tbsp of cooking oil in a pan over medium heat. Add the thinly sliced onions and stir-fry until they become translucent. This will bring out their natural sweetness.

Step 5
Once the onions are nicely softened, add the chicken tenderloins (which you’ve already shredded into bite-sized pieces). Now, add the BBQ sauce ingredients: 1 Tbsp soy sauce, 1 Tbsp oligosaccharide, 1 Tbsp ketchup, and a pinch of black pepper. Stir everything well and cook until the chicken is coated in a glossy, flavorful BBQ sauce.

Step 6
Lightly toast your bread slices, if you like. Spread a thin layer of mayonnaise on the inside of each toasted slice. The mayonnaise acts as a moisture barrier and adds a creamy richness.

Step 7
Gently squeeze out any excess liquid from the pickled lettuce and celery. Arrange them evenly over the mayonnaise-spread bread slice. The crisp vegetables will add a wonderful texture.

Step 8
Now, generously pile the delicious BBQ chicken mixture on top of the pickled vegetables. The rich flavor of the chicken is the star of this sandwich!

Step 9
Spread mayonnaise on the remaining slice of toasted bread and place it on top of the chicken, completing the sandwich.

Step 10
Properly wrapping your sandwich is key to enjoying it mess-free! This is especially important for kids’ lunchboxes, to prevent the filling from spilling out. Today, I’ll show you how to wrap sandwiches neatly using only parchment paper, without any tape. Parchment paper, like baking paper, won’t stick to tape, making it perfect for a natural wrap. Nowadays, you can even find parchment paper with built-in slide cutters, making it very convenient.

Step 11
Cut a piece of parchment paper that is generously larger than your sandwich. Carefully place the sandwich in the center of the parchment paper.

Step 12
Bring the two long sides of the parchment paper together over the center of the sandwich and fold them down neatly. Wrap it snugly around the sandwich shape.

Step 13
Fold in the side edges of the parchment paper at the top, tucking them neatly into the space below. This creates a secure closure on one side.

Step 14
If you stand the sandwich up at this point, you’ll see one side is neatly folded, almost like a gift.

Step 15
Finally, fold the bottom part of the parchment paper inwards, just like you did with the top edges, and tuck it into the previously folded section. Tucking it in firmly will ensure the wrap stays in place.

Step 16
Once the bottom is also neatly tucked in, your sandwich is perfectly wrapped and ready to stand up without falling apart.

Step 17
Voila! This packaging prevents any filling from leaking out and keeps the sandwich tidy in your lunch bag. It looks wonderfully presentable too!

Step 18
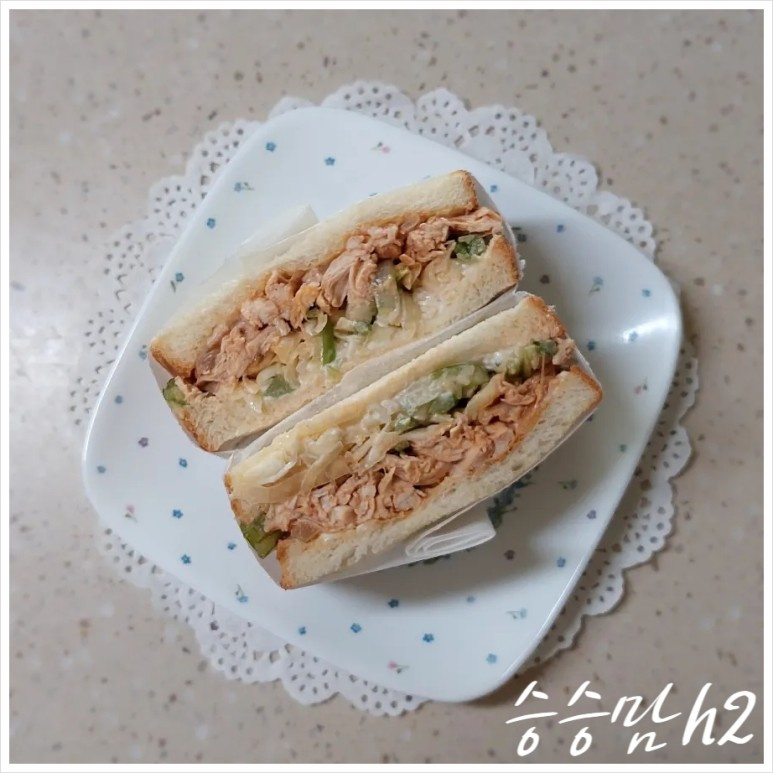
If you plan to eat it right away, cut the sandwich in half for easier handling. The cross-section revealing the delicious filling will look very appetizing.

Step 19
Now, let’s try a diagonal wrapping method that might save on parchment paper. The idea is that cutting diagonally might use less paper than a straight cut. I wonder if it works just as well?

Step 20
Cut a piece of parchment paper slightly larger than your sandwich. Instead of placing the sandwich in the center, position it slightly diagonally, almost like a diamond shape.

Step 21
Bring the diagonal corners of the parchment paper together over the center of the sandwich and fold them down neatly. Wrap it following the diagonal shape of the sandwich.

Step 22
Fold in the side edges of the parchment paper at the top, tucking them neatly into the space below, just like in the previous method.

Step 23
Fold the bottom part of the parchment paper inwards and tuck it securely into the folded top section. Ensure it’s tucked in well.

Step 24
Oh, it works! The diagonal wrap results in a similarly neat finish. This method seems to use less parchment paper and is quite convenient, making it a more efficient option. It’s perfect for kids’ picnic lunches or snacks!
