
Gourmet Butter Vanilla Cream Scones
How to Make Delicious Vanilla Cream Scones with Gourmet Butter

Today, I’m sharing a recipe for Vanilla Cream Scones. These scones are made with rich gourmet butter and filled generously with smooth vanilla cream. Perfect for a delightful homemade treat!
Scone Dough Ingredients- 140g Cake flour (for a tender crumb)
- 30g Granulated sugar (adjust to taste)
- Pinch of salt (enhances flavor)
- 3g Baking powder (for lift and fluffiness)
- 45g Cold unsalted gourmet butter, cut into cubes
- 30g Egg (room temperature)
- 40g Cold milk
- Egg wash (for brushing, made with remaining egg and milk in a 1:1 ratio)
Vanilla Cream Ingredients- 50g Cold heavy cream (dairy)
- 50g Cold vegetable whipping cream
- 12g Vanilla syrup (for sweetness and aroma)
- 50g Cold heavy cream (dairy)
- 50g Cold vegetable whipping cream
- 12g Vanilla syrup (for sweetness and aroma)
Cooking Instructions
Step 1
First, attach the blade to your food processor. Add 140g of cake flour and 3g of baking powder. Combining the dry ingredients helps prevent lumps.

Step 2
Add the 45g of cold unsalted gourmet butter, cut into cubes, to the food processor. Keeping the butter cold is crucial for a good scone texture.

Step 3
Using the ‘pulse’ function of the food processor, pulse in 1-2 second bursts. Continue until the butter is cut into small pieces resembling coarse meal, about 10-15 pulses. Be careful not to over-process, as this can melt the butter and affect the texture.

Step 4
Now, add 30g of sugar and a pinch of salt. Pulse a few more times to combine.

Step 5
Pulse about 5 times to incorporate the sugar and salt evenly into the flour and butter mixture.

Step 6
Add 30g of room temperature egg and 40g of cold milk. These liquids will help bind the dough.

Step 7
Pulse the food processor in short bursts of 2-3 seconds until the dough just comes together into a cohesive mass. Stop as soon as there are no dry streaks of flour. Overmixing can develop gluten, leading to tough scones.

Step 8
This is what your finished scone dough should look like – a nicely cohesive ball.

Step 9
Gently turn the scone dough out onto a silicone baking mat or a lightly floured surface. Handle the dough as little as possible.

Step 10
Using a scraper or your hands, lightly bring the dough together into a single mound. Avoid kneading; you want to preserve the flaky layers.

Step 11
To create the characteristic layers of a scone, use your scraper to cut the dough in half horizontally. Stack one half on top of the other, then cut vertically and stack again. Repeat this folding and stacking process about 3 times. This layering technique is key to achieving flaky scones.

Step 12
Wrap the layered dough tightly in plastic wrap and refrigerate for 40 minutes. This chilling step helps the butter firm up again, ensuring a better rise when baking. If you’re short on time, you can freeze it for 20 minutes.

Step 13
Once chilled, divide the dough into portions of approximately 70g each. Gently flatten each portion with your palm to form a round scone shape. Don’t flatten them too thinly, as this can result in hard scones.

Step 14
Place the shaped scone dough onto a baking sheet lined with parchment paper, leaving some space between each scone.

Step 15
Lightly brush the tops of the scones with egg wash. The egg wash was made by mixing leftover egg with milk in a 1:1 ratio. This will give the scones a beautiful golden-brown color when baked.

Step 16
Preheat your oven to 180°C (350°F) for 10 minutes. Bake at 180°C (350°F) for 20 minutes, then reduce the oven temperature to 180°C/175°C (350°F/347°F) and bake for another 10 minutes, totaling 30 minutes. (Adjust baking time and temperature according to your oven’s specifications.) Once baked, remove the scones from the oven and let them cool completely on a wire rack. They can be fragile when warm.

Step 17
Now, let’s make the vanilla cream. In a clean bowl, combine 50g of cold dairy heavy cream, 50g of cold vegetable whipping cream, and 12g of vanilla syrup.

Step 18
Using a hand mixer, whip the cream mixture until stiff peaks form. Start on low speed and gradually increase. The cream should hold its shape when you lift the beaters.

Step 19
Your vanilla cream is ready when lifting the mixer beaters creates a stiff peak that stands upright like a triangle. Be careful not to over-whip, as it can turn into butter.

Step 20
Once the scones have cooled completely, carefully slice them in half horizontally using a serrated knife.

Step 21
Generously fill the bottom half of each scone with the prepared vanilla cream. Using a piping bag makes it much easier to fill the scones evenly and neatly. Don’t be shy with the cream!

Step 22
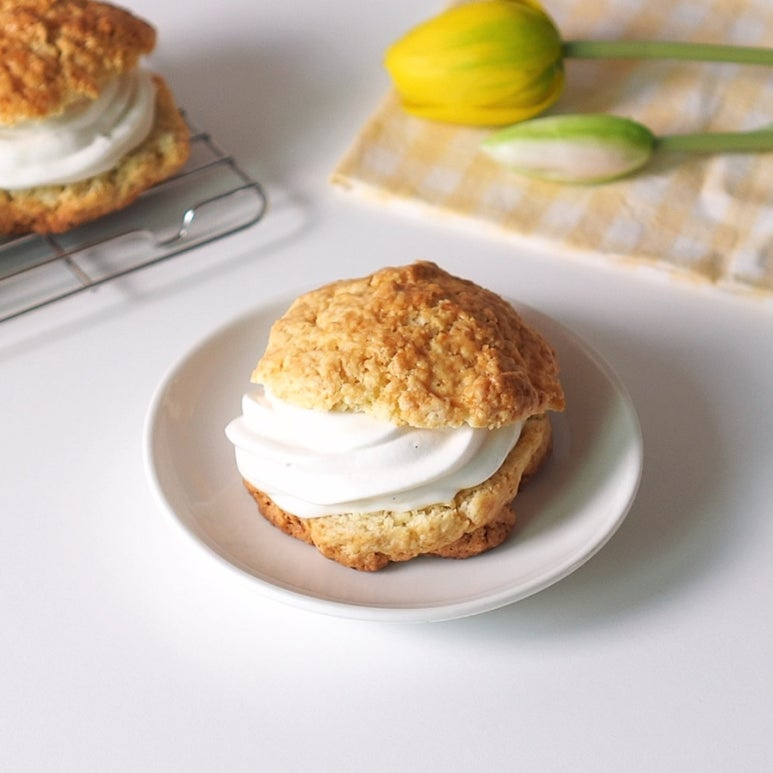
Place the top half of the scone back on to complete the sandwich. A little cream peeking out from the sides looks delightful.

Step 23
Finally, arrange your beautiful vanilla cream scones on a serving plate. Your delicious homemade dessert is ready to be enjoyed with a warm cup of coffee or tea!
