
Elegant Apple Bird Sculpture
Crafting a Beautiful Bird from Apple Slices

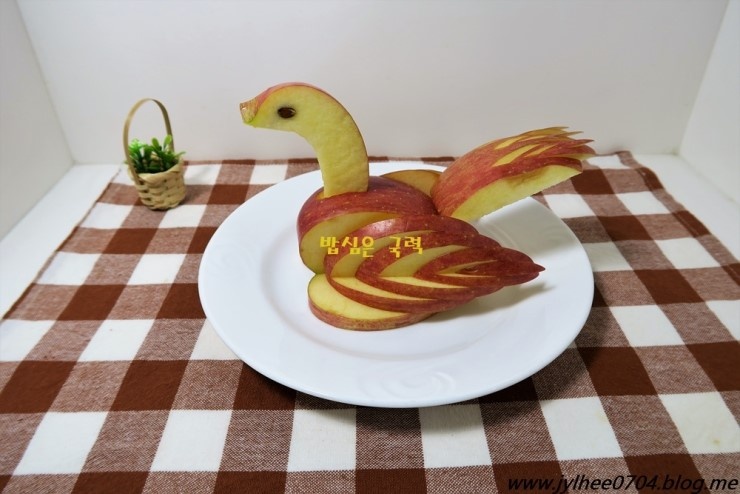
Hello there! As the saying goes, ‘Food is power.’ Apples are incredibly nutritious, packed with dietary fiber, pectin, vitamins, and various minerals, making them highly beneficial for weight management, preventing constipation, and reducing the risk of adult diseases and cancer. Enjoying an apple daily is a fantastic way to boost your health. Today, we’re going to transform this healthy and delicious fruit into a charming bird sculpture! Imagine placing this exquisite apple bird at the center of your dessert platter, perhaps complemented by other fruits – it makes for a stunning decorative centerpiece. Perfect for special occasions, home gatherings, or as a delightful and educational craft for kids. Let’s get started on creating this beautiful apple art!
Ingredients- 1 fresh apple (a red one will look most vibrant)
- 1 toothpick (or small skewer stick)
Cooking Instructions
Step 1
For the most visually appealing results, choose an apple with a deep, vibrant red skin. The brighter the skin’s color, the more striking your finished apple bird will be.

Step 2
Starting from the top of the apple (near the stem), make a flat cut about one-third of the way down. Aim to make the ‘body’ section slightly larger than the ‘head’ section; this slight difference in size helps create a stable and well-proportioned bird shape. The part with the red peel visible will form the bird’s body.

Step 3
Stand the apple piece that will form the body upright. Place two chopsticks vertically on either side of the apple piece, acting as guides. Carefully slice downwards along the outside of the chopsticks, creating deep cuts but ensuring the apple doesn’t split completely in the middle. This technique leaves the center intact and prepares the apple for shaping.

Step 4
Now, let’s craft the wings. On each of the cut sides of the apple, gently press the peel with the tip of your knife and push it inwards, creating thin, leaf-like shapes. This process will naturally form the bird’s wings as you carefully peel and shape the apple.

Step 5
Repeat the same wing-shaping process on the other side. Ensure both wings are symmetrical for a balanced and beautiful bird appearance. Take your time to refine the shapes.

Step 6
Using the remaining apple pieces, we’ll create the tail and the head. Divide these leftover apple sections into approximately three parts to prepare pieces for the tail, head, and a small support if needed.

Step 7
Hold a piece of apple against the body to gauge its size for the tail, then trim it accordingly. Carve the tip of this tail piece into a delicate three-part leaf shape using a paring knife. Next, cut a toothpick in half to create two smaller pieces for securing the tail.

Step 8
Insert one half of the cut toothpick into the trimmed tail piece. Then, carefully insert the other end of the toothpick into the back of the apple body. This will firmly attach the tail to the bird’s body, ensuring it stays in place.

Step 9
Now, it’s time to complete the head of our apple bird. Set the body and tail aside for a moment while you prepare the apple piece for the head.

Step 10
Select a suitable apple slice for the head. You can either cut a thin slice from the remaining apple and then shape it into a head, or use a small wedge. Once shaped, gently press two small apple seeds into the surface to serve as eyes. Alternatively, you can slice small pieces of apple skin to mimic eyes.

Step 11
Position the prepared head piece onto the front of the apple body. Using a toothpick tip or a small knife, carefully create a small indentation or hole where the head will be attached. Gently insert the head piece into this opening. Voila! Your charming apple bird sculpture is complete! It’s ready to be a beautiful addition to your fruit platter or as a delightful decorative piece.
