
Dinosaur Cookies: A Fun Baking Adventure
Make Your Niece/Nephew Smile with These Adorable Dinosaur Cookies!

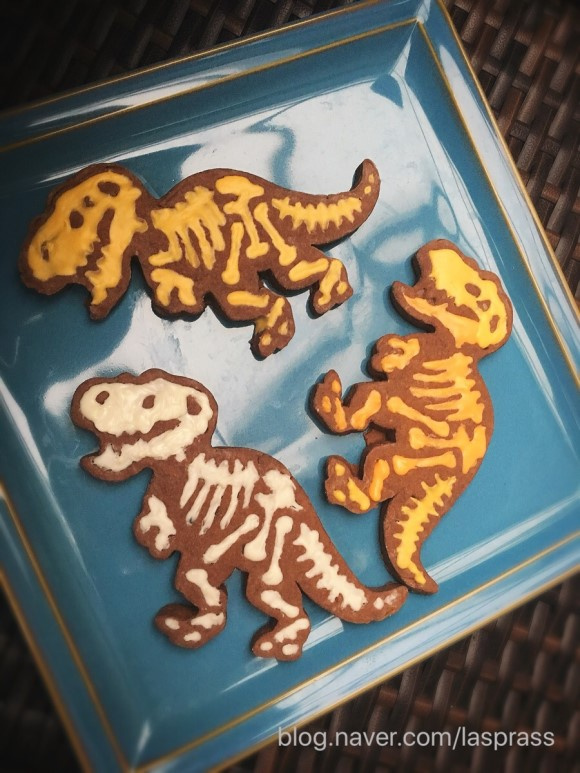
I created these charming dinosaur cookies to bring joy to my first niece/nephew! Dinosaurs are captivating for all kids, boys and girls alike. I’ve crafted incredibly realistic dinosaur-shaped cookies that are sure to be a hit.
Cookie Ingredients- Plain Cookie Mix 500g (convenient alternative to flour)
- Cocoa Powder 10g (for the chocolate dinosaur bones)
- 110g Butter, softened
- 55ml Milk
- 3 Egg Yolks
Cooking Instructions
Step 1
I’m using a plain cookie mix as a substitute for all-purpose flour, which makes the process much easier. This particular mix is from ‘Bread Garden’ and is great because it already contains sugar, so there’s no need to add extra.

Step 2
First, place the softened butter in a bowl. Then, add 3 egg yolks.

Step 3
Whisk the butter and egg yolks together until well combined. Next, add the milk and mix again. Finally, sift in the cookie mix and knead until a cohesive dough forms.

Step 4
See how simple it is? I added 10g of cocoa powder to the dough because I wanted to make the dinosaur bones in chocolate. You can adjust the amount of cocoa powder or omit it if you prefer.

Step 5
Once the dough is ready, wrap it tightly in plastic wrap or place it in an airtight container. Refrigerate for at least one hour. Chilling the dough makes it firmer and much easier to roll out and cut.

Step 6
Now, let’s get our cookie cutters ready! For this recipe, I’m using a ‘Tyrannosaurus Rex’ cutter because that’s my nephew’s absolute favorite. Using dinosaur shapes that kids love will make the baking process even more fun!

Step 7
After an hour in the fridge, take the dough out. Lightly dust your work surface with flour. Roll out the dough to an even thickness of about 0.5 cm. Use the dinosaur cutter to cut out the shapes, then use a bone-shaped cutter to imprint or cut overlapping shapes for a more dimensional look.

Step 8
Place the cut-out dinosaur cookies onto a baking sheet lined with parchment paper, leaving some space between them. Baking on parchment paper prevents sticking. Bake in a preheated oven at 180°C (350°F) for 15-20 minutes, or until the edges are lightly golden brown. Isn’t that easy?

Step 9
Your wonderfully baked dinosaur cookies are ready! They taste like a delicious chocolate butter cookie, loved by everyone, young and old. They make the perfect treat for kids!

Step 10
Once the cookies have cooled completely, prepare a chocolate piping bag or melted chocolate. Gently melt the chocolate in a double boiler or microwave, then carefully pipe it onto the cookie ‘bones’ to decorate. If you don’t have a piping bag, melted chocolate works just fine.

Step 11
Ta-da! Here are your fantastic dinosaur cookies! If you don’t have chocolate piping, you can also use icing or powdered sugar for a beautiful and tasty decoration. I was so happy with how much my nephew loved them, even though it was my first time making them! Thanks to this chocolate cutter, I’ve become the best aunt!

Step 12
If you have any leftover dough, don’t let it go to waste! You can use a mooncake mold, similar to how I made those cookies previously, to cut out more shapes.

Step 13
Bake the cookies made from the leftover dough just like the mooncake cookies. While they are still warm, brush them lightly with honey and sprinkle with sesame seeds for a delightful, nutty crunch. Make sure to utilize all your dough! I hope you enjoyed this recipe. Thank you!
