
Delicious Tuna Kimbap You Can Make at Home
Mastering Kimbap: A Step-by-Step Guide to Perfect Tuna Kimbap

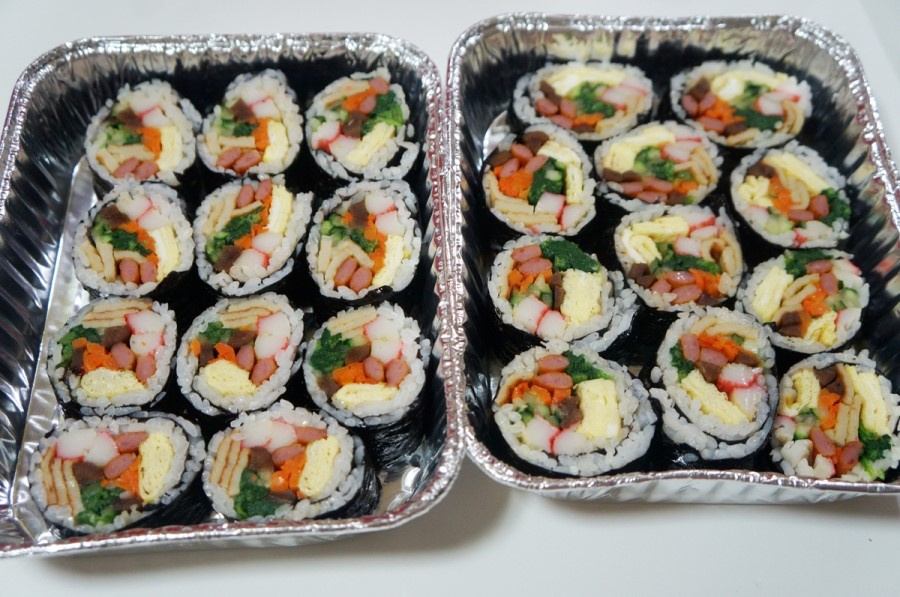
Are you hesitant to visit kimbap restaurants due to rising prices? Homemade kimbap is truly the best! I’ll guide you through making delicious basic kimbap and the ever-popular tuna kimbap that rivals restaurant quality. While preparing the ingredients might seem a bit tedious, rolling kimbap is surprisingly easy once you get started. Given the high cost of store-bought kimbap nowadays, you can make ten or even twenty rolls at home for the price of just a few. If you have the time, creating your own flavorful kimbap is incredibly rewarding!
Basic Ingredients- 10 sheets of dried seaweed for kimbap
- 2 cucumbers
- 2 carrots
- 1 bunch of spinach
- 100g ham (canned or long strips)
- 100g seasoned burdock root
- 4 rectangular fish cakes
- 150g imitation crab sticks
- 10 eggs
Cooking Instructions
Step 1
The beauty of homemade kimbap lies in the freedom to choose your ingredients! There are no strict rules, so feel free to use up any leftover vegetables or your favorite items from the fridge to create your unique kimbap. Whatever you include, it’s bound to be delicious!

Step 2
Slice the imitation crab sticks, fish cakes, and ham into long, thin strips suitable for kimbap. Lightly oil a pan and stir-fry them over medium-low heat until slightly golden. This process enhances their flavor and texture. You can also season the ham with a little soy sauce and sugar before frying for extra taste.

Step 3
Cut the cucumbers into long, thin strips, removing the seeds. Place them in a bowl, sprinkle generously with salt, and let them sit for about 15 minutes, turning them halfway through. After salting, rinse them lightly under cold water and squeeze out all excess moisture thoroughly. This step ensures the cucumber remains crisp and prevents the kimbap from becoming soggy. Slicing them a bit thicker is also fine.

Step 4
Julienne the carrots into strips similar in length and thickness to the cucumbers. Heat a little oil in a pan over medium heat and stir-fry the carrots until they are slightly tender. Be careful not to overcook them, as they can become mushy. Stir-frying brings out the carrots’ natural sweetness, adding depth to the kimbap.

Step 5
Thoroughly wash the spinach. Bring a pot of water to a boil with a pinch of salt, and blanch the spinach for just 1-2 minutes. Avoid overcooking, as it will become too soft. Immediately rinse the blanched spinach under cold water, squeeze out excess moisture, and season lightly with a dash of soy sauce or salt for enhanced flavor. Spinach is in season now, making it affordable and delicious – a perfect ingredient to use!

Step 6
The ‘egg garnish’ is a crucial element for delicious kimbap. A thick, golden-yellow egg omelet not only provides structure but also a lovely savory flavor, so it’s worth preparing a generous amount.

Step 7
In a bowl, whisk the eggs thoroughly. Lightly grease a non-stick pan heated over low heat. Pour in a thin layer of the egg mixture. Once the egg is mostly set, gently lift the edge and fold it in half. Cook briefly on the folded side. This method helps create a thicker omelet.

Step 8
Slide the folded omelet to one side of the pan. Pour another thin layer of egg mixture into the empty space and spread it out. Once this layer is set, fold it in half again. Repeating this process will result in a satisfyingly thick egg omelet. Using 10 eggs, you should be able to make about 2-3 omelets.

Step 9
Once the thick egg omelets are cooked, cut them into long strips, similar in size to the imitation crab sticks, ham, and pickled radish. This ensures visual harmony within the kimbap roll.

Step 10
Now, let’s prepare the star of our tuna kimbap! In a bowl, combine the well-drained canned tuna with 2-3 tablespoons of mayonnaise and mix well. Perilla leaves are also prepared; their refreshing aroma pairs wonderfully with the creamy tuna mixture.

Step 11
It’s time to season the warm rice that forms the base of our kimbap. Add salt, sesame oil, and toasted sesame seeds to the rice and mix gently until evenly combined. Use a spatula to fluff the rice and prevent it from clumping.

Step 12
Place a sheet of kimbap seaweed on a bamboo mat. Spread a thin, even layer of seasoned rice over about two-thirds of the seaweed sheet, leaving the top edge bare to help seal the roll. Arrange your prepared fillings neatly over the rice, centering them for easier rolling. You can layer the ingredients artfully.

Step 13
Here comes the crucial rolling technique! Using the bamboo mat, firmly press and roll the kimbap, tucking the ingredients inside. Lift the edge of the mat slightly as you roll forward, applying gentle pressure to create a compact roll.

Step 14
Be careful not to roll too tightly, as this can cause the seaweed to tear. Hold the mat with both hands, gently tightening the roll with steady pressure. Ensure evenness on both sides as you roll, picturing yourself tucking everything snugly inside. A firmly rolled kimbap will hold its shape and prevent ingredients from spilling out.

Step 15
Now, for the tuna kimbap. Lay a sheet of seaweed on the bamboo mat, spread a thin layer of rice over it, and place a perilla leaf on top. The perilla leaf helps absorb excess moisture from the tuna and adds a wonderful fragrance. Next, spoon the prepared tuna-mayo mixture evenly over the rice.

Step 16
Layer the other kimbap fillings (egg omelet, cucumber, carrot, ham, etc.) on top of the tuna mixture. Avoid overfilling, as this can cause the roll to burst. Roll firmly, just as you did with the basic kimbap, pressing gently to create a tight roll.

Step 17
Continue this rolling process, and you’ll soon find yourself with a generous batch of beautifully made kimbap. Don’t worry if your first few rolls aren’t perfect; practice makes perfect! You’ll soon be rolling ten or twenty kimbap with ease.

Step 18
Finally, brush the rolled kimbap with a little sesame oil for a glossy finish and sprinkle with toasted sesame seeds. To slice neatly without the rice sticking, lightly dampen a kimbap knife or a regular knife with water. Cut into your desired serving sizes and enjoy your homemade kimbap!
