
Delicious Homemade Napa Cabbage Kimchi
How to Make Delicious Napa Cabbage Kimchi for Holidays and Summer

This recipe makes it easy to prepare delicious Napa Cabbage Kimchi at home without the hassle of salting the cabbage yourself. While I used pre-salted cabbage for convenience, the taste is just as wonderful as traditional homemade kimchi. Having a jar of this well-fermented kimchi will surely make your dining table richer and more enjoyable. I’ve made it with a generous amount of broth, ensuring the seasoning distributes evenly and keeps the kimchi moist. You’ll have plenty to enjoy until the next kimchi-making season! The key is a flavorful broth, which adds depth and moisture, preventing the kimchi from drying out.
Kimchi Ingredients- 10kg Salted Napa Cabbage
- 1.5kg Radish
- 1 bunch Green Onions
- A little Leek
Kimchi Filling Ingredients (Pureed)- 500g Radish
- 1/2 Apple
- 1/2 Onion
- 1/2 Pear
- 2 Tbsp Shrimp Paste (heaping)
Sweet Rice Flour Paste- 3 cups Water
- 3 Tbsp Sweet Rice Flour
Broth Ingredients- 2 Dried Pollock Heads
- A little Dried Pollock Flakes
- 10g Dried Radish
- 3 Leeks
- 1/2 Onion
- 4 Liters Water
Kimchi Filling Seasoning- 4 cups Gochugaru (Korean Chili Flakes)
- 1/2 cup Minced Garlic
- 1 cup Fish Sauce (Anchovy)
- 2 Tbsp Fermented Anchovy Sauce
- 2 cups Prepared Broth
- 500g Radish
- 1/2 Apple
- 1/2 Onion
- 1/2 Pear
- 2 Tbsp Shrimp Paste (heaping)
Sweet Rice Flour Paste- 3 cups Water
- 3 Tbsp Sweet Rice Flour
Broth Ingredients- 2 Dried Pollock Heads
- A little Dried Pollock Flakes
- 10g Dried Radish
- 3 Leeks
- 1/2 Onion
- 4 Liters Water
Kimchi Filling Seasoning- 4 cups Gochugaru (Korean Chili Flakes)
- 1/2 cup Minced Garlic
- 1 cup Fish Sauce (Anchovy)
- 2 Tbsp Fermented Anchovy Sauce
- 2 cups Prepared Broth
- 2 Dried Pollock Heads
- A little Dried Pollock Flakes
- 10g Dried Radish
- 3 Leeks
- 1/2 Onion
- 4 Liters Water
Kimchi Filling Seasoning- 4 cups Gochugaru (Korean Chili Flakes)
- 1/2 cup Minced Garlic
- 1 cup Fish Sauce (Anchovy)
- 2 Tbsp Fermented Anchovy Sauce
- 2 cups Prepared Broth
Cooking Instructions
Step 1
Once you receive the salted Napa cabbage, immediately turn it upside down to drain excess water.

Step 2
For a refreshingly cool kimchi, prepare the radish: use about 500g for pureeing and the remaining 1kg for julienning. Pureeing radish, rather than just julienning it, makes the kimchi broth exceptionally refreshing and flavorful – a tip that never disappoints!

Step 3
In a blender, combine the 500g of pureed radish with 1/2 apple, 1/2 onion, 1/2 pear, 1 piece of ginger, and 2 heaping tablespoons of shrimp paste. Blend until smooth. The fruits add sweetness and a cooling sensation, while the shrimp paste enhances the umami flavor.

Step 4
To the pureed ingredients, add a generous amount of minced garlic and the prepared sweet rice flour paste. Mix well until everything is thoroughly combined. The sweet rice flour paste helps to thicken the kimchi filling and mellow its texture.

Step 5
Now, let’s make the spicy seasoning that defines the kimchi’s taste. Mix in 2 tablespoons of fermented anchovy sauce, 2 cups of the prepared broth, and 4 cups of gochugaru (Korean chili flakes). Stir until well combined. Allowing the seasoning mixture to rest for about 30 minutes will deepen its flavor and enhance its beautiful color. (Tip: It’s helpful to make extra broth in advance.)

Step 6
Since this kimchi is intended to be eaten soon, julienne the radish finely, like noodles. This is different from the coarser cut for winter kimchi meant for long storage. Fine shreds allow the seasoning to penetrate better and result in a tender texture.

Step 7
With 1kg of finely julienned radish and the prepared leeks and green onions, the preparation of the kimchi filling ingredients is almost complete. All that’s left is to stuff the cabbage leaves!

Step 8
Add the finely julienned radish to the seasoning mixture that has been resting for 30 minutes and is now a beautiful color. Mix gently until the radish is well coated. You’ll notice the color becoming even richer as the radish blends with the seasoning.

Step 9
Once the radish and seasoning are well combined, add the chopped green onions and leeks. Stir them in. Now is the time to taste a piece of cabbage leaf to adjust the overall seasoning. If the cabbage is too salty, make the filling slightly less salty, and if it’s too bland, add a little more seasoning. Adjust the final taste with coarse sea salt if needed.

Step 10
Carefully spread the prepared kimchi filling between the Napa cabbage leaves. It’s best to coat the leaves rather than stuffing them excessively, ensuring the seasoning distributes evenly for a delightful bite. (Tip: This delicious filling is so good, you might find yourself snacking on it!)

Step 11
Arrange the beautifully stuffed kimchi neatly into a kimchi container. Filling a container this full brings a sense of satisfaction and preparedness.

Step 12
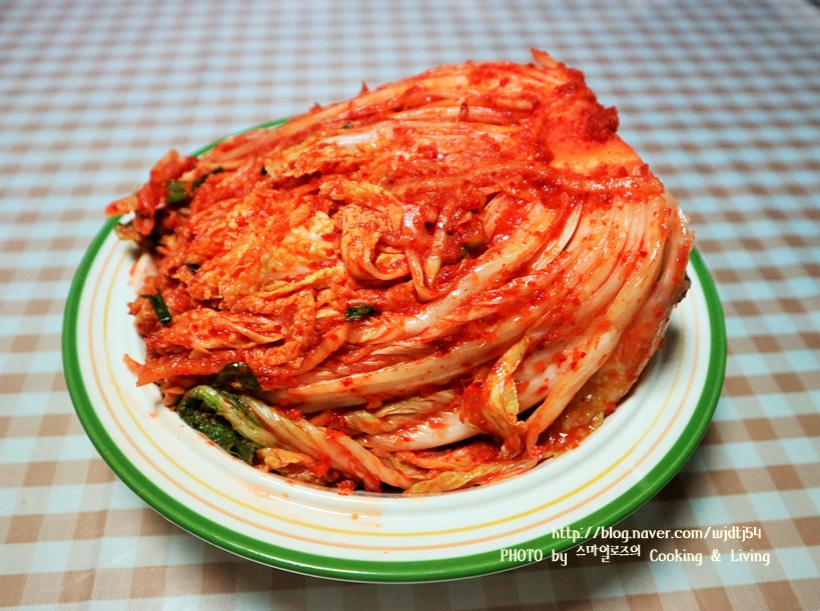
I’ve plated a portion of the kimchi right after packing it. Look how vibrant and appetizing the color is! Enjoy the fresh, crisp taste.
