
Crispy Young Radish and Green Cabbage Kimchi
Easy and Refreshing Yeolmu and Eolgari Kimchi Recipe

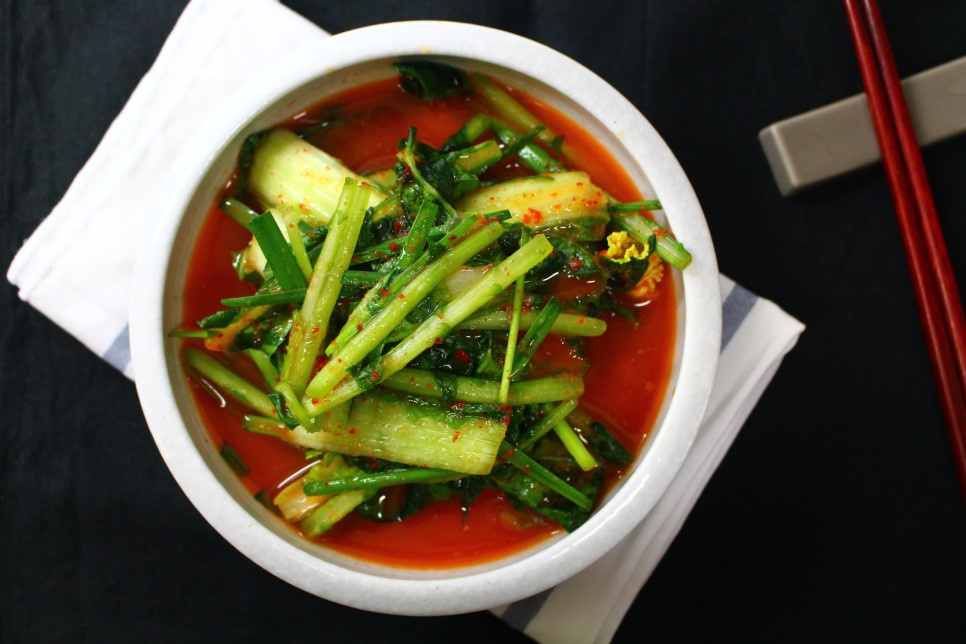
Say goodbye to your side dish worries! Make a batch of homemade Yeolmu and Eolgari Kimchi and delight your whole family. This kimchi, with its refreshing and spicy broth and crisp texture, is a perfect match for bibimbap or noodles. Generous amounts of red chili peppers add a pleasant heat that opens up your palate, offering a deep, invigorating flavor. The beautifully red, fermented kimchi juice is a delicacy in itself.
Anchovy-Kelp Broth Preparation- 5 sheets dried kelp (approx. 5×5 cm)
- 15g dried anchovy
- 3L water
Starch Paste Cooking- Anchovy-Kelp Broth 3L
- 5 Tbsp glutinous rice flour or all-purpose flour
Kimchi Seasoning Mixture- 6 Tbsp Korean chili powder (gochugaru)
- 5 Tbsp minced garlic
- 1 Tbsp minced ginger
- 1 medium onion
- 5 Tbsp fish sauce (e.g., anchovy or sand lance)
- 3 Tbsp salted shrimp (finely minced)
- 1/4 cup (approx. 50ml) plum extract or syrup
- 2 Tbsp sugar
- 1/4 cup (approx. 50g) coarse sea salt
- Anchovy-Kelp Broth 3L
- 5 Tbsp glutinous rice flour or all-purpose flour
Kimchi Seasoning Mixture- 6 Tbsp Korean chili powder (gochugaru)
- 5 Tbsp minced garlic
- 1 Tbsp minced ginger
- 1 medium onion
- 5 Tbsp fish sauce (e.g., anchovy or sand lance)
- 3 Tbsp salted shrimp (finely minced)
- 1/4 cup (approx. 50ml) plum extract or syrup
- 2 Tbsp sugar
- 1/4 cup (approx. 50g) coarse sea salt
Cooking Instructions
Step 1
Trim the roots and any wilted outer leaves of the Eolgari (green cabbage). Wash thoroughly.

Step 2
Cut the tougher stems of the Eolgari into 2-3 sections, and chop the leafy parts into bite-sized pieces. Be careful not to cut them too small, as they might become mushy.

Step 3
Trim the muddy roots of the Yeolmu (young radish). Cut thicker stems in half and leave thinner ones as they are. If there are radish bulbs, cut them into quarters.

Step 4
Remove any withered leaves or yellowing ‘rice sprout’ leaves from the Yeolmu. Cut the stalks into segments of about 7-8 cm. Pieces that are too long can be difficult to mix.

Step 5
Place the prepared Yeolmu and Eolgari in a large bowl. Pour 1 liter of water over them to moisten the vegetables. This step helps to soften the vegetables before salting.

Step 6
Evenly sprinkle about 3/4 cup of coarse sea salt (approx. 150g) over the moistened vegetables. Let them salt for about 1 hour, turning them over 2-3 times during this period to ensure even salting. After salting, gently squeeze out excess water.

Step 7
In a pot, combine 2.5 liters of water, 5 pieces of kelp, and 15g of dried anchovies. Bring to a boil. Once boiling, remove the kelp immediately to prevent bitterness. Continue to simmer for about 10 more minutes to extract the anchovy flavor. Strain the broth and let it cool completely.

Step 8
In a small saucepan, whisk together 500ml of water and 5 Tbsp of glutinous rice flour or all-purpose flour until smooth. Cook over low heat, stirring constantly, until the mixture thickens into a smooth paste. Let it cool completely. If the paste is too thin, the kimchi will not be crisp; if too thick, it may taste bitter.

Step 9
In a blender or food processor, combine 1 Tbsp minced ginger, 1 peeled medium onion (roughly chopped), red and green chili peppers (seeds removed, roughly chopped), 5 Tbsp minced garlic, 5 Tbsp fish sauce, and 3 Tbsp finely minced salted shrimp.

Step 10
Use the ‘pulse’ or ‘chop’ function to process the ingredients into a coarse paste. Avoid making it completely smooth; a little texture is desirable.

Step 11
Rinse the salted Yeolmu and Eolgari 5-6 times under cold running water to remove any grit or excess salt. Drain them well in a colander for about 20 minutes. (Tip: Be thorough with washing, as these vegetables can retain a lot of soil.)

Step 12
In a large bowl, add the drained Yeolmu and Eolgari. Add thinly sliced onion (about 1cm thick). Optionally, you can add leek or chives cut into 6cm lengths.

Step 13
Pour the cooled starch paste into the bowl with the vegetables and other ingredients. The starch paste adds a smooth texture and enhances the umami flavor of the kimchi.

Step 14
Add the blended seasoning mixture from step 9. Season with 1/4 cup of coarse sea salt (approx. 50g) to taste. Stir in 1/4 cup of plum extract and 2 Tbsp of sugar for sweetness and depth of flavor. Adjust the overall seasoning.

Step 15
Gently mix all the ingredients and seasoning together with your hands. Avoid kneading or pressing too hard, as this can bruise the vegetables and make them mushy.

Step 16
Once everything is evenly combined, pack the kimchi tightly into an airtight container. Press down firmly to minimize air pockets.

Step 17
Let the kimchi ferment at room temperature for about one day, then store it in the kimchi refrigerator to chill. Enjoy the refreshing, slightly sour taste that complements any meal!
