
Crispy Radish Greens Kimchi Made with Thinned Radishes
Recipe for Healthy and Delicious Radish Greens Kimchi Using Thinned Radishes Grown in Our Garden

Try making delicious kimchi with fresh radish greens from the thinned radishes left after making dongchimi! This radish greens kimchi boasts a wonderfully crisp texture and deep flavor, made using fresh radishes and their greens directly from the garden. While they’re great for drying into sigeumchi (seasoned dried radish greens), today we’ll make a special kimchi. The unique seasoning, using rice and broth instead of a glutinous rice paste, will enhance the kimchi’s flavor, making it richer and more profound. This specialty kimchi can be stored in your kimchi refrigerator and enjoyed for a long time.
Kimchi Ingredients- 2 bundles of thinned radishes (with fresh greens)
- 1 cup coarse sea salt (approx. 200g)
- 1 liter water
- 20 Tbsp chili powder (approx. 100g)
- 1 medium onion
- 20 cloves garlic (approx. 100g)
- 1 piece ginger (about 1/3 the size of garlic)
- 2 Tbsp plum extract (maesilcheong)
- 25 Tbsp anchovy sauce (approx. 125ml)
- 3 Tbsp cooked rice (used instead of glutinous rice paste)
- 3 cups kelp and anchovy broth (made by simmering dried anchovies and kelp)
Cooking Instructions
Step 1
Introducing the fresh thinned radishes harvested directly from the garden. These radishes were planted specifically to use their greens for kimchi. The greens can be dried to make ‘sigeumchi’, but today we’ll use them fresh to make delicious kimchi. The radishes themselves are small and perfect for making ‘dongchimi’ (water kimchi).

Step 2
It seems we thinned the radishes a bit late, as they’ve grown quite a bit. There’s a mix of sizes. Some are robust, while others are still small, but all are suitable for making kimchi.

Step 3
Remove any yellowing or wilted leaves from the radish greens. Then, trim off the very tips of the green leaves to maintain their freshness.

Step 4
Cut off the thin, root-like fibers from the bottom of the radish. Then, starting from the top where the greens are attached, use a knife to scrape off the skin, cleaning the radish thoroughly. It’s best to peel thinly to preserve the radish’s natural sweetness.

Step 5
We’ll prepare the cleaned radish greens in two ways. First, the sturdier greens attached to the radishes for kimchi. Second, the tender young leaves that can be blanched and seasoned later. Separating them like this makes cooking more convenient.

Step 6
Cut the radishes lengthwise into 4 to 6 pieces, depending on their size. Cutting them too small might make them mushy when cooked, so keeping them in larger pieces will help maintain their crispiness.

Step 7
Cut the radish greens into manageable lengths of about 5-6 cm. Wash the trimmed greens thoroughly under running water to remove any dirt and gently pat them dry. Ensure they are clean and ready for the next step.

Step 8
In a large bowl or kimchi container, place a layer of the washed, still slightly moist radish greens at the bottom. Sprinkle about 1 tablespoon of coarse sea salt evenly over this layer. Add another layer of radish greens, then sprinkle more salt. Repeat this process, layering and salting, to ensure the salt is evenly distributed.

Step 9
Carefully and gently sprinkle 1 liter of water over the salted greens, ensuring it distributes evenly without washing away the salt. This amount of greens, from 2 bundles of thinned radishes, will be salted with 1 cup of coarse sea salt for about 2 hours. Remember to flip the greens halfway through the salting process for even results. This quantity is roughly equivalent to two bundles of radish greens you might find at a market.

Step 10
After 2 hours of salting, I grab a handful of the thinned radishes. They yield about 14 handfuls. I measure them this way to accurately determine the amount of seasoning needed, especially the anchovy sauce.

Step 11
Rinse the salted radishes and greens 2-3 times under running water to remove excess salt. Drain them thoroughly in a colander. It’s important to remove as much water as possible to prevent the kimchi from becoming too diluted.

Step 12
Transfer the drained radish greens and radishes to a large bowl. Add the 20 tablespoons of chili powder and mix gently with your hands, ensuring the powder is evenly coated and doesn’t clump. It’s crucial that every piece of greens gets coated with the chili powder.

Step 13
In a blender, combine 1 roughly chopped onion, 20 cloves of garlic, 1 piece of ginger, 2 tablespoons of plum extract, and 25 tablespoons of anchovy sauce. Blend until smooth. This pureed mixture will create a smoother texture and distribute flavors more evenly.

Step 14
Pour the blended seasoning mixture over the radish greens and radishes that have been coated with chili powder. Ensure the beautiful red color coats the greens.

Step 15
Prepare the ‘paste’ by using 3 tablespoons of cooked rice and 3 cups of kelp and anchovy broth. First, add the rice and a small amount of broth to the blender and blend until very smooth. Add more broth gradually to prevent the rice from clumping. Then, add the remaining broth and blend again until smooth. This rice mixture will act as a binder, similar to glutinous rice paste, adding body and umami to the kimchi.

Step 16
Pour the blended rice mixture into the bowl containing the radish greens, radishes, and seasoning. Now, mix everything thoroughly with your hands, ensuring all ingredients are well combined. Kneading firmly helps the seasonings penetrate the greens and radishes, making the kimchi more flavorful.

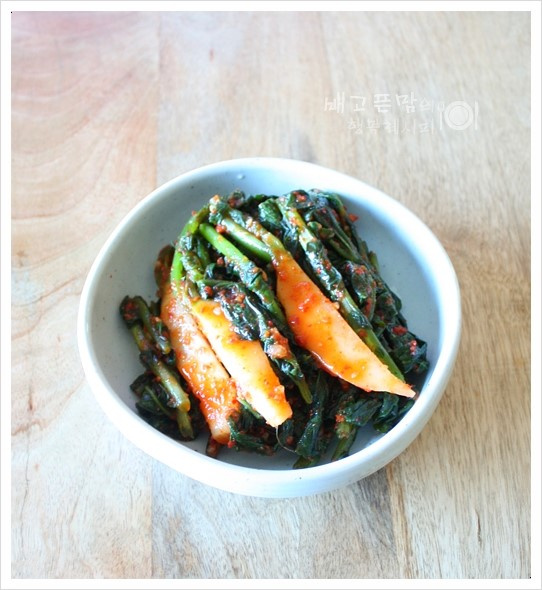
Step 17
The radish greens kimchi is ready! You’ll notice the volume has significantly reduced compared to the initial amount, due to the salting and mixing. Pack the finished kimchi tightly into a kimchi container. Let it sit at room temperature for about a day, then store it in your kimchi refrigerator. If you prefer it spicier and more fermented, you can leave it at room temperature for 2-3 days before refrigerating, and it will develop a rich flavor quickly.
