
Crispy Grilled Rice Balls: Yaki Onigiri
Making Savory Tuna-Mayonnaise Yaki Onigiri with Kawaji No. 1 Rice

Gyeonggi-do’s native rice varieties include three types: Matdeurim, Chamdeurim, and Kawaji No. 1. Chamdeurim is favored for its nutty flavor and soft texture, making it suitable for everyday rice, bibimbap, and porridge. Matdeurim boasts a rich aroma, sweet aftertaste, and chewy texture, perfect for dishes with strong flavors. Kawaji No. 1 is a medium-sticky rice with a soft texture, ideal for gimbap and lunch boxes. You can achieve a wonderfully sticky rice without adding glutinous rice! Normally, I always cook white rice with glutinous rice, but using only Kawaji No. 1 rice results in a soft, nutty, and wonderfully sticky rice that’s perfect for making gimbap and onigiri.
Ingredients- Cooked Rice
- Canned Tuna
- Mayonnaise, 2 Tbsp
- Cheongyang Peppers, 1-2 (finely chopped)
Seasoning (Sauce)- Soy Sauce, 2 Tbsp
- Mirin (Rice Wine), 1 Tbsp
- Oligosaccharide, 1 Tbsp
- Soy Sauce, 2 Tbsp
- Mirin (Rice Wine), 1 Tbsp
- Oligosaccharide, 1 Tbsp
Cooking Instructions
Step 1
To showcase the stickiness of Kawaji No. 1 rice, I opted not to use glutinous rice this time and added a little barley instead. Rinse the rice thoroughly, place it in your rice cooker, and press the ‘cook’ button to make rice. (Tip: For firmer rice grains suitable for onigiri, use slightly less water than usual when cooking.)

Step 2
Even without glutinous rice, the rice turns out glossy, sticky, and moist. Let the freshly cooked rice cool slightly before proceeding.

Step 3
First, let’s make the delicious sauce to brush onto the yaki onigiri. Combine soy sauce, mirin, and oligosaccharide in a 2:1:1 ratio. (For example: 2 Tbsp soy sauce, 1 Tbsp mirin, 1 Tbsp oligosaccharide). This ratio creates a harmonious sweet and savory flavor.

Step 4
Drain the oil thoroughly from the canned tuna and place the tuna flakes in a bowl. Add the finely chopped Cheongyang peppers and 2 tablespoons of mayonnaise, then mix well. (Tip: If you like it spicier, increase the amount of Cheongyang peppers. For a milder version for children, you can omit the peppers and add corn kernels or finely diced carrots instead.)

Step 5
While the spicy tuna-mayonnaise filling and the sauce are being prepared, gently stir the warm cooked rice and let it cool down to a manageable temperature. The rice should be warm but not too hot to handle, as very hot rice is difficult to shape, and cold rice won’t stick together well.

Step 6
Take a portion of the slightly cooled rice and roll it into a ball. Then, flatten it gently with your palm. Create a well in the center, similar to how you would shape a songpyeon (Korean rice cake), and fill it generously with the prepared tuna-mayonnaise mixture. Carefully enclose the filling with the rice, shaping it into a compact ball or flattened disc to prevent the filling from leaking out.

Step 7
Shape the onigiri as desired. You can flatten it gently with your palms for a round, flat shape, or use your thumb and index finger to press the sides, creating a more traditional triangular onigiri shape.

Step 8
Lightly oil a frying pan and heat it over medium-low heat. Place the shaped rice balls in the pan and grill them until golden brown on all sides, including the edges. Be careful not to burn them by cooking over high heat, which can make them hard and overly browned like burnt rice (nurungji). Ensure there’s enough space between the rice balls to prevent them from sticking together.

Step 9
Once the exterior of the rice balls is golden brown, use a brush to evenly coat both sides with the prepared soy sauce mixture. Since the soy sauce mixture can burn easily, reduce the heat to low. Grill for a short time on each side until the sauce is slightly caramelized, being careful not to let it burn. Watch closely as the sauce can char quickly.

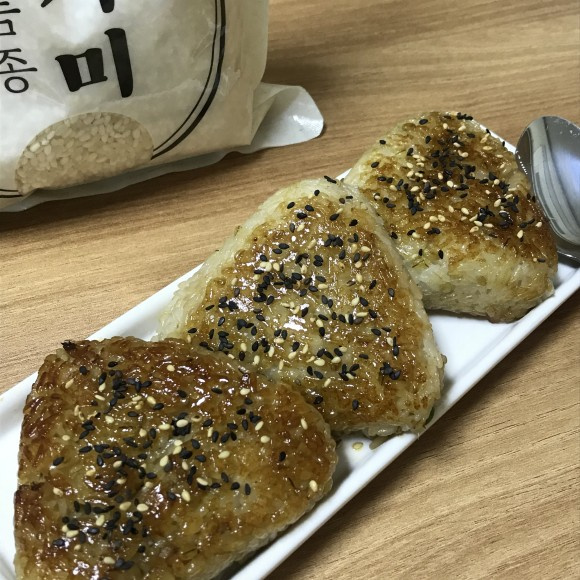
Step 10
Arrange the beautifully grilled yaki onigiri on a plate. For a decorative touch, sprinkle with black sesame seeds and toasted sesame seeds. Your delicious yaki onigiri are now complete! They are best enjoyed warm.
