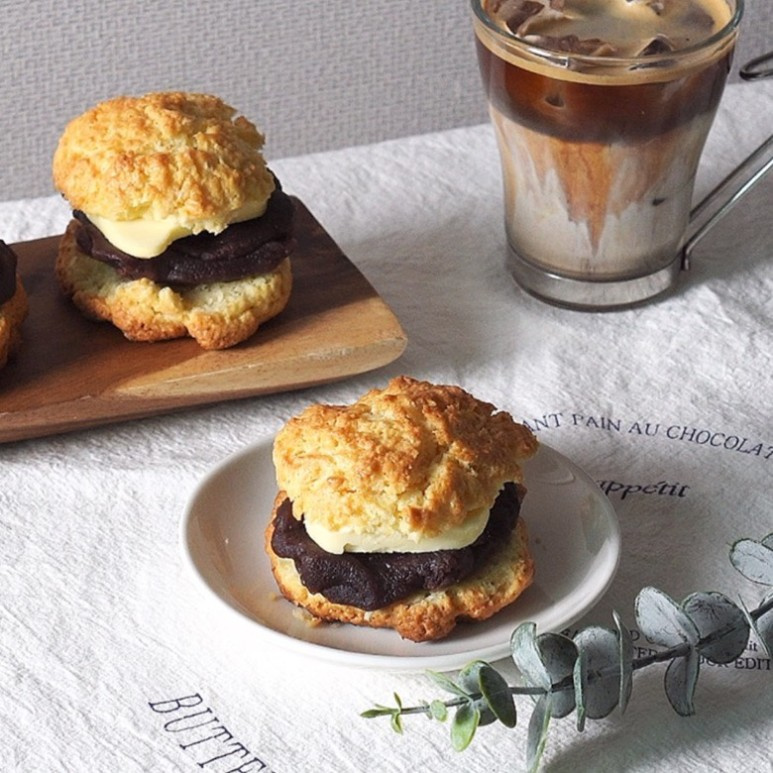
Crispy & Creamy Red Bean Butter Scones
The Ultimate Red Bean Butter Scone Recipe

Today, I’m excited to share a fantastic recipe for Red Bean Butter Scones! These scones boast a delightful contrast of textures: a crispy exterior and a tender, moist interior, complemented by the sweet, savory combination of red bean paste and rich butter. Perfect for an afternoon treat or a special breakfast!
Scone Dough Ingredients- 140g cake flour (sifted)
- 30g granulated sugar
- A pinch of salt (about 1g)
- 3g baking powder
- 45g cold unsalted butter (cut into small cubes)
- 30g egg (lightly beaten)
- 40g cold milk
- A little egg wash (or milk) for brushing
Red Bean Butter Filling Ingredients- Red bean paste (anko) to your desired amount
- Unsalted butter to your desired amount (can be the same amount as red bean paste, or to taste)
- Red bean paste (anko) to your desired amount
- Unsalted butter to your desired amount (can be the same amount as red bean paste, or to taste)
Cooking Instructions
Step 1
In a food processor bowl, combine the sifted cake flour (140g), baking powder (3g), and the cold unsalted butter (45g) that has been cut into small cubes. Using cold butter is key to achieving a wonderfully flaky and crispy scone.

Step 2
Pulse the food processor for about 2-3 seconds at a time, repeating the process. Continue until the butter is broken down into pieces the size of small peas. (If rubbing the butter in by hand, work quickly to prevent it from melting.)

Step 3
Add the granulated sugar (30g) and a pinch of salt to the mixture and pulse a few more times to combine.

Step 4
Pulse the mixture again about 3-5 times to ensure the dry ingredients are mixed with the sugar and butter pieces. Be careful not to over-process, as this can melt the butter and affect the scone’s texture.

Step 5
Pour in the beaten egg (30g) and cold milk (40g) to start forming the dough.

Step 6
Stop the food processor once the ingredients start to clump together and form a cohesive mass. You don’t need to see a perfectly smooth dough; just ensure there are no dry flour spots and it’s beginning to come together. Overworking the dough develops gluten, leading to tough scones.

Step 7
Turn the dough out onto a lightly floured surface or a silicone mat. Use a spatula or bench scraper to gently gather it into a single ball. Avoid kneading or pressing down too hard.

Step 8
Using your bench scraper, make diagonal cuts across the surface of the dough, then fold it over itself. Repeat this process (one fold in one direction, then one fold in the perpendicular direction) about 3 times. This layering creates the beautiful texture inside the scones.

Step 9
Shape the dough into a flat rectangle, wrap it tightly in plastic wrap, and refrigerate for at least 40 minutes. Chilling the dough makes it easier to handle and ensures a crispier bake.

Step 10
Once chilled, divide the dough into portions of approximately 72g each. (You can adjust the size according to your preference.)

Step 11
Gently press each portion of dough into a round, slightly flattened scone shape. Aim for a moderate thickness, as making them too thin can result in dry, hard scones. Place them on a baking sheet lined with parchment paper, leaving some space between each scone.

Step 12
Brush the tops of the scones with egg wash (or milk) for a lovely golden color and a slight sheen once baked.

Step 13
Time to bake! Preheat your oven to 180°C (350°F). Bake for 20 minutes at 180°C. Oven temperatures can vary, so you might need to adjust slightly. For example, after preheating to 180°C/180°C, bake at 180°C/175°C for 20 minutes, then potentially increase to 180°C/180°C for another 10 minutes, depending on your oven’s performance.

Step 14
Once baked to a golden brown, carefully remove the scones from the oven and place them on a wire rack to cool completely. They will be soft when warm, but cooling allows their signature crispiness to develop.

Step 15
When the scones are fully cooled, use a serrated knife to carefully slice each one in half horizontally.

Step 16
Place the bottom half of a scone on your serving plate. Keep the top half aside.

Step 17
Generously spread the red bean paste onto the cut side of the bottom scone half. Then, arrange slices of cold unsalted butter on top of the red bean paste. You can also mix the butter into the red bean paste if you prefer, but placing it on top offers a lovely contrast.

Step 18
Gently place the reserved scone top back onto the filled bottom half, enclosing the red bean paste and butter filling. Be careful not to press down too hard.

Step 19
And there you have it – your delicious Red Bean Butter Scones, featuring a perfect crunch, a tender crumb, and the delightful sweet and buttery filling! Enjoy every bite!


