
Crispy and Savory Fried Flounder with Tangy and Sweet Vegetable Seaweed Salad
[Fresh Korean Flounder] A Truly Special Dish! Fried Flounder Paired with a Sweet and Sour Vegetable Seaweed Salad

Fragrant with perilla leaves, this Korean-style fried flounder is incredibly crispy on the outside and tender on the inside. Served with a sweet and tangy sauce and a medley of fresh vegetables, it’s a dish that will have you giving it a big thumbs up! It’s also an elegant option perfect for entertaining guests.
Main Ingredients- 1/2 Korean Flounder
- 3 Perilla Leaves
- 2 Mini Bell Peppers
- 1/2 Onion
- 1 Tbsp Dried Seaweed (cut)
- 1/2 Cucumber
Batter and Vegetable Toppings- 5 Scallions
- 2 Perilla Leaves
Flounder Frying Batter- 6 Tbsp Sticky Flour (Chalmilgaru)
- 2.5 Soju Cups Cold Water
- 1 Pinch Salt
Sweet and Tangy Sauce- 4 Tbsp Soy Sauce
- 2 Tbsp Plum & Ginger Rice Wine (Maesilsaenggang Mat-sul)
- 1 Tbsp Oligodang (Korean corn syrup)
- 1/2 Tbsp Minced Garlic
- 2 Tbsp Vinegar
- 5 Scallions
- 2 Perilla Leaves
Flounder Frying Batter- 6 Tbsp Sticky Flour (Chalmilgaru)
- 2.5 Soju Cups Cold Water
- 1 Pinch Salt
Sweet and Tangy Sauce- 4 Tbsp Soy Sauce
- 2 Tbsp Plum & Ginger Rice Wine (Maesilsaenggang Mat-sul)
- 1 Tbsp Oligodang (Korean corn syrup)
- 1/2 Tbsp Minced Garlic
- 2 Tbsp Vinegar
- 4 Tbsp Soy Sauce
- 2 Tbsp Plum & Ginger Rice Wine (Maesilsaenggang Mat-sul)
- 1 Tbsp Oligodang (Korean corn syrup)
- 1/2 Tbsp Minced Garlic
- 2 Tbsp Vinegar
Cooking Instructions
Step 1
Prepare the fresh Korean flounder, bursting with vitality. Its chewy texture makes it excellent for frying.

Step 2
I chose this fresh flounder directly from the fish market. Fresh ingredients are key to delicious food!

Step 3
Carefully skin the flounder and cut it into fillets for easy handling. We’ll save the bones and head for frying too.

Step 4
First, let’s prepare the vegetables. Wash the cucumber, peel it, and slice it into bite-sized pieces (about 0.5 cm thick). Cut the mini bell peppers in half, remove the seeds, and slice them into thin strips. Soak the dried seaweed in cold water until softened, then rinse thoroughly and squeeze out any excess water. Thinly slice the onion and also thinly slice the perilla leaves for added fragrance. (Feel free to add other vegetables like carrots or red cabbage!)

Step 5
Now, let’s make the sweet and tangy sauce. In a bowl, combine 4 Tbsp soy sauce, 2 Tbsp plum & ginger rice wine, 1 Tbsp oligodang, 1/2 Tbsp minced garlic, and 2 Tbsp vinegar. Whisk everything together until well combined. This sauce will elevate the flavor of the fried flounder.

Step 6
Time to make the frying batter. In a large bowl, add 6 Tbsp of sticky flour and a pinch of salt. Pour in 2.5 soju cups of cold water. It’s crucial to mix this well with a whisk until there are no lumps, ensuring a smooth batter. Avoid lumps for a perfectly crispy coating.

Step 7
Finely chop the perilla leaves and scallions to add fragrance to the batter.

Step 8
Stir these chopped ingredients into the batter until evenly distributed. This step adds a delightful aroma and subtle color to the fried coating.

Step 9
Once all preparations are complete, take the flounder from the refrigerator and cut it into bite-sized pieces (about 2-3 cm). Cutting them too small might cause them to break apart during frying, so aim for a moderate size.

Step 10
Dip the cut flounder pieces into the flour batter, ensuring they are evenly coated. Don’t make the coating too thick; just enough to cover the fish.

Step 11
Heat your frying oil to around 170-180°C (340-350°F). Carefully place the battered flounder pieces into the hot oil, one by one. Be mindful of the oil temperature: too low and the fish will be greasy, too high and it will burn on the outside before cooking through.

Step 12
Fry the flounder until it turns golden brown and the outside becomes wonderfully crispy. Flip them occasionally to ensure even cooking. Listen for that satisfying ‘crisp’ sound!

Step 13
Once golden and crispy, remove the fried flounder from the oil using a slotted spoon or strainer, allowing excess oil to drain off. You can also place them on paper towels.

Step 14
If you have leftover frying oil, now is the time to fry the flounder’s head and bones until they are also crispy. This way, nothing goes to waste, and you can enjoy every part of the fish!

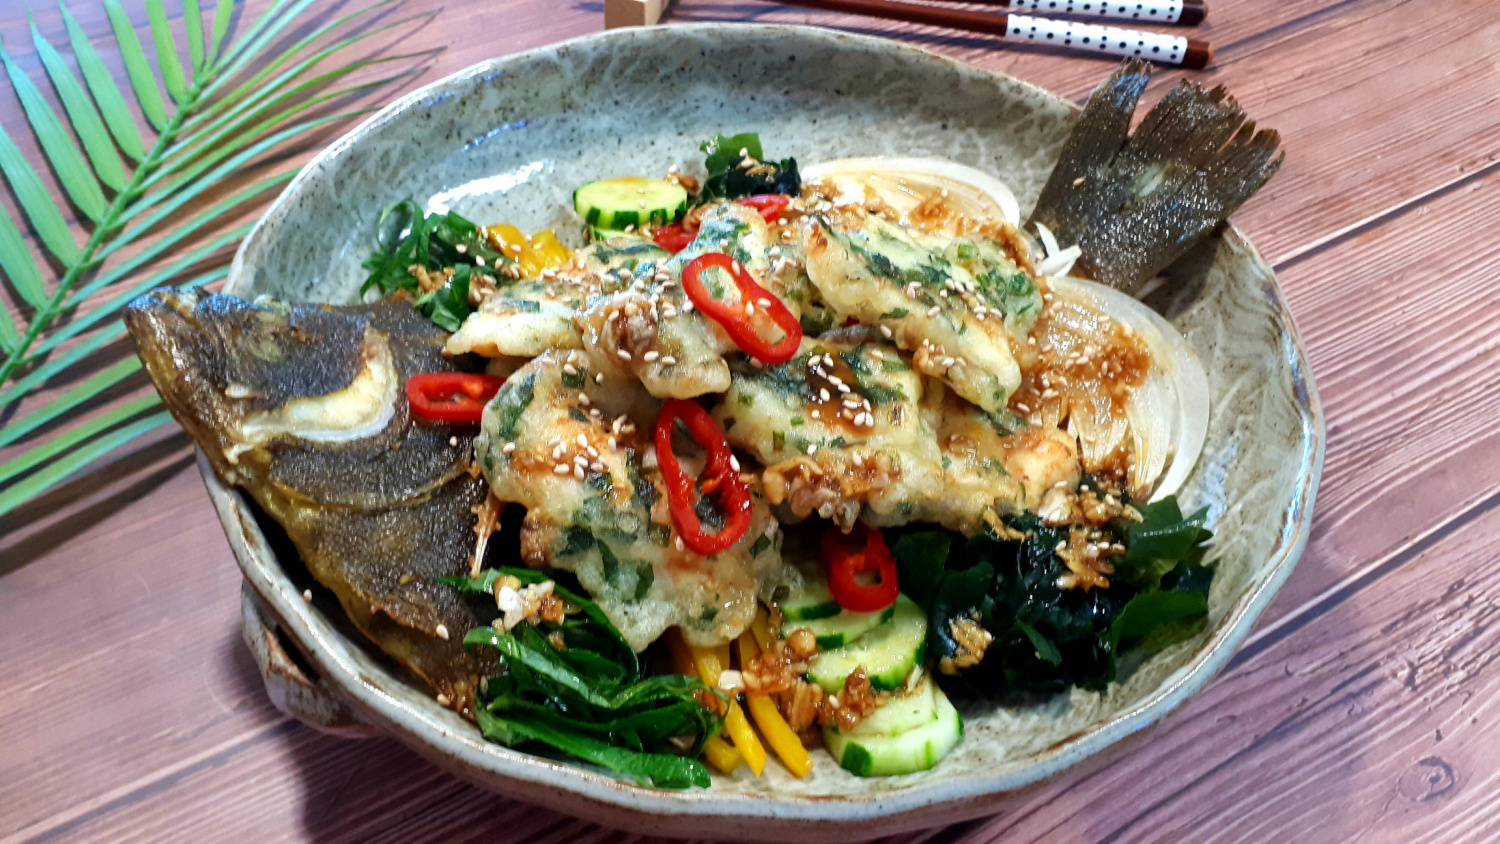
Step 15
Arrange the fried flounder head and bones attractively on a serving plate. Then, artfully top them with the prepared mix of crisp vegetables (onion, cucumber, bell pepper, and seaweed).

Step 16
Finally, place the crispy fried flounder fillets on top of the vegetables. Your delicious creation, crispy on the outside and tender on the inside, is nearing completion!

Step 17
Drizzle the prepared sweet and tangy sauce evenly over the fried fish and vegetables. The key is to ensure the sauce generously coats everything.

Step 18
For an extra touch, sprinkle some sesame seeds on top. This not only adds flavor but also enhances the visual appeal, completing your delicious fried flounder dish!

Step 19
This dish was so incredibly delicious that I devoured all the fried flounder in no time! I even licked the bones and head clean – it’s that addictive. The balance of the sweet and sour sauce with the vegetables is perfect, making it a dish I highly recommend for entertaining guests!
