
Crispy and Delicious Buchimgae Kimbap
Mastering Jeongeup-Style Buchimgae Kimbap Featured on ‘Sikgaek’ (The Master)

Today, we’re diving into another delightful dish featuring scallions (buchu)! I had half a bunch of scallions left over and hate wasting produce I’ve purchased. This recipe is inspired by a visit to Jeongeup where I tasted an incredibly delicious version, and I’m excited to recreate it for you. This Buchimgae Kimbap offers a wonderfully crispy exterior from the pancake and a flavorful, moist interior, perfectly complemented by the crunchy pickled radish and savory seasoned scallions. It’s a unique and satisfying way to enjoy your meal!
Ingredients- 1 bunch scallions (about 100g)
- 1 cup pancake mix (buchim garu) (about 120g)
- 1 roll of kimbap seaweed (for kimbap)
- 1 bowl of cooked rice (about 200g)
- 1 Tbsp sesame oil
- A small amount of carrot
- 1 Tbsp toasted sesame seeds
- A small amount of bell pepper (optional, for color)
Cooking Instructions
Step 1
Let’s start by preparing all our ingredients meticulously. Thoroughly wash and finely chop the vegetables that will go into the kimbap. It’s best to julienne or finely mince vegetables like carrots and bell peppers to ensure a pleasant texture when you bite into the kimbap.

Step 2
Now, let’s make the delicious pancake batter! In a bowl, add the pancake mix and gradually pour in water while mixing. Aim for a slightly thick batter consistency, not too runny. Add the finely chopped vegetables (scallions, bell pepper, etc.) to the batter and mix evenly. If you have bell peppers, adding them will make the kimbap look even more appetizing!

Step 3
Prepare the seasoned scallion side dish. You can follow my previous ‘Delicious Seasoned Scallion Recipe’ for this. Simply toss the scallions with seasonings like soy sauce, sesame oil, and toasted sesame seeds. The fresh aroma and crisp texture of the scallions will enhance the overall flavor of the kimbap.

Step 4
Sauté the carrots. Lightly grease a pan with sesame oil and add the julienned carrots. Sprinkle a tiny pinch of salt to bring out the carrots’ natural sweetness as you stir-fry them. Carrots are rich in Vitamin A, which is fat-soluble. Lightly sautéing them in oil helps improve your body’s absorption of this vitamin.

Step 5
Season the rice for the kimbap. In a bowl of warm rice, add sesame oil and toasted sesame seeds. Gently mix with a spatula or spoon until the seasonings are evenly distributed and the rice grains are not clumped together.

Step 6
Now it’s time to cook the star of our kimbap: the buchimgae (pancake)! It’s best to cook the pancake to a size similar to a sheet of kimbap seaweed, as this will make rolling easier later. While a square pan is ideal for shaping, you can achieve a delicious pancake with a regular frying pan as well.

Step 7
Place a sheet of parchment paper on your kimbap rolling mat. Carefully lay the freshly cooked, warm pancake onto the parchment paper. Now, just like making regular kimbap, arrange the kimbap pickled radish, seasoned scallions, and sautéed carrots neatly over the pancake.

Step 8
Using the parchment paper, gently pull and roll the pancake tightly to form a kimbap shape, being careful not to tear it. Once the shape is somewhat formed, re-wrap it with the kimbap mat and pull firmly to press and secure the entire roll. This ensures the kimbap holds its shape nicely.

Step 9
After rolling, carefully peel away the parchment paper. Behold, your ‘Buchimgae Kimbap’ is complete, featuring a golden-brown pancake exterior and a colorful array of fillings!

Step 10
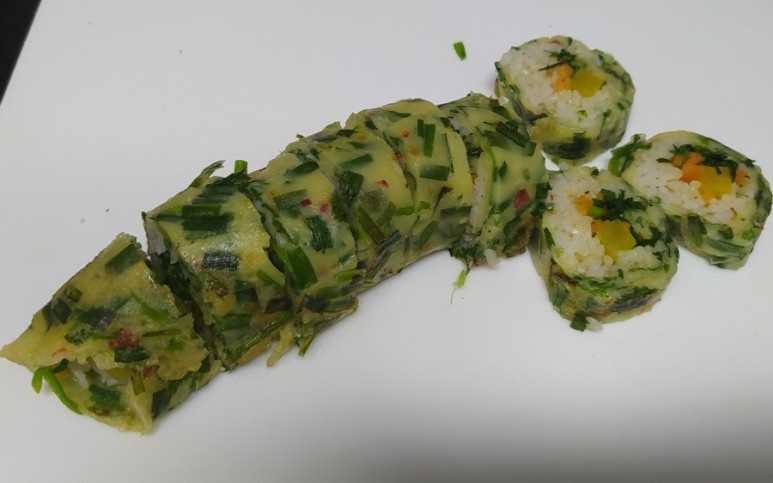
Slice the completed Buchimgae Kimbap into bite-sized pieces. Dipping your knife lightly in water before slicing will help prevent the kimbap from sticking and ensure clean cuts.

Step 11
Ta-da! Your Buchimgae Kimbap looks absolutely delicious! Isn’t the presentation stunning? I tasted the ends right away, and the combination of the savory pancake and the fillings was simply divine. The original Jeongeup version doesn’t include bell peppers, but I added them for extra color. Feel free to adjust the ingredients to your liking!

Step 12
Today, I also prepared ‘Mayak Kimbap’ (addictive kimbap) alongside the Buchimgae Kimbap. I’ll be uploading the detailed recipe for Mayak Kimbap soon, so stay tuned! What do you think? Doesn’t this special Buchimgae Kimbap look wonderful? I highly recommend making it for special occasions or whenever you crave something unique and delicious!
