
Crisp & Refreshing! Winter Delicacy: How to Make Radish Dongchimi
How to Make Dongchimi: The Secret to Delicious, Fizzy Radish Kimchi

On a snowy winter day, imagine the delightful taste of roasted sweet potatoes paired with refreshing Dongchimi! This recipe guides you through making your own perfect Dongchimi at home, easily achieving that crisp, slightly pungent broth that will truly invigorate your senses. It’s simpler than you think! #Dongchimi #HowToMakeDongchimi #WinterDongchimi #RadishKimchi #WinterRadishKimchi
Dongchimi Ingredients- 3kg Radishes (choose large, firm ones)
- 20 Pickled Peppers (or dried chili peppers)
- 2 Onions (medium-sized)
- 1 bunch Green Onions (approx. 20-30 stalks)
- 5 Red Amaranth Bunches (for vibrant color)
- 1 Pear (for sweetness and crispness)
- 6 cloves Garlic
- 1 Tbsp Ginger (minced or thinly sliced)
- 1 piece Dried Kelp (for broth, preferably in a tea bag)
- A little Radish Greens (optional, for garnish and added flavor)
Salting the Radishes- 1 cup Coarse Sea Salt (Korean rock salt recommended)
Dongchimi Brine- 3L Water (filtered or purified)
- 2/3 cup Coarse Sea Salt
- 1 tsp New Sugar (or granulated sugar)
- 1/3 cup Plum Extract (for umami and faster fermentation)
- 1 cup Coarse Sea Salt (Korean rock salt recommended)
Dongchimi Brine- 3L Water (filtered or purified)
- 2/3 cup Coarse Sea Salt
- 1 tsp New Sugar (or granulated sugar)
- 1/3 cup Plum Extract (for umami and faster fermentation)
Cooking Instructions
Step 1
Prepare the radishes, the star of your Dongchimi. First, wash them thoroughly to remove any dirt and lightly peel the outer skin. Cut the radishes into 3-4cm thick rounds, then slice them into crescent shapes. (Tip: Avoid slicing the radishes too thinly, as they can become mushy. Cut them slightly thick. If you want the Dongchimi to ferment faster, you can cut the radishes into eighths by halving the rounds and then halving those pieces again.)

Step 2
Prepare the green onions and red amaranth. Trim the roots of the green onions and wash them under running water, then pat them dry. Gently wash the red amaranth as well. Lightly sprinkle coarse salt over the green onions and amaranth and let them wilt for about 10-15 minutes. This makes them easier to handle and arrange nicely in the jar.

Step 3
Prepare the aromatics and fruit. Peel and thinly slice the garlic cloves. Peel and finely mince or thinly slice the ginger. Wash the pear thoroughly with a paper towel lightly dampened with vinegar (keep the skin on), then cut it into roughly 1cm thick pieces. Peel and quarter the onions.

Step 4
Check the quality of your prepared radishes. (This step doesn’t directly impact the process but highlights the use of good ingredients.) Using firm, dense radishes will result in delicious Dongchimi. If you’re curious, you might even enjoy a piece of the radish with the blueish top – it’s part of the fun!

Step 5
At the bottom of your fermentation jar, place the quartered onions. This layer will infuse the brine with a subtle sweetness and a hint of pungency, adding depth and a refreshing flavor to the broth.

Step 6
Arrange about half of the lightly wilted green onions and red amaranth attractively on top of the onions. You can leave the green onions as they are or artfully arrange them.

Step 7
Next, layer the sliced pear, the kelp (for broth), garlic cloves, and ginger. Arranging the ingredients in layers ensures that their flavors infuse evenly into the brine.

Step 8
Roll the radish pieces in coarse sea salt (using aged, natural sea salt is highly recommended for best results). Ensure the salt coats the radish evenly. This process helps draw out moisture from the radishes, making them firmer and allowing them to absorb flavors better.

Step 9
Carefully pack the salted radishes into the jar, filling the spaces. Add a sprinkle of coarse salt between the layers of radish. This helps to season the Dongchimi and keeps the radishes firm.

Step 10
Now it’s time to add the pickled peppers. If you don’t have pickled peppers, dried chili peppers can be used, or you can omit them. (Tip: Pickled peppers add a spicy, refreshing umami to the Dongchimi broth.) Tuck the peppers in between the radish pieces. (Caution: If you forget this step and add the brine first, you’ll need to carefully remove the radishes, add the peppers, and then put the radishes back. Following the steps in order is important.)

Step 11
Fill the jar with the remaining radishes. Then, arrange the rest of the green onions on top. These final additions add color and flavor.

Step 12
Finally, if you have tender radish greens, gently place them on top. Covering the radishes with these greens acts like a blanket, helping to prevent ingredients from floating and keeping the broth clear.

Step 13
Prepare the Dongchimi brine. In 3 liters of clean water, dissolve 2/3 cup of coarse sea salt, 1 tsp of New Sugar (or granulated sugar), and 1/3 cup of plum extract. Stir well until the sugar and salt are completely dissolved. (Tip: Adding a little plum extract helps the Dongchimi ferment faster and adds a pleasant depth of flavor. This is especially useful when making it later in the season and wanting to enjoy it sooner.)

Step 14
Before pouring the brine, strain it through a fine-mesh sieve or cheesecloth. This will ensure a clear and pristine broth. (Tip: The photo for straining is missing, but it’s a recommended step.) Pour enough brine to completely cover the ingredients.

Step 15
Place a heavy plate or a fermentation weight on top to keep the ingredients submerged in the brine. This is crucial to prevent spoilage and maintain the quality of the Dongchimi.

Step 16
On the 6th day after making it, the radishes aren’t fully fermented yet, but the broth is already deliciously crisp and flavorful! Letting it ferment for a few more days will deepen the taste even further. (This step illustrates the fermentation progress.)

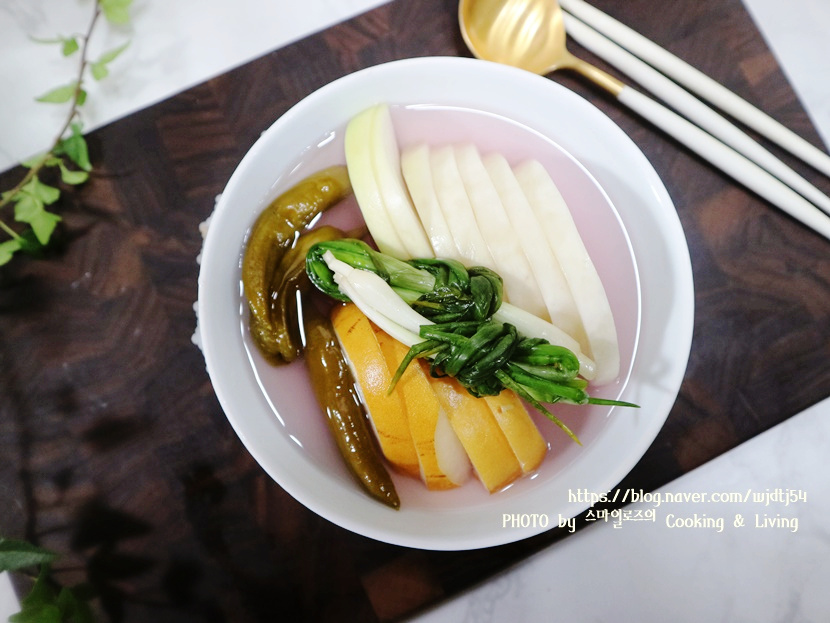
Step 17
The subtle pink hue from the red amaranth in the broth looks absolutely appetizing. To avoid making the broth too cloudy, it’s best to use only about 5 bunches of red amaranth for color and flavor. This meticulously prepared Radish Dongchimi will surely be a winter highlight!
