
Chuncheon Dakgalbi Made with Baek Jong-won’s All-Purpose Sauce
Our Home is a Chuncheon Dakgalbi Restaurant: Baek Jong-won’s Secret All-Purpose Sauce Recipe

Hello everyone! Today, I made delicious Dakgalbi using chicken thigh meat with Baek Jong-won’s all-purpose sauce. My secret ingredient is the gochujang from my grandmother’s house, but you can make it just as tasty with store-bought gochujang! It uses quite a bit of gochujang and gochugaru, but the sweetness balances it out so well that my 8-year-old son absolutely loved it, even making ssam with it! Follow along and let’s have a delicious dinner together!
Main Ingredients for Dakgalbi- 400g chicken thigh meat
- Napa cabbage (generous amount, to taste)
- 1/3 carrot
- 1/2 onion
- Green onion (generous amount, to taste)
- Sweet potato (generous amount, to taste)
- Rice cakes (tteok) (generous amount, to taste)
- 1 cup all-purpose sauce
- 2 Tbsp perilla oil
- A pinch of sesame seeds
- A pinch of black pepper
Baek Jong-won’s All-Purpose Sauce (Total 1 cup)- 1/2 cup soy sauce
- 1/2 cup gochujang (Korean chili paste)
- 1/2 cup gochugaru (Korean chili flakes)
- 1/2 cup minced garlic
- 1/2 cup sugar (brown sugar for richer flavor)
- 1/2 cup cooking wine (mirin or cheongju)
- 1/2 cup soy sauce
- 1/2 cup gochujang (Korean chili paste)
- 1/2 cup gochugaru (Korean chili flakes)
- 1/2 cup minced garlic
- 1/2 cup sugar (brown sugar for richer flavor)
- 1/2 cup cooking wine (mirin or cheongju)
Cooking Instructions
Step 1
Baek Jong-won’s all-purpose sauce is usually a full cup, but today we’ll make a portion for one meal using half cups for each ingredient! (If you want to make a larger batch for storage, just scale up the sauce ingredients proportionally.)

Step 2
First, let’s make the all-purpose sauce that will define the flavor of our Dakgalbi. In a bowl, add half a cup of gochujang. (If you like it spicier, you can increase the gochujang slightly or add some chopped fresh chili peppers.)

Step 3
Next, add half a cup of soy sauce. Soy sauce adds a savory depth to the sauce.

Step 4
Add half a cup of sugar for sweetness. If you have brown sugar at home, I recommend using it. Brown sugar adds a deeper, more subtle sweetness and richer flavor than white sugar. White sugar is perfectly fine too.

Step 5
Add half a cup of cooking wine (like mirin or cheongju) to remove any unwanted meat odors and balance the flavors.

Step 6
Add half a cup of gochugaru (Korean chili flakes) for that characteristic spicy kick of Dakgalbi. To adjust spiciness, it’s better to add chopped fresh chili peppers separately or adjust the amount of gochujang, rather than adding more gochugaru, which can make the sauce taste gritty.

Step 7
Finally, add a generous half cup of minced garlic to complete the aromatic profile of the sauce. The pungent garlic aroma pairs wonderfully with Dakgalbi.

Step 8
Once all the sauce ingredients are in the bowl, stir well until the sugar dissolves and everything is smoothly combined. This all-purpose sauce is versatile and can be used in various other dishes.

Step 9
Now, let’s prepare the vegetables for the Dakgalbi. Cut the napa cabbage into larger pieces, not too small, so you get a satisfying bite. If the pieces are too small, they can become mushy when cooked.

Step 10
Cut the carrot into similar thickness as the cabbage, about 4-5cm long. This adds color and a nice crunch.

Step 11
Chop the onion into large pieces as well to add sweetness and flavor. Cutting all the vegetables into larger pieces is key to maintaining a good texture alongside the chicken.

Step 12
Since chicken thighs take longer to cook, if the vegetables are cut too small, they might overcook and become soft before the chicken is done. The texture of the vegetables is important for enjoying Dakgalbi.

Step 13
Chewy rice cakes (tteok) and soft sweet potatoes are essential additions to Dakgalbi! Adjust the amounts to your liking. Cut the sweet potatoes into substantial chunks so they don’t fall apart when cooked.

Step 14
Cut the chicken thigh meat into bite-sized pieces. If there are bones, it’s best to remove them for easier eating.

Step 15
Place the cut chicken thigh meat in a large bowl and pour the prepared all-purpose sauce (1 cup) over it.

Step 16
Add 2 tablespoons of perilla oil for a nutty aroma.

Step 17
Using your hands or a spatula, mix the chicken and sauce thoroughly. Ensure every piece is well-coated for maximum flavor infusion.

Step 18
Finally, sprinkle 1 tablespoon of sesame seeds and let the chicken marinate for about 10 minutes. This step allows the flavors to penetrate the meat even deeper, enhancing the overall taste.

Step 19
(Optional) While the Dakgalbi is marinating, let’s quickly make some Doenjang Jjigae (soybean paste stew). Boil water with dried kelp and anchovies to make a broth. Using pre-made broth packs makes this process very convenient. Adding radish to the stew provides a refreshing taste.

Step 20
Once the broth is ready, add doenjang (soybean paste) along with onion, green onion, and enoki mushrooms. Mushrooms add extra flavor, so feel free to add your favorites.

Step 21
I added half a tablespoon of doenjang from my grandmother’s house! This is my secret ‘kick point’ for an incredibly rich and savory stew. If you want a restaurant-style depth, try mixing 1 Tbsp doenjang, a little gochujang, and a little ssamjang to season. (For children, set aside some stew before adding spicy elements.)

Step 22
I scooped out some stew for the kids before adding half a tablespoon of gochugaru and one chopped cheongyang chili pepper to the remaining portion for a spicier adult version.

Step 23
(Optional) I had some leftover seasoning for Oi Sobagi (stuffed cucumber kimchi), so I thinly sliced some cucumber and made a quick cucumber salad to serve alongside. Its sweet and sour flavor complements the Dakgalbi beautifully.

Step 24
Now, let’s cook the Dakgalbi! Heat up a pan and add the marinated chicken along with all the prepared vegetables, sweet potatoes, and rice cakes at once.

Step 25
Stir-fry over medium heat until the chicken is cooked through and the vegetables are tender. To prevent sticking, add a little water occasionally while stir-frying. Once the chicken is fully cooked and the sauce has thickened nicely, your delicious Dakgalbi is ready!

Step 26
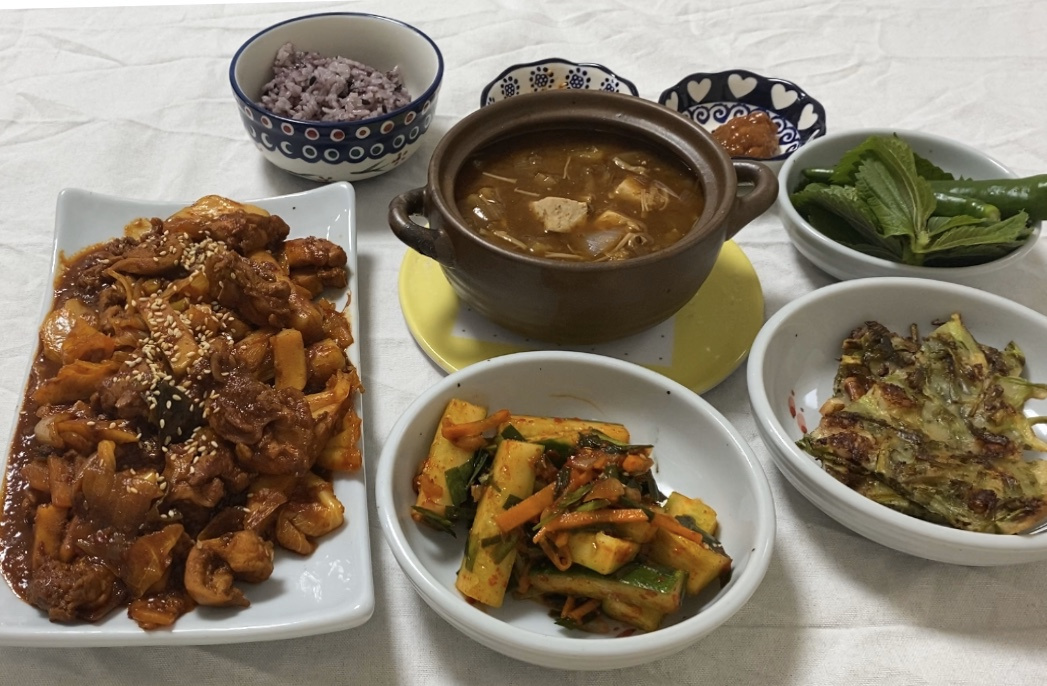
Serve the well-cooked Dakgalbi on a plate, and it will truly feel like your home has become a Chuncheon Dakgalbi restaurant! Enjoy it with fresh lettuce wraps.
