
Authentic Sweet Rice with Dates and Chestnuts (Yakbap)
Making Traditional Yakbap Easily with a Rice Cooker

The ultimate choice for holidays, special occasions, or when you crave a satisfying snack! Introducing a recipe for delicious and chewy Yakbap made easily with just a rice cooker. It boasts a delicate sweetness and savory flavor, enhanced with plenty of nuts for a delightful texture. On special days, present loved ones with heartfelt homemade Yakbap.
Ingredients (Measurements: Standard Paper Cup | Tablespoon)- 4 cups sweet glutinous rice (rinsed and soaked for 30 minutes)
- 3 cups water steeped with dates
- 2/3 cup brown sugar (can substitute with yellow sugar)
- 1/2 cup soy sauce
- 5 tablespoons sesame oil
- 2 tablespoons cinnamon powder (optional)
- Nuts (to taste)
Cooking Instructions
Step 1
First, rinse 4 cups of sweet glutinous rice thoroughly and soak it in water for about 30 minutes. This is a crucial step to achieve the chewy texture characteristic of Yakbap. Now, let’s prepare the sauce that will bring the sweet and savory flavor! In 3 cups of water steeped with dates, add 2/3 cup of brown sugar (you can adjust sweetness to your preference, and yellow sugar can be used as a substitute if brown sugar isn’t available), 1/2 cup of soy sauce, and 5 tablespoons of sesame oil for a nutty aroma. If you enjoy the flavor of cinnamon, add about 2 tablespoons of cinnamon powder. In my household, we often omit cinnamon because we don’t particularly enjoy its strong flavor, or because the children dislike it. For nuts, prepare them according to your preference. I’ve used chestnuts and dates harvested from my hometown, along with dried persimmons my mother dried herself. Feel free to add your favorite nuts like walnuts, pine nuts, or sunflower seeds.

Step 2
The glutinous rice has been pre-soaked, and the sweet and savory sauce has already been made. By tasting the sauce beforehand, you can adjust it to achieve your desired balance of sweetness and saltiness. If it tastes a bit bland, add a little more sugar or soy sauce to season it to your liking. I love Yakbap so much that I’ve made it many times, so I can whip this up quickly now. You’ll become proficient with it after making it a few times as well.

Step 3
Combine the soaked glutinous rice, prepared nuts, dates, and dried persimmons with the sauce. Mix gently to ensure each grain of rice is evenly coated with the seasoning.

Step 4
Now it’s time to cook the rice in the rice cooker. If you haven’t soaked the glutinous rice, add enough sauce to just cover the rice. However, since we have soaked the rice, you should add just enough sauce so that it’s barely visible peeking through the rice grains. This is significantly less water than you would use for regular rice. Adjusting the water level is key to preventing a mushy texture and achieving a perfectly cooked Yakbap.

Step 5
Place the inner pot into the rice cooker and start the cooking cycle. Since I soaked the glutinous rice for over an hour, I used the ‘Quick White Rice’ setting. This shortens the cooking time considerably, allowing for a faster completion of the Yakbap. Of course, if your rice cooker has a specific ‘Yakbap’ setting, that would be the most ideal option to use. The regular ‘White Rice’ setting also works well. Feel free to explore your rice cooker’s various functions and choose the most appropriate mode.

Step 6
Once the cooking cycle is complete, you might notice the Yakbap has a lighter color than expected. Don’t worry! While it’s still warm, gently stir it with a spatula. Leaving it undisturbed for too long can cause the bottom to burn, so it’s best to stir it thoroughly to ensure even cooking and allow it to cool slightly.

Step 7
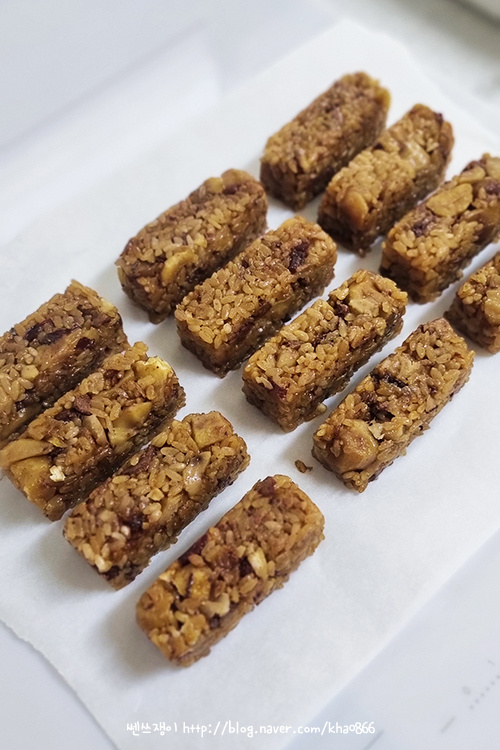
Voila! Your fluffy, deeply colored, and delicious Yakbap is ready! Transfer the cooked Yakbap to a wide tray or plate and let it cool down for a bit. Trying to shape it while it’s too hot might cause it to lose its form.

Step 8
If you want to shape your Yakbap into attractive forms, consider using various baking molds. I’ve used silicone financier molds, pressing the Yakbap firmly into them to create nice shapes. Pressing down firmly is essential for the shapes to hold well.

Step 9
Carefully unmold the Yakbap, and you’ll have beautifully shaped servings. It’s been so long since I’ve used baking molds or pans that I almost felt like I’d forgotten how to bake! Nowadays, I’ve been focusing so much on home cooking that I’ve drifted away from baking. I need to reflect on this and try more baking recipes in the future. But isn’t this Yakbap you’ve made today just wonderful?

Step 10
Finally, let’s package the finished Yakbap for convenient storage or gifting. Wrapping it entirely with tape can be cumbersome when eating. Therefore, I’ve chosen to tie one side with a bread tie, creating a simple knot. This makes it much easier to open and enjoy. When giving Yakbap as a gift, such thoughtful packaging not only makes it easier for the recipient to eat but also conveys a sense of care, even in small details. Enjoy your delicious Yakbap!
