
Authentic Hayashi Rice: A Harmony of Hearty Vegetables and Tender Meat
Delicious Hayashi Rice Recipe (Hayashi Rice) Made at Home

Learn how to easily and deliciously make rich and flavorful Hayashi Rice (also known as Hayashi Raisu) at home. This dish, featuring an abundance of vegetables and tender pork, makes for a wonderful meal that the whole family will love.
Core Vegetables- 2 Potatoes (approx. 120g): Wash, peel, and dice into 2cm cubes.
- 1/3 Carrot (approx. 60g): Wash, peel, and dice into slightly smaller 1.5cm cubes than the potatoes (as carrots are harder).
- 2 Onions (approx. 270g): Peel and dice into 2cm cubes.
- 1/3 Zucchini: Remove seeds and dice into 2cm cubes.
Cooking Instructions
Step 1
Let’s start by preparing the vegetables. Wash and peel 2 medium potatoes (about 120g) and dice them into bite-sized, 2cm cubes. If you prefer more generous chunks of vegetables than the original recipe suggests, feel free to increase the amount of potato.

Step 2
Next, prepare 1/3 of a carrot (about 60g). Dice it to a size similar to the potatoes, but slightly smaller (about 1.5cm). Since carrots are firmer than potatoes, cutting them smaller ensures they cook at a similar rate.

Step 3
Peel and dice 2 onions (about 270g) into 2cm cubes. Onions caramelize when sautéed, adding a wonderful sweetness that enhances the overall flavor of the Hayashi Rice.

Step 4
Dice 1/3 of a zucchini into 2cm pieces, similar to the other vegetables. Zucchini cooks quickly, so avoid dicing it too small to prevent it from becoming mushy.

Step 5
If you have them, wash and trim 80g of garlic scapes, then cut them into 1cm lengths. Garlic scapes add a subtle aroma and a pleasant crispness to the Hayashi Rice, making it even more delicious. (You can omit them if unavailable.)

Step 6
Cut the main ingredient, 200g of pork tenderloin, into slightly larger pieces than the vegetables, about 2.5cm. This is because meat shrinks when it cooks, and larger pieces provide a better texture.

Step 7
Heat the butter (10g) or cooking oil in a pan over medium heat. Add the diced pork tenderloin and cook until about 80% done. It doesn’t need to be fully cooked at this stage, as it will simmer later with water. Just sear the surface until the color changes.

Step 8
Once the pork is partially cooked, add the diced potatoes, carrots, and zucchini to the pan. Sauté them together with the pork. Sautéing the vegetables first helps to bring out their natural sweetness and integrate them well with the meat.

Step 9
After sautéing the vegetables with the pork, pour in 700ml of water. Cover the pot and let it simmer until the ingredients are cooked. Adjust the amount of water based on the thickness of your Hayashi Rice roux.

Step 10
After simmering with the lid on for about 4-5 minutes, check if the potatoes, carrots, and zucchini are about 80% cooked. Be careful not to overcook them at this stage, as they can become too soft.

Step 11
Now it’s time to add the onions and garlic scapes. Since these ingredients are softer and more aromatic than the other vegetables, it’s best to add them after the firmer vegetables have partially cooked. Simmer them briefly to retain their crispness and fragrance. This ensures their delicate texture and aroma are preserved.

Step 12
Add the onions and garlic scapes and continue to simmer for another 2-3 minutes. Then, turn off the heat temporarily. Ensure all ingredients are tender but not mushy.

Step 13
Crucially, turn off the heat before adding the Hayashi Rice roux. This prevents clumps and ensures a smooth sauce. Add the Hayashi Rice roux (1 packet, 100g) to the pot and stir thoroughly until it is completely dissolved and lump-free. This step is key to achieving a velvety smooth texture.

Step 14
Once the roux is fully dissolved, turn the heat back on to low. Stir in 2 tablespoons of ketchup. Ketchup adds umami, a touch of sweetness, and a lovely gloss to the sauce. Continue to simmer gently, stirring occasionally, until the sauce reaches your desired thickness.

Step 15
The Hayashi Rice sauce has thickened beautifully and has a rich consistency. The final thickness can vary depending on the moisture content of your ingredients and how long you simmer. If it seems too thick, simply add a little more water to achieve your preferred consistency.

Step 16
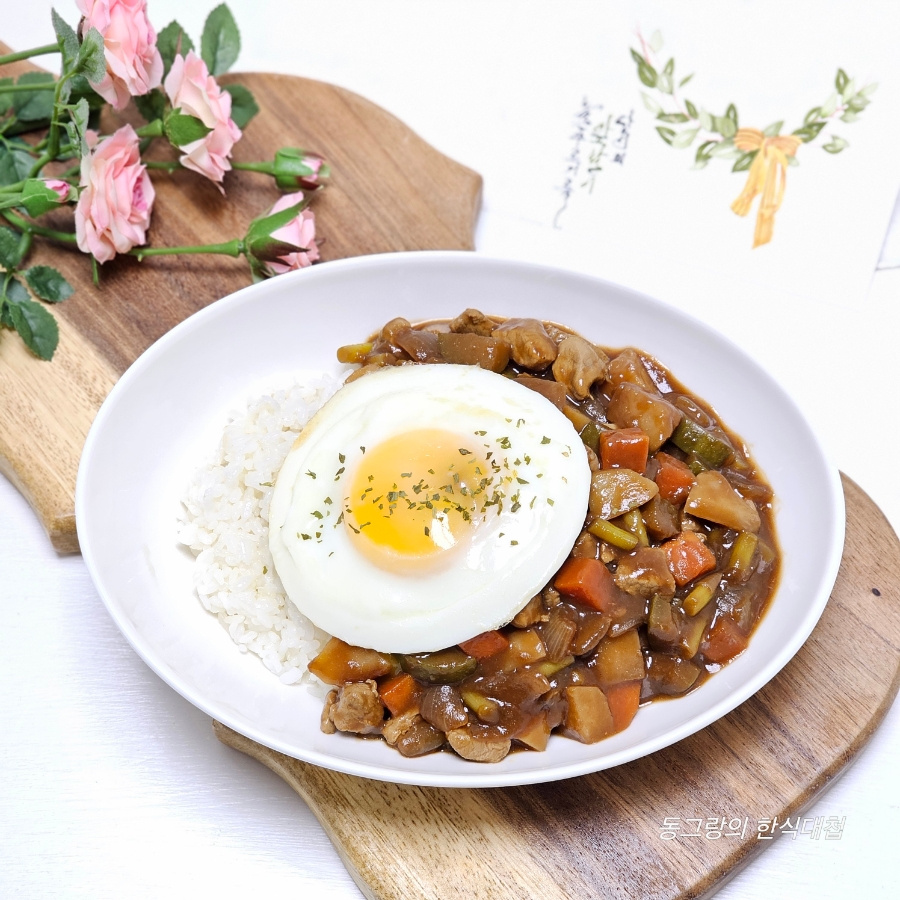
Serve the finished Hayashi Rice generously over a bed of warm rice. For an extra touch, top with a fried egg (sunny-side up is perfect!) and a sprinkle of parsley flakes. Your delicious and impressive Hayashi Rice is ready to be enjoyed!
