
Assorted Dumpling Shapes
How to Make 6 Beautiful Dumpling Shapes: Round, Square, Crescent with Pleats, Steamed Bun Style, Fortune Bag, and Leaf Shape

I’ll walk you through step-by-step how to create 6 different, charming dumpling shapes! Let’s see how it’s done. Perfect for adding a special touch to your homemade dumplings.
Basic Ingredients- Dumpling wrappers
- Dumpling filling (ground meat, vegetables, etc., prepared to your preference)
Cooking Instructions
Step 1
Refer to the video for a visual guide on how to form each dumpling shape. (Link: https://youtu.be/iFxfTpazcuc)

Step 2
Place a suitable amount of your prepared dumpling filling in the center of a dumpling wrapper. Then, lightly brush water along the edges of the wrapper. This water acts as glue to seal the dumplings.

Step 3
Fold the wrapper in half over the filling, pressing the edges firmly to seal. Ensure no filling can escape. This forms the basic crescent shape.

Step 4
Apply a little water to both pointed ends of the crescent-shaped dumpling. Bring these two ends together and press firmly to seal, creating a rounded, pouch-like shape. This is the classic round dumpling.

Step 5
Now, let’s create a pleated crescent dumpling. Similar to before, place the filling in the center and moisten the edges. Then, make a single, gentle press in the center of the wrapper. This is key for creating the pleats.

Step 6
You’ll notice the wrapper is now divided into two sections by that central press. Keep one side as it is, and pick up the other side. You’ll start pleating this side by pressing firmly.

Step 7
Gently fold and press the wrapper, creating small, even pleats along one side. Repeat on the other side. When you bring the two pleated edges together, you’ll have a beautiful, pleated crescent dumpling. The intricate folds make it look very elegant.

Step 8
Making square dumplings is surprisingly easy! Start by gently pressing down once in the center of the filling. This slight indentation helps define the square shape.

Step 9
Then, simply bring the four edges of the wrapper up to meet in the center and press to seal. A light press in the middle will help maintain the square form. Isn’t that incredibly simple?

Step 10
Next, we’ll make the steamed bun-style dumpling. Place the wrapper with the filling upwards. Gather the edges and twist them in one direction, creating a round, bun-like shape, similar to a mini bao.

Step 11
Personally, I find that the more intricate the pleats, the more appealing and substantial the dumpling looks. Take your time to create neat folds.

Step 12
Let’s move on to the fortune bag dumpling, which looks like it’s filled with good luck! It’s similar to the steamed bun style, but the key difference is that you tie the top. Place the filling in the center and gently stretch the wrapper upwards.

Step 13
Carefully gather and twist the stretched wrapper, similar to the bun style. For the fortune bag, unlike the regular bun, it’s helpful to apply a little water to the inside of the wrapper near the top gathering point. This ensures a secure tie at the opening, creating a charming pouch effect. You’re essentially forming a small bag.

Step 14
Use blanched chives you have on hand to tie the opening of the fortune bag dumpling. This creates a beautifully finished look and adds a subtle aroma.

Step 15
If the chive tie is a bit long, trim it neatly for a more polished appearance. This small detail makes a big difference.

Step 16
Finally, we’ll tackle the leaf-shaped dumpling, which is a bit more challenging. This shape might be easier to grasp by watching the video. Start by lightly moistening the edges of the wrapper.

Step 17
Gently pull the wrapper towards the center, towards the filling. Then, similar to how we made the pleated crescent, fold and press to create pleats. The technique here is to pull the wrapper while forming the pleats, guiding it towards the center.

Step 18
If you find you can’t form any more pleats, pull the wrapper back towards the filling again to gather it, and then repeat the pleating process. Consistent and numerous pleats will give the leaf its beautiful, natural shape.

Step 19
Like the other pleated designs, the more pleats you make and the more uniform they are, the prettier the leaf dumpling will turn out! Practice makes perfect.

Step 20
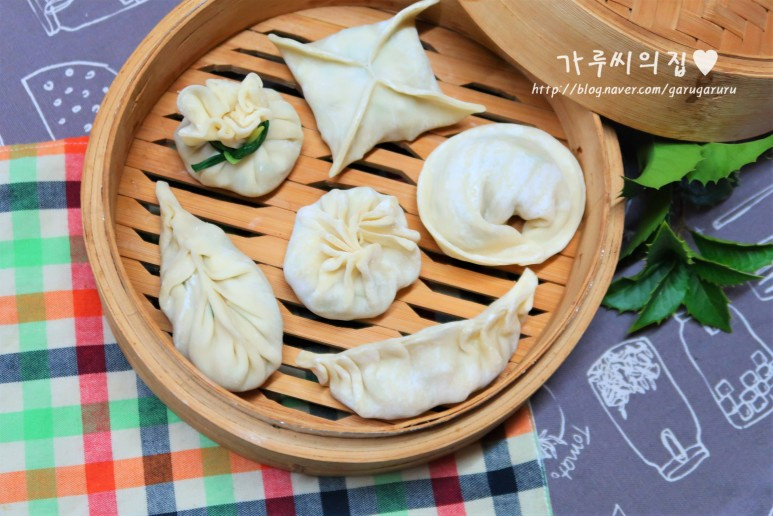
And there you have it! From right to left, we have the round dumpling, the square dumpling, the pleated crescent, the steamed bun style, the fortune bag, and finally, the leaf shape. All six unique dumpling styles are now complete. Enjoy your creative dumpling-making!
