
Adorable Snail-Shaped Gimbap
Making Cute Snail Gimbap for a Picnic Lunchbox

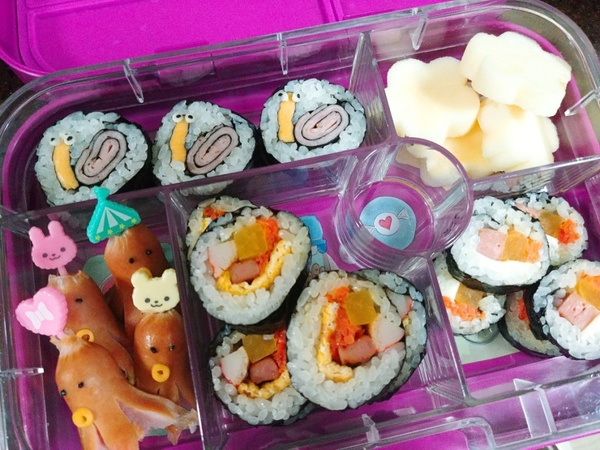
Wow, it’s my child’s picnic day! The time I thought would never come has finally arrived. It’s only twice a year, but I find myself surprisingly reluctant to pack the lunchbox. When I first started making lunchboxes, it was exciting, but humans get used to things, you know? Anyway, wanting to pack a new kind of picnic lunchbox for my child, I decided to make snail gimbap.
Basic Ingredients- Freshly cooked rice
- Salt, to taste
- 1 Tbsp sesame oil
- 2 sheets of gim (seaweed)
Cooking Instructions
Step 1
First, prepare the rice, the foundation of gimbap. Season the warm, freshly cooked rice lightly with salt, and mix in 1 tablespoon of fragrant sesame oil. Gently mix to avoid clumping the rice grains for a smoother texture.

Step 2
Prepare the first element for the snail’s body: the cheese. Take 2 slices of processed cheese and cut each slice into 4 equal pieces (by cutting in half horizontally and vertically). You’ll have 8 pieces in total. Now, overlap 2 pieces of cheese and place them on a sheet of gim. You will need 2 sheets of gim for this recipe.

Step 3
Roll the gim around the overlapped cheese pieces tightly. Once rolled, use scissors to cut the roll into 2-3 cm thick segments. These segments will form the body of the snail later.

Step 4
Now, let’s make the snail’s shell. On the other sheet of gim, overlap 2 slices of sandwich ham. Place the ham neatly along one edge of the gim. Roll the gim tightly around the ham, pressing firmly as you go. Ensure the ham is completely enclosed within the gim.

Step 5
It’s time to assemble the snail shape. Spread a thin layer of cooked rice over another sheet of gim. It’s important to spread the rice thinly and evenly, as too much rice can cause the gimbap to burst. Place the cheese rolls you prepared earlier onto the rice.

Step 6
On top of the cheese rolls, neatly place the ham roll. You can add a little more rice here to help bind the cheese and ham rolls together. Don’t use too much extra rice; just enough to help them adhere.

Step 7
Now, carefully roll everything up, just like making regular gimbap. Gently press with your hands as you roll to ensure the rice and fillings stay compact. You can slightly dampen the edge of the gim with water to help it seal securely.

Step 8
Slice the completed roll into desired thicknesses. When you cut it, the layers of cheese and ham will reveal a cute snail-like pattern! It already looks charming, but adding features will make it even more lively and adorable.

Step 9
To create the snail’s eyes, use a drinking straw. (While using a different colored cheese than what’s in the gimbap can make the eyes stand out, it’s not essential.) Press the end of the straw firmly to cut out small circles of cheese. Place two of these cheese circles onto each gimbap slice to form the base of the snail’s eyes.

Step 10
Finally, use black sesame seeds to add the pupils to the cheese eyes, and voila! Your incredibly cute snail gimbap is complete. This will make your child’s picnic lunchbox extra special. Enjoy! ^^
