
Garlicky Preserved Pickles
Whole Garlic Pickles: A Perfect Side Dish for Any Meal

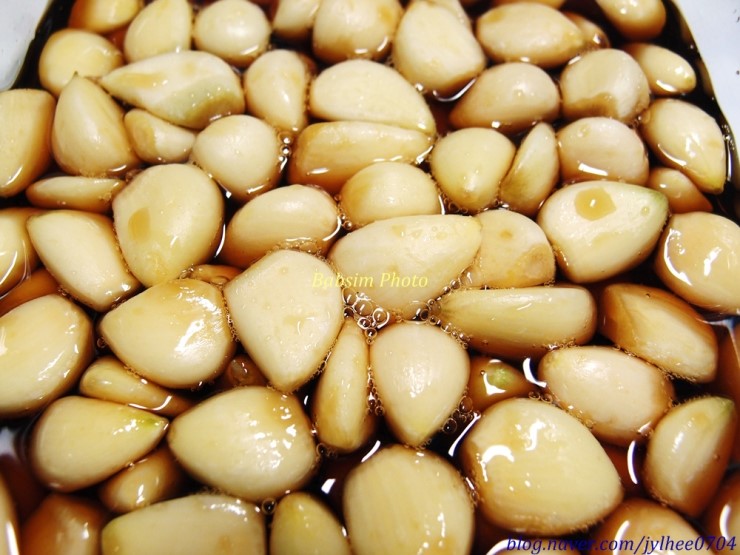
These whole garlic pickles are not only a fantastic banchan (side dish), but they also boast powerful antiseptic properties and are great for skin health. Enjoy the pungent, slightly sweet, and savory flavor of these homemade pickles that are sure to become a favorite!
Main Ingredients- 1 bag peeled garlic (approx. 350g)
First Brining Liquid- 1 cup water (200ml)
- 1 cup vinegar (200ml)
Second Pickling Soy Sauce Mixture- 1/2 cup soy sauce (100ml)
- 1/2 cup corn syrup or rice syrup (100ml)
- 1/2 cup sugar (100ml)
- 1 tbsp roasted salt (approx. 10g)
- 1 cup water (200ml)
- 1 cup vinegar (200ml)
Second Pickling Soy Sauce Mixture- 1/2 cup soy sauce (100ml)
- 1/2 cup corn syrup or rice syrup (100ml)
- 1/2 cup sugar (100ml)
- 1 tbsp roasted salt (approx. 10g)
Cooking Instructions
Step 1
Prepare your fresh peeled garlic. Rinse the garlic thoroughly under cold running water 3-4 times. Then, use scissors or a knife to trim off the pointed ends of the garlic cloves. (Tip: The garlic tips can sometimes add a bitter taste and are not ideal for long-term preservation, so trim them carefully.)

Step 2
Drying the garlic well is crucial for preventing it from becoming mushy and maintaining a crisp texture. Gently press each garlic clove with multiple layers of paper towels to absorb excess moisture. Ensure the garlic is completely dry.

Step 3
Now, let’s make the first brining liquid. In a clean bowl, combine 1 cup of water and 1 cup of vinegar in equal proportions (1:1). The vinegar will help mellow the pungent flavor of the garlic and add antiseptic benefits.

Step 4
Submerge the trimmed and dried garlic cloves in the vinegar-water mixture, ensuring they are fully covered. Let the garlic soak for about 30 minutes to soften its sharp, pungent taste. Be mindful of the soaking time, as prolonged soaking might diminish the garlic’s characteristic flavor.

Step 5
Next, we’ll prepare the delicious pickling soy sauce mixture. In a pot or bowl, combine 1/2 cup soy sauce, 1/2 cup corn syrup (or rice syrup), and 1/2 cup sugar. Stir well until the sugar is completely dissolved and there are no lumps. This creates a perfect balance of sweet and savory flavors.

Step 6
Add 1 tablespoon of roasted salt to the mixture. Roasted salt offers a richer umami flavor and a toasty aroma compared to regular salt, significantly enhancing the pickle’s taste. (Tip: If you don’t have roasted salt, regular salt can be used, but roasted salt will provide a deeper flavor profile.)

Step 7
Stir the mixture again thoroughly to ensure all ingredients are well combined. This completes your flavorful pickling soy sauce base.

Step 8
Carefully transfer the drained garlic cloves from the vinegar soak into a clean storage container. Pack them in, but leave a little space rather than filling it to the brim.

Step 9
Pour the prepared soy sauce mixture over the garlic, making sure the garlic is completely submerged in the liquid. Seal the container tightly and let it sit at room temperature for 3 days to ferment. (Tip: Fermentation time can vary with temperature. If it’s very hot, consider storing it in a slightly cooler spot.)

Step 10
After 3 days, open the container. You might notice some foam on the surface of the soy sauce. This is a natural reaction between the garlic’s compounds and the soy sauce and is perfectly normal.

Step 11
It’s time to strain the soy sauce. Carefully pour only the soy sauce through a sieve into a saucepan. Bring it to a gentle boil, just until it bubbles a little (this is called ‘han-sok-keum’ in Korean, meaning a short boil). This process cleanses the sauce and improves its shelf life. Use medium heat for this step.

Step 12
While the soy sauce is boiling, keep the garlic cloves in the container, or transfer them to another clean vessel to keep them fresh.

Step 13
Once the soy sauce has had its brief boil, remove it from the heat and let it cool down completely to room temperature. It’s essential to ensure the soy sauce is cold before pouring it back over the garlic; otherwise, the garlic might cook.

Step 14
Pour the completely cooled soy sauce mixture back over the garlic in the container. Ensure the garlic is fully submerged to allow the flavors to meld evenly.

Step 15
Seal the container tightly again and store it in the refrigerator. Allow the pickles to mature for at least a week before enjoying. This resting period will soften the pungent garlic flavor and enhance its savory notes. These pickles are a wonderful, long-lasting banchan, so give them a try!
