
Super Simple No-Bake Chocolate Cheesecake
[No-Bake] A Sweet Indulgence for Special Occasions: ‘Decadent Chocolate Cheesecake’!

Experience the divine combination of rich chocolate jam and creamy cream cheese! This is a no-bake chocolate cheesecake recipe perfect for when you crave something sweet and decadent, easily made in your own kitchen. Enjoy it with a warm cup of tea or fragrant coffee!
Ingredients- 1 round springform pan (18cm diameter)
- 50g butter
- 25-30 plain cookies (like digestive biscuits or coconut cookies)
- 180g chocolate spread (e.g., Nutella)
- 20g dark chocolate block
- 400g cream cheese
- 20g granulated sugar
- 1 tsp vanilla sugar (optional)
- 2 Tbsp unsweetened cocoa powder
- 1 pinch salt
Cooking Instructions
Step 1
Let’s prepare all the ingredients for making a delicious ‘No-Bake Chocolate Cheesecake’!

Step 2
First, get your 18cm diameter springform pan ready. This is what we’ll use to form the cake base.

Step 3
Cut parchment paper to fit the bottom and sides of your cake pan. This will help prevent the cake from sticking.

Step 4
Lightly grease the inside of the pan with a tiny bit of oil where you’ll place the parchment paper. This helps the paper adhere to the pan.

Step 5
For the cookie crust, any plain cookie will work well. I’ve used coconut cookies for their aroma, but digestive biscuits are also a fantastic choice. Feel free to use your favorite!

Step 6
Crush about 30 cookies into fine crumbs. If you don’t have a food processor, place them in a thick plastic bag and crush them with a rolling pin or the bottom of a heavy glass.

Step 7
Melt 50g of butter. You can do this in the microwave for about 30-60 seconds, or gently over low heat on the stovetop.

Step 8
Add the melted butter to the crushed cookie crumbs and mix thoroughly with a spatula until all the crumbs are moistened. It should resemble damp sand.

Step 9
Pour the cookie and butter mixture into the prepared cake pan.

Step 10
Press the cookie mixture firmly onto the bottom of the pan using the back of a spoon or a glass. Ensure it’s evenly spread and compacted. Place the pan in the refrigerator or a cold place for at least 1 hour to set firmly.

Step 11
Now, let’s make the cheesecake filling! Place 400g of softened cream cheese into a clean bowl. Using cream cheese that’s at room temperature will make it easier to mix smoothly.

Step 12
Add 20g of granulated sugar to the cream cheese.

Step 13
Stir in 1 teaspoon of vanilla sugar for an extra touch of flavor (this is optional but recommended). Mix gently until the sugar is well incorporated and dissolved into the cream cheese.

Step 14
Now, add 180g of chocolate spread (like Nutella) for that rich chocolatey taste.

Step 15
Melt 20g of dark chocolate block. You can do this using a double boiler or in the microwave in short intervals. Let it cool slightly before adding.

Step 16
Add 1 tablespoon of unsweetened cocoa powder now to deepen the chocolate flavor. (We’ll use a total of 2 tablespoons).

Step 17
To prevent lumps, it’s best to sift the cocoa powder. Sift it into the bowl for a smoother filling.

Step 18
Mix all the ingredients together until well combined and smooth. Ensure there are no lumps of cream cheese, chocolate spread, or cocoa powder. A hand mixer will speed this up considerably.

Step 19
Add a pinch of salt to enhance the overall sweetness and depth of flavor.

Step 20
Voila! Your rich and delicious chocolate cheesecake filling is ready!

Step 21
Carefully pour the prepared chocolate cheesecake filling over the chilled cookie crust in the pan.

Step 22
Gently tap the pan on the counter a couple of times to release any air bubbles and create a smooth surface. Smooth the top with a spatula. Return the pan to the refrigerator and chill for at least 2-3 hours, or until completely firm.

Step 23
I made this cake the evening before and let it chill overnight. Here it is, ready to be revealed in the morning!

Step 24
Sift a generous tablespoon of cocoa powder evenly over the top of the cake for a beautiful finish.

Step 25
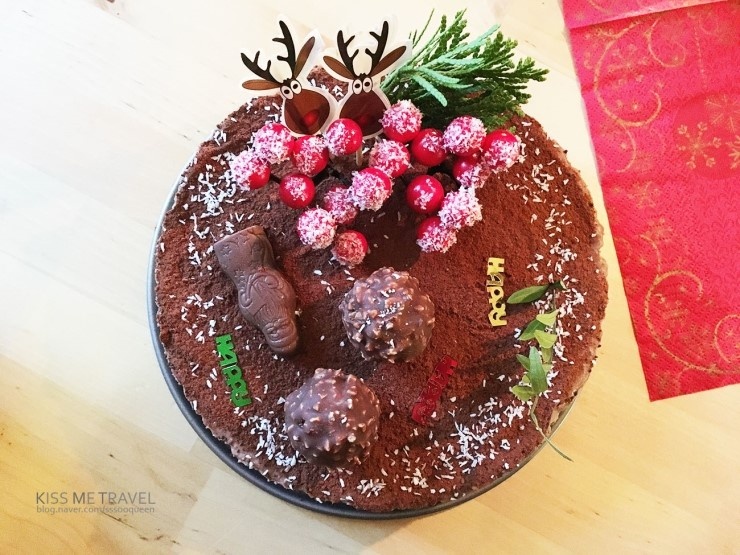
Now, it’s time to decorate! Add your personal touch with toppings that suit the occasion. Fresh berries, chocolate shavings, or sprinkles all work wonderfully.

Step 26
If you’re using chocolates like Ferrero Rocher for decoration, inserting a toothpick into them beforehand makes them easier to secure onto the cake, helping them stay in place.

Step 27
Finally, a light dusting of powdered sugar over the decorations adds a professional, elegant touch to your no-bake chocolate cheesecake. Enjoy your masterpiece!
