
Rice-Free Diet Gimbap (Keto Gimbap)
Create Healthy and Delicious Gimbap Without Rice

Today, I’m sharing a special recipe for diet gimbap where instead of rice, we’ll make a pancake using cabbage and eggs as the filling! This version is packed with flavor and health benefits. If seasoned well, it’s incredibly delicious. Perfect for those on a ketogenic diet or trying to eat healthier!
Main Ingredients- Gimbap seaweed sheets
- Pickled radish (danmuji)
- Imitation crab sticks (mat-sal)
- 1/2 head of cabbage (approx. 250g)
- 4-5 eggs
- 1 medium cucumber
- 1 medium carrot
Cooking Instructions
Step 1
First, wash the cabbage thoroughly under running water and then shred it as thinly as possible. Thinly shredded cabbage results in a softer texture and better flavor absorption.

Step 2
Place the shredded cabbage in a bowl and soak it in cold water for about 10 minutes. This step helps reduce any bitterness and enhances the crispiness of the cabbage.

Step 3
After 10 minutes, drain the cabbage and rinse it multiple times under running water. It’s crucial to drain as much water as possible by letting it sit in a colander.

Step 4
Add a pinch of salt to the drained cabbage and mix well. This seasoning step ensures the final gimbap isn’t bland.

Step 5
Let the salted cabbage sit for about 10 minutes to wilt slightly. This process will naturally draw out some moisture from the cabbage.

Step 6
After 10 minutes, discard the water that has accumulated from the cabbage. Gently squeeze the cabbage with your hands to remove as much excess moisture as possible. A little moisture is fine.

Step 7
To the squeezed cabbage, crack in 4-5 fresh eggs. Add a tiny pinch of black pepper and salt. The eggs will act as a binder for the cabbage mixture.

Step 8
Using chopsticks, mix everything thoroughly until well combined. We’ll be making a delicious pancake from this mixture shortly.

Step 9
Wash the carrot and peel it using a vegetable peeler. Then, thinly julienne it with a mandoline slicer or a knife. Carrots add a lovely color to the gimbap.

Step 10
Wash the cucumber, sprinkle some coarse salt on its surface, and rub it gently with your hands. Rinse it under running water and then julienne it thinly, similar to the carrot. Rubbing with salt helps remove any bitterness and makes the cucumber extra crisp.

Step 11
Add about 1/2 teaspoon of salt to the julienned cucumber and mix well. Let it sit for about 10 minutes to draw out moisture, which prevents the gimbap from becoming soggy.

Step 12
After 10 minutes, discard the water from the cucumber. Gently squeeze out any remaining moisture with your hands. It should still be slightly moist.

Step 13
Heat a frying pan over medium-low heat and add a generous amount of cooking oil. Pour the cabbage and egg mixture into the pan. Spreading it thinly will help it cook evenly and faster.

Step 14
Once the mixture is in the pan, use a spatula to spread it evenly. Cook over medium-low heat. If the pancake starts to move when you gently shake the pan, the bottom is cooked. Lift the edge with a spatula to check for a golden-brown color before flipping.

Step 15
Drizzle a little more cooking oil around the edges of the pancake and continue to cook. This helps make the pancake crispier.

Step 16
Gently press the pancake with the spatula while cooking over medium-low heat until both sides are golden brown. Be careful not to use high heat, as this can burn the outside before the inside is cooked.

Step 17
Once the cabbage and egg pancake is nicely golden brown, set it aside to cool slightly before using it in the gimbap. Using it too hot might make the seaweed soggy.

Step 18
To minimize dishwashing, wipe the same frying pan clean with a kitchen towel and use it for the next steps. This is an efficient kitchen hack!

Step 19
Reheat the wiped pan with a little cooking oil. Add the julienned carrots and about 1/3 teaspoon of salt. Stir well and sauté over medium heat.

Step 20
Sauté the carrots just until they soften slightly. Avoid overcooking them, as you want to maintain a bit of their crunch.

Step 21
Wipe the pan clean again with a kitchen towel. Prepare the imitation crab sticks by tearing them in half lengthwise. Lightly toast them in the dry pan for a minute or two on each side. This enhances their flavor.

Step 22
Lightly squeeze any excess water from the pickled radish. Arrange all the prepared fillings (cabbage pancake, pickled radish, crab sticks, cucumber, carrot) neatly on a plate. Your gimbap ingredients are almost ready!

Step 23
Place a gimbap seaweed sheet on a bamboo rolling mat. Lay the cabbage and egg pancake on about two-thirds of the seaweed sheet, spreading it to match the size of the seaweed. Leave a small margin at the edge for sealing.

Step 24
Arrange the prepared fillings neatly on top of the cabbage pancake. Layer the pickled radish, crab sticks, julienned cucumber, and carrot. Use a moderate amount to prevent the gimbap from bursting when rolled.

Step 25
Lightly moisten the far edge of the seaweed sheet with water. This will help seal the gimbap roll tightly.

Step 26
Using the bamboo mat, roll the gimbap tightly, pressing firmly to compact the fillings. Roll forward, applying gentle pressure to shape the roll.

Step 27
Once rolled, brush the outside of the gimbap with sesame oil. This adds a wonderful aroma and a nice sheen.

Step 28
Cut the gimbap into bite-sized pieces, about 2 cm thick. Wetting your knife slightly or applying a bit of oil will prevent the rice or fillings from sticking and ensure clean cuts.

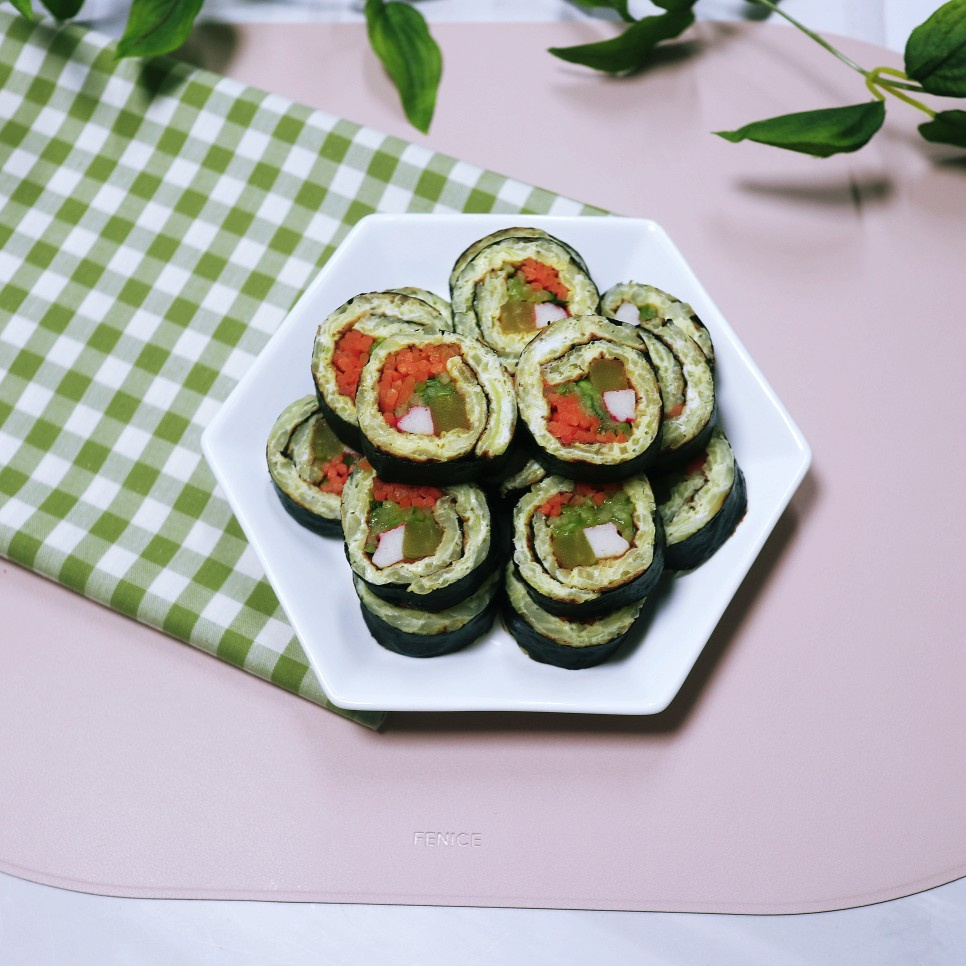
Step 29
Voila! Your delicious diet gimbap is ready. Look at that beautiful, packed cross-section! Repeat the process with the remaining ingredients to make more rolls.

Step 30
Serve your healthy and delicious diet gimbap on a plate. Enjoy your meal!
