
How to Make Delicious and Crunchy Godelbaegi Kimchi
A Spring and Autumn Delicacy! Enjoy the uniquely bitter and refreshing Godelbaegi Kimchi, even more delicious when homemade.

Perfect for when you have a poor appetite! Introducing Godelbaegi Kimchi, a delightful dish for spring and autumn. Thanks to modern cultivation techniques, the bitterness is significantly reduced, making it enjoyable for everyone. If you love that slightly bitter taste, why not try making it easily and deliciously with me? I’ll guide you through a simple Godelbaegi Kimchi recipe that anyone can follow!
Main Ingredients- 4 bundles of fresh Godelbaegi (bitter greens)
- 250g scallions
- 1 onion
- 1 cup coarse salt (for salting)
Kimchi Seasoning- 1.5 cups gochugaru (Korean chili flakes)
- 1 cup fish sauce (anchovy or sand lance)
- 0.5 cup plum extract (or syrup)
- 6 Tbsp minced garlic
- 1 Tbsp minced ginger
- 1.5 cups flour paste (cooked and cooled)
- 1.5 cups gochugaru (Korean chili flakes)
- 1 cup fish sauce (anchovy or sand lance)
- 0.5 cup plum extract (or syrup)
- 6 Tbsp minced garlic
- 1 Tbsp minced ginger
- 1.5 cups flour paste (cooked and cooled)
Cooking Instructions
Step 1
Prepare 4 bundles of fresh Godelbaegi. Godelbaegi wilts quickly, so it’s best to prepare it immediately after purchasing. Using fresh greens is the first step to delicious kimchi.

Step 2
Gently rub the root part, where soil might be attached, with your hands to remove dirt. Then, rinse thoroughly under running water.

Step 3
If there’s any tough skin or stubborn dirt remaining on the roots, gently scrape it off with the back of a knife to clean them. Be careful not to scrape too much, as this can remove nutrients.

Step 4
Fresh Godelbaegi are characterized by their abundant leaves and firm stems. Using fresh vegetables is the secret to achieving a crisp texture and great taste in your kimchi.

Step 5
For salting, use 1.5 cups of coarse salt. Rinsing the Godelbaegi briefly with lukewarm water before salting can speed up the salting process and help extract the bitterness a bit faster. (However, avoid using very hot water, as it can make the greens mushy.)

Step 6
Place the Godelbaegi and salt in a salting container and mix well. Then, place two heavy stones on top to press down the greens, ensuring they stay submerged. This helps the Godelbaegi salt evenly.

Step 7
Salt for 1 hour, then flip the greens and salt for another hour. After about 2 hours of salting, a dark liquid should be noticeably drawn out. If you prefer less bitterness, you can extend the salting time or soak them in cold water for longer.

Step 8
After salting for a total of 2 hours, rinse the Godelbaegi thoroughly 3-4 times under cold running water. Ensure all salt is removed with each rinse.

Step 9
Soak the washed Godelbaegi in fresh cold water for another 30 minutes to further remove any remaining bitterness. Changing the water two to three times during this period will yield even better results.

Step 10
Prepare the kimchi seasoning. In a bowl, combine 1.5 cups of gochugaru, 1 cup of fish sauce, 0.5 cup of plum extract, 6 Tbsp of minced garlic, 1 Tbsp of minced ginger, and 1.5 cups of cooled flour paste. Mix them well. For added sweetness and umami, grate 1 onion and add it to the mixture. (If you prefer a less sweet kimchi, you can omit the sugar. This recipe results in a savory, less sweet flavor.)

Step 11
Add the prepared scallions, cut into 3-4cm lengths, to the seasoning mixture. Gently toss them to coat evenly with the seasoning. Be careful not to break the scallions.

Step 12
Add the drained Godelbaegi to the seasoning. Gently mix with your hands, ensuring each strand is coated with the seasoning. Avoid mixing too vigorously, as this can mash the Godelbaegi.

Step 13
The Godelbaegi Kimchi, now softened, is complete. While it might seem a bit more wilted than initially expected, its flavor will be absolutely fantastic.

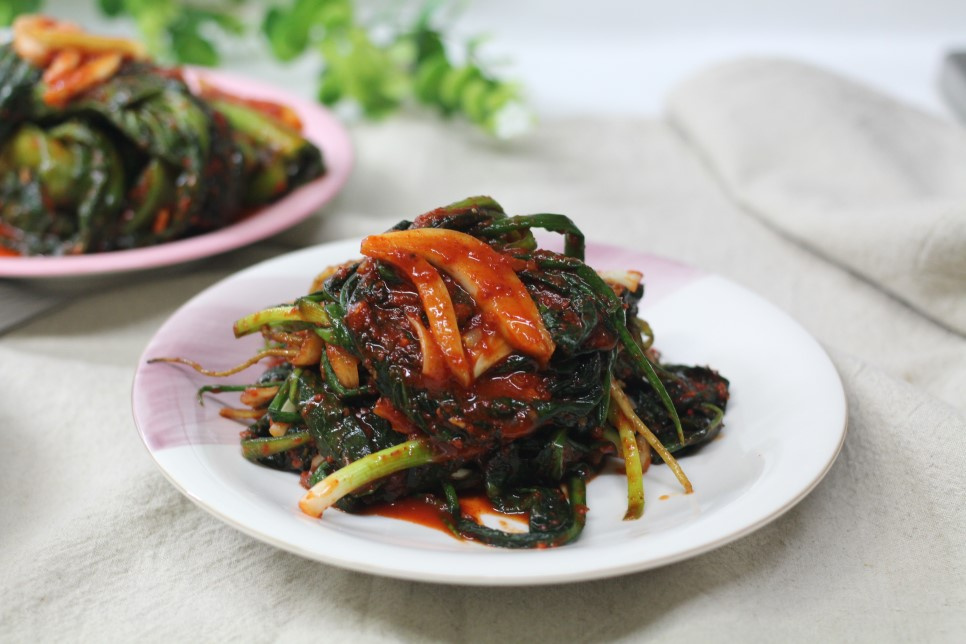
Step 14
Here’s the appetizing appearance of the glossy Godelbaegi Kimchi. As with any kimchi, the seasoning is key, and the flavor of this seasoning blend is the heart of Godelbaegi Kimchi!

Step 15
You can enjoy the Godelbaegi Kimchi right away, but for a deeper, more developed flavor, it’s best to store it in the kimchi refrigerator for about a day before serving. Enjoy your delicious homemade kimchi!
