
Decadent Brownie Tree Cake for Christmas
DIY Brownie Tree Cake: A Simple and Festive Centerpiece for Your Home Party

Get ready for the upcoming Christmas with a special party dessert! This recipe shows you how to create a festive tree-shaped cake using a convenient fudge brownie mix. It’s incredibly easy to make, perfect for home parties, and boasts a rich, fudgy texture. Even without an oven, you can achieve a wonderful result in the microwave. Let’s create a magical holiday atmosphere!
Ingredients- Fudge Brownie Mix 400g (Recommended: one containing French flour)
- Oil or Melted Butter 150g
- 3 Eggs
Cooking Instructions
Step 1
Introducing the ‘Fudge Brownie Mix’ for today’s recipe. I chose this mix, which contains French flour, from my favorite online baking store, and it made creating this brownie incredibly easy and delicious. Feel free to select a mix that suits your preference!

Step 2
The brownie mix I purchased came with two baking boxes. We’ll be using these boxes as our baking pans, so there’s no need to prepare separate ones – making cleanup a breeze!

Step 3
Inside the mix, you’ll find the brownie powder and sugar. There are two packets of sugar included, allowing you to adjust the sweetness. I found that using just one packet was perfectly sweet for me, but feel free to adjust it to your liking.

Step 4
First, in a bowl, have your measured oil or melted and slightly cooled butter (150g) ready, along with 3 fresh eggs. Using fresh eggs will contribute to a richer flavor.

Step 5
Add the brownie mix powder and sugar (if using) to the bowl with the wet ingredients. Mix gently with a whisk or spatula until just combined and no dry streaks remain. Be careful not to overmix.

Step 6
Once the batter is mixed, you’ll notice its thick, fudgy consistency. Pour this rich brownie batter into your prepared baking box(es). For easier removal later, you can lightly grease the inside of the boxes with butter or oil before pouring.

Step 7
After pouring the batter, gently tap the box(es) on the counter a few times to level the surface. This ensures even baking. Now, bake in a preheated oven at 170-180°C (340-350°F) for about 20-25 minutes. Adjust the baking time based on your oven’s performance.

Step 8
To check if your brownie is done: insert a skewer or toothpick into the center. If it comes out clean, it might be slightly overbaked. If it’s wet with batter, it needs more time. A few moist crumbs clinging to the skewer indicate a perfectly fudgy texture.

Step 9
Once the brownie has completely cooled, I melted some ‘Abc Chocolates’ I had at home to drizzle over it, as I had run out of chocolate pens. You can use dark or milk chocolate, or even a drizzle of melted white chocolate for decoration. Get creative with your toppings!

Step 10
Followed by a light dusting of cocoa powder through a sieve for an extra layer of rich flavor and an appealing look. Now, it’s time to cut the brownie into pieces to assemble our tree. We’ll use these cut pieces to build the festive shape.

Step 11
Notice the deep chocolate color and the dense, fudgy texture of the cut brownie pieces? We will now carefully stack these pieces on a plate to form a Christmas tree shape. Layer the brownie pieces, building height and width as you go to create your desired tree silhouette.

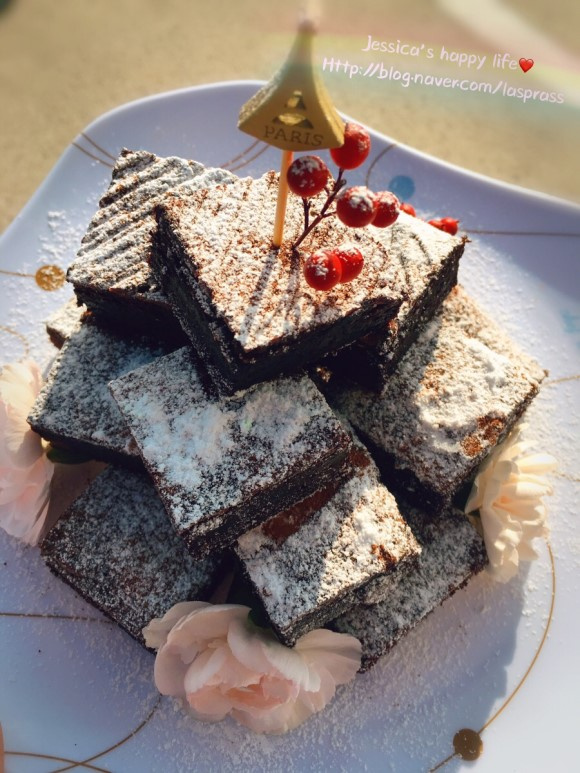
Step 12
I stacked them by placing 5 pieces on the bottom layer, then 1, followed by 4, then 3, 2, and finally 1 piece at the very top. (Alternatively, you can try arrangements like 5-4-3-2-1, or any other combination!). Insert festive picks for decoration, and dust the top with powdered sugar to mimic snowfall. This creates a stunning, winter wonderland visual!

Step 13
This Brownie Tree Cake is surprisingly easy to make, yet it looks incredibly special! It makes a wonderful homemade gift for loved ones on any special occasion. Be sure to try making it for your Christmas home party or year-end gathering!
