
Sweet Homemade Mulberry Yogurt Cheese
An Easy Recipe for Homemade Mulberry Yogurt Cheese

Introducing our special homemade mulberry yogurt cheese, made by adding generous amounts of sweet mulberry syrup to plain yogurt! It’s perfect to enjoy with baguette, and it’s also a healthy treat you can share with your beloved dog. The ‘whey’ naturally obtained during the cheesemaking process is also an excellent healthy drink for dogs during the summer. Although rich in protein, it can be an acquired taste due to its unique aroma. However, the whey made with mulberry syrup has a pleasant sweetness even without any added ingredients. Plain yogurt is also a great snack for dogs, even for those with lactose intolerance. During the fermentation process, lactose is mostly eliminated, so most dogs can enjoy yogurt without any issues.
Main Ingredients- 1517g Plain Yogurt
- 160g Mulberry Syrup
Utensils- Outer Container (to hold the colander)
- Container with a Colander (similar to tofu mold)
- Cheesecloth or Muslin
- Outer Container (to hold the colander)
- Container with a Colander (similar to tofu mold)
- Cheesecloth or Muslin
Cooking Instructions
Step 1
First, let me tell you about our homemade mulberry syrup. This syrup was made by combining mulberries harvested from Unseong-jeong with sugar in a 1:1 ratio and fermenting it carefully for 100 days. Now, let’s prepare the tools for making the cheese! The outermost container should be large enough to hold the colander inside and collect the separated whey. The inner colander container is similar to the colander part of a tofu mold. I used the colander part of a ‘Jjim-Cook’ steamer I bought from Daiso, but it seems they don’t sell it anymore. You can find similar products online. An important tip: Lactic acid bacteria are sensitive to metal, so be sure to use containers made of glass, wood, or plastic.

Step 2
Now, let’s get started with making the cheese. Take the mulberries from the mulberry syrup and gently mix them into the plain yogurt.

Step 3
Using a spatula or spoon, stir the mixture until the mulberries and yogurt are evenly combined, without any lumps. The color will blend beautifully.

Step 4
Prepare the setup for whey separation. Place a support structure inside the outer container to hold the colander container, and then place the colander container on top. I used a container from a picnic set that fit perfectly. It’s important that the outer and inner containers fit together well.

Step 5
Next, carefully line the colander container with a clean cheesecloth or muslin. While the yogurt will separate without the cheesecloth, using it will make the separation of cheese and whey much cleaner and easier.

Step 6
Gently pour the mulberry-yogurt mixture onto the cheesecloth. If your container is too small to hold all the yogurt at once, you can pour it in batches after some whey has drained. If you have a large enough container, you can pour it all in at once.

Step 7
After pouring in the yogurt, cover the container with a lid or a clean cloth. This prevents dust and insects from entering, ensuring hygienic aging.

Step 8
Now comes the waiting part. After about two to three hours, you’ll notice that the yogurt level has significantly decreased. During this process, the whey will separate and drain into the bottom container.

Step 9
Once the yogurt level has lowered, carefully pour out the separated whey. Then, add any remaining yogurt mixture. If you used a large container from the start, you’ll only need to do this once. I created a support using parts from a shake cup. Feel free to use tools you have around the house.

Step 10
This is the whey that was poured out midway. After about two to three hours, this much whey has been separated. You can save this whey to use as a healthy drink.

Step 11
Once the yogurt level from the second pour has also lowered sufficiently, it’s time to make the cheese firmer. Use the remaining parts of the cheesecloth to evenly cover the top of the cheese. Then, place another container of similar size to the colander container on top, filled with water, to add weight. This process helps to drain more whey and make the cheese firmer. I used the outer container from my colander set, and it fit perfectly, making it very convenient.

Step 12
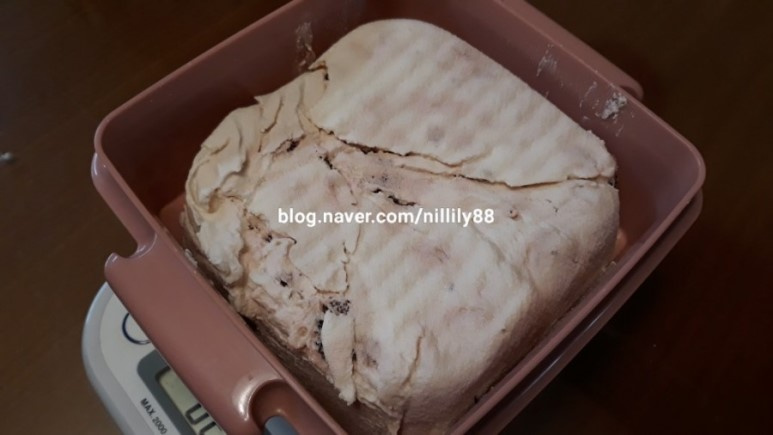
After another two to three hours, when the separation is complete, drain all the remaining whey. Then, carefully invert and remove the cheese along with the cheesecloth. You’ll see that the cheese has pressed firmly. If you prefer a firmer texture, you can press it further with a heavier object.

Step 13
Gently peel away the cheesecloth that covered the top, and voilà! You’ll see your delicious mulberry yogurt cheese, ready to be enjoyed.

Step 14
Store the finished mulberry yogurt cheese in an airtight container of a similar size and keep it refrigerated for use. I use the deeper container from my picnic set as the outer container and a shallower container of the same size for storage. Feel free to use whatever containers you have available.

Step 15
The final result is approximately 620g of mulberry yogurt cheese and 960g of separated whey. Enjoy this delicious cheese and healthy whey in various ways by storing it in the refrigerator!
