
Spicy Stir-fried Octopus with ‘Fire Flavor’
Experience the Intense ‘Fire Aroma’ at Home! Authentic Stir-fried Octopus Recipe

This ‘Bul-nakji-bokkeum’ isn’t just spicy; it’s infused with a captivating ‘fire aroma’! Achieving that distinct smoky char at home, often found in stir-fries or Jjamppong, can be challenging. But with this recipe, you’ll master the art of creating a restaurant-quality stir-fried octopus bursting with smoky notes. We’ll guide you through the essential steps of preparing frozen octopus to achieve a perfect, springy texture and then expertly stir-frying it to unlock that irresistible smoky flavor. Even beginners can confidently create this delicious dish!
Main Ingredients- 3 frozen octopus
- 1 stalk of green onion
- 1 onion
- A handful of soybean sprouts
- 1 Korean green chili pepper (Cheongyang chili)
- 1/2 cup cooking oil
Seasoning Ingredients- 2 Tbsp gochugaru (Korean chili flakes)
- 3 Tbsp soy sauce
- 1 Tbsp sugar
- 1 Tbsp cooking wine (mirin)
- 1 Tbsp minced garlic
- 1 Tbsp sesame oil
- 2 Tbsp gochugaru (Korean chili flakes)
- 3 Tbsp soy sauce
- 1 Tbsp sugar
- 1 Tbsp cooking wine (mirin)
- 1 Tbsp minced garlic
- 1 Tbsp sesame oil
Cooking Instructions
Step 1
Let’s start by properly preparing the frozen octopus. It might seem a bit daunting at first, but you’ll get the hang of it quickly. I thawed mine by transferring it from the freezer to the refrigerator the day before. If you’re short on time, you can also use your microwave’s defrost function. Aim for a state where the outside is thawed, but the inside is still slightly icy for easier handling.

Step 2
Rinse the thawed octopus thoroughly under cold running water to remove any surface impurities.

Step 3
Gently lift the octopus head. You’ll find a slightly attached part connecting the head to the body. Use your finger or a knife to carefully cut or break this connection. It should separate quite easily.

Step 4
To remove the innards, turn the octopus head inside out. You can do this by inserting your finger and gently pushing to invert it.

Step 5
Inside the inverted head, you’ll see the dark innards and other internal parts. Gently pull or scrape these out with your fingers. They should come away cleanly.

Step 6
After removing the innards, look inside the head again for the eye sockets, which are hard, round parts. Carefully remove these as well. Once done, turn the head back to its original shape.

Step 7
Now, turn the octopus tentacles inside out. You’ll find a beak-like structure. Push it out using your finger or a knife.

Step 8
This is a crucial step for great octopus! Take some coarse sea salt and vigorously scrub the octopus, much like washing laundry. This scrubbing action effectively removes any slime and impurities, enhancing the octopus’s texture. Don’t worry about damaging the octopus; it’s quite resilient!

Step 9
The more vigorously you scrub, the cleaner the octopus becomes and the firmer and more springy its texture will be. This process transforms the octopus to a visual appearance similar to live octopus.

Step 10
You’ll notice a lot of white foam forming as you scrub. Continue scrubbing until this foam subsides significantly, indicating that the impurities have been thoroughly removed.

Step 11
Here’s the octopus after being scrubbed with salt. It looks incredibly clean and has a wonderfully firm, plump appearance, comparable to fresh, live octopus.

Step 12
Now, let’s briefly blanch the prepared octopus. Bring a pot of water to a boil. Add the octopus and blanch it for a very short time – no more than 15 seconds. Overcooking will make it tough, so be quick!

Step 13
Immediately after blanching, transfer the octopus into a bowl of ice water for about 1-2 minutes. This shocking process helps to firm up the octopus, resulting in an even more delightfully chewy and springy texture. Finally, arrange the octopus on a serving plate.

Step 14
Let’s prepare the vegetables. Slice the green onion into bite-sized pieces for making green onion oil. Slice the onion as thinly as possible; thin slices caramelize beautifully and contribute to the ‘fire flavor’. Chop the Cheongyang chili pepper to your desired size. Larger pieces make it easy to remove if the dish becomes too spicy.

Step 15
Blanch the soybean sprouts as well. Add them to boiling water and cook briefly until they are still crisp. Rinse them under cold water to maintain their crunchiness. Having these prepped makes the stir-frying process much smoother.

Step 16
Now, let’s mix the sauce. In a bowl, combine 2 tablespoons of gochugaru, 3 tablespoons of soy sauce, 1 tablespoon of minced garlic, and 1 tablespoon of sugar. Adding 1 tablespoon of cooking wine (mirin) will also enhance the flavor.

Step 17
Stir all the seasoning ingredients together until well combined. You’ve now created a delicious and balanced sauce!

Step 18
Time to stir-fry the octopus and achieve that signature ‘fire flavor’! This is the key step for imparting that smoky aroma. Heat a frying pan over high heat, then add 1/2 cup of cooking oil. Add the sliced green onions and reduce the heat to low. Slowly cook the green onions until their fragrance is released, creating ‘green onion oil’. Cooking on low heat is crucial here.

Step 19
Once the green onion aroma intensifies, add the thinly sliced onions. Spread them out evenly in the pan, ensuring they coat the bottom and sides.

Step 20
To prevent oil splattering, immediately cover the pan with a lid and increase the heat to high. Be careful! Caramelizing the onions slowly and thoroughly over a long period is essential for developing that deep ‘fire flavor’. Be patient with this step.

Step 21
This step requires some waiting. Since there’s plenty of oil, the onions are unlikely to burn easily. Continue cooking until the onion aroma becomes very fragrant and the onions start to turn golden brown.

Step 22
Once the onions are well-caramelized and have released their smoky aroma, add the prepared sauce to the pan.

Step 23
Add the blanched octopus and the chopped Cheongyang chili peppers. Stir-fry everything together vigorously. Initially, the sauce might seem to separate from the ingredients, but as the octopus cooks, everything will come together nicely.

Step 24
As the octopus cooks, it will release its juices, helping all the ingredients to bind together and become glossy. Just before turning off the heat, drizzle in 1 tablespoon of sesame oil for an extra layer of flavor and aroma.

Step 25
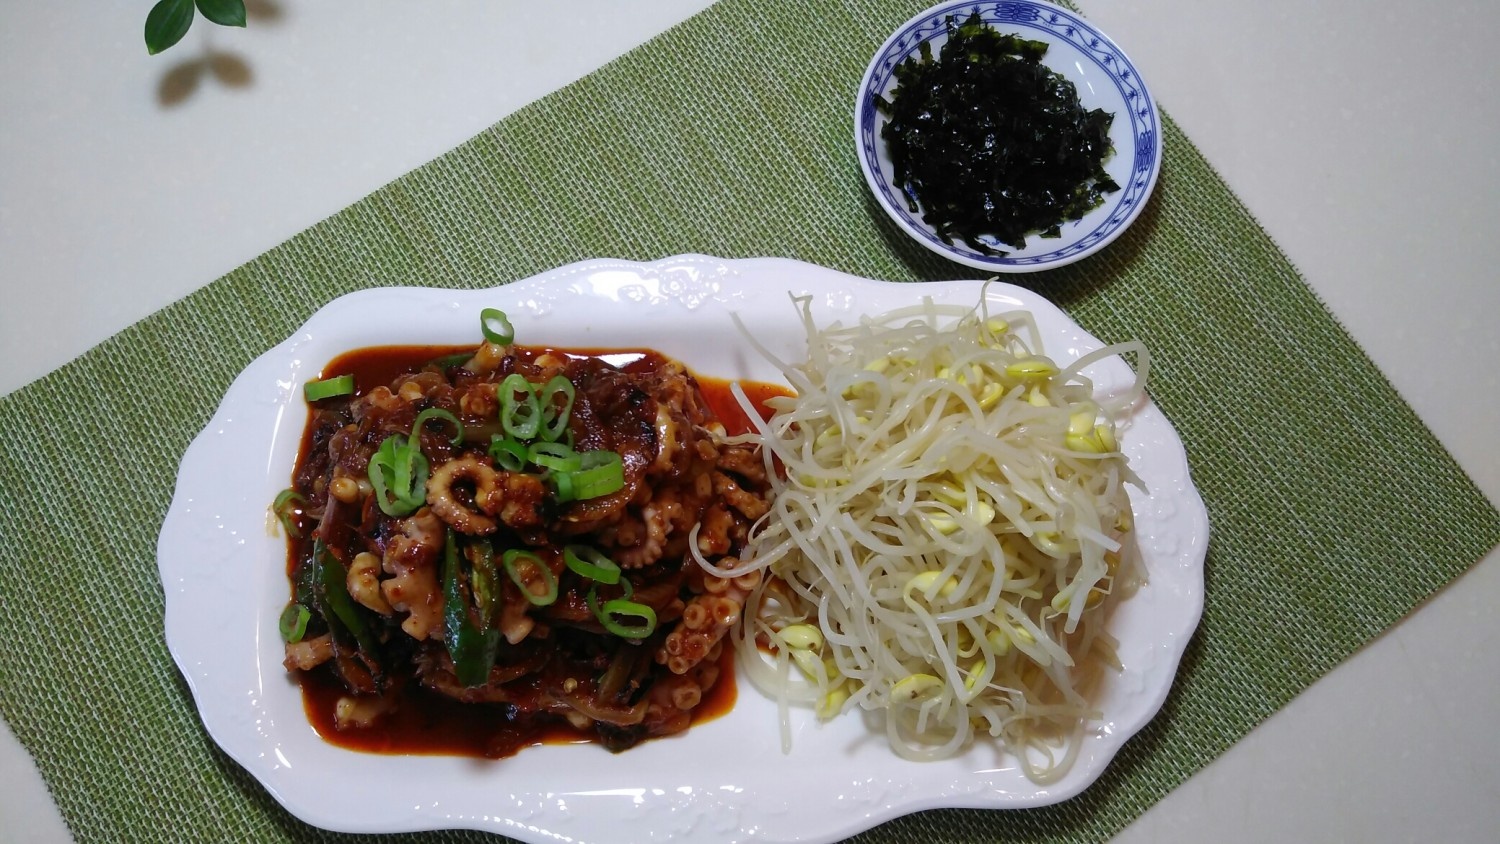
Transfer the finished stir-fried octopus to a beautiful serving dish. Arrange the blanched soybean sprouts on top. Look at that appetizing presentation! You’ve successfully recreated that authentic ‘fire aroma’ at home.

Step 26
This dish is delicious on its own, but it’s also fantastic served over rice as a rice bowl or mixed with some crumbled seaweed for an even richer flavor. Enjoy your homemade specialty octopus stir-fry! Bon appétit!
